AWS S3 is Amazon Simple Storage Service which is an object storage service that provides great scalability and faster performance. The best thing about this service is it can be used by all types of users to store and protect their critical data. Amazon’s Cloudfront works well with S3 to reduce the website’s loading time. By reducing the load on the main servers, the setup improves the site loading speed and keeps the data protected. Let’s see how can we Setup Cloudfront for S3.
Key Benefits of Amazon Simple Storage Service i.e. S3
Top-notch Security
The storage buckets created with Amazon S3 can only be used by the persons’ who created them. During the creation, they have to create a personal identity to use them in the future. To make use of these buckets, you need to seek permission from the ones who created them. All the information will be given to the creator through notifications and detailed reports. It is very secured and provided top-tier security.
Available for all
Amazon S3 is available for all types of users and not only for specific ones. It provides the same scalability, reliability and faster performance to each user whenever they use it for data storage and buckets creation. It comes with a standard availability of 99.99% resources.
Quick Migration
The data migration with S3 is pretty easy. It is compatible with different services when it comes to migrating the stored data over the cloud. The best part about this service is a user can easily transfer or receive a large amount of data from Amazon S3.
Budget-friendly
What makes Amazon’s S3 more reliable storage service is it is very affordable. You won’t be charged extra for any services. You will be charged only for the data that you have used. The storage option is very cheaper and you can even use the built-in migration option to transfer the stored data to different servers.
Easy Management
Amazon S3 serves a user-friendly interface with top-tier security to keep the data of the users protected. You can easily configure or set up this service with existing systems and can start backing up its data. All the cloud services can be accessed through Amazon S3 as it is compatible with all the standards.
Now, to make your website run faster and to reduce the traffic load on the existing server, Cloudfront can be used with the S3. Let’s see how one can set up Cloudfront for S3. Here, we have created a step by step tutorial to understand the setup procedure of Cloudfront for S3.
How to Setup Cloudfront for S3?
Step 1: Bucket Creation
The first, thing you need to do here is creating an S3 Bucket. To do so, you need to go to the AWS Console first and then create an S3 Bucket.
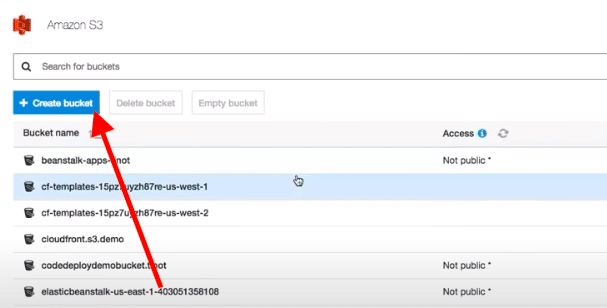
Setup Cloudfront for S3 – Bucket Creation
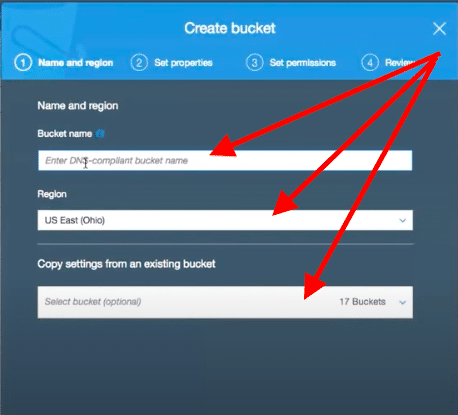
Setup Cloudfront for S3 – Create Bucket
Go to: AWS Services>> Search for S3>> Amazon S3 Management Page>> Click + Create bucket
Step 2: Uploading the Bucket
Once you create a bucket, the next thing you need to do here is uploading it to the Cloudfront. You need to create a demo file to upload the bucket. Since you are creating it for the first time, it will take a while to complete the process.
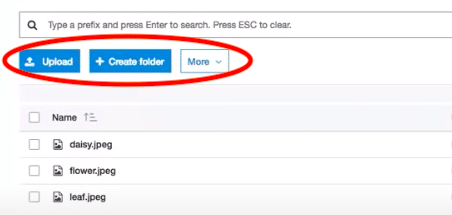
Setup Cloudfront for S3 – Uploading the bucket
Go to: Amazon S3>> Open the Cloudfront.Demo>> Click Upload button
Note: You can also click on the Create Folder option to create a new folder of files that you want to upload to the Cloudfront.
Step 3: Open Cloudfront
Click on to the Services tab from the top-front and select Cloudfront from the left sidebar.
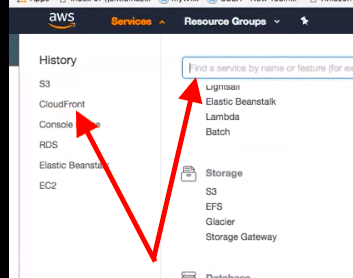
Setup Cloudfront for S3 – Open Cloudfront
Step 4: Search for Networking
From here, click the Search bar and search for Networking and Networking Incontinent Delivery option.
Step 5: Cloudfront Distribution
You need to click on to the Create Distribution button from this page.
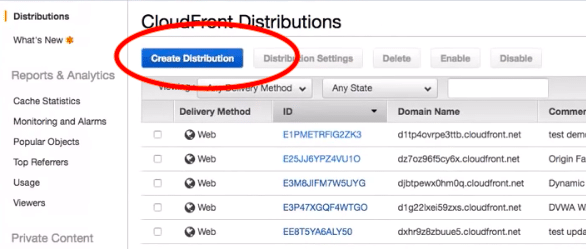
Setup Cloudfront for S3 – Cloudfront distribution
Step 6: On-page Instructions
Now, follow the on-page instructions by filling in the given form. Make sure you add the right information there such as the domain name, origin path, origin id and other information must be correct.
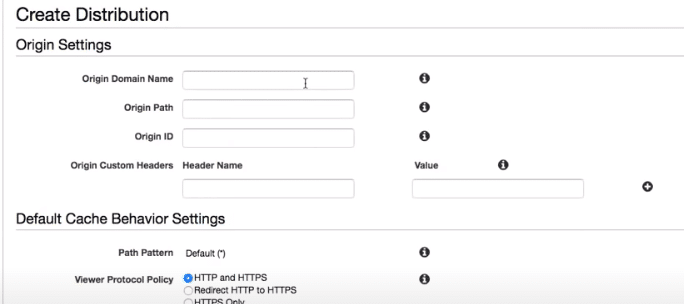
Setup Cloudfront for S3 – On page instruction
Step 7:
Once the Cloudfront Distribution is created, it would show up on the main screen of Cloudfront’s services. You can check it by clicking on to its name.
Step 8: Create Custom Error Response
Now, you must create an error response for the website by selecting the error code. Click the Create Custom Error Response option, select the error code and enter the custom message on your own.
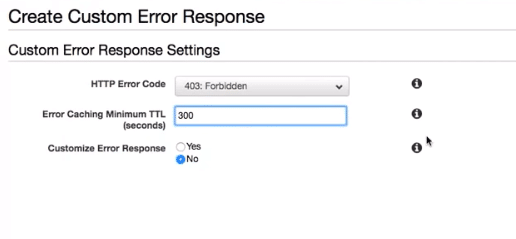
Setup Cloudfront for S3 – Create custom Error response
You can also manage the Geo Restriction and many other functions of your website right from this page. You can use the additional plug-in to work with the S3 Buckets easily.
Conclusion:
That’s all about the Setup of Cloudfront for S3. Thankfully, there are many readily available templates there for the users. These templates can be used by anyone simply by selecting them from the given page. What you can do here is just follow the given steps and start creating an S3 bucket for Cloudfront to make your website run smoother.