Types of EC2 Placement Groups

Types of EC2 Placement Groups

Upon launching new EC2 instances, the service tends to add the instance so that every one of your instances get spread out over underlying hardware in order to get the lowest possible correlated number of failures. Placement Groups are used for the sake of influencing the placement interdependent groups of instances so that they supply the requirements of your workload. According to which type of workload you possess; you may get to create a placement group through utilizing a chosen placement strategy out of the following ones:

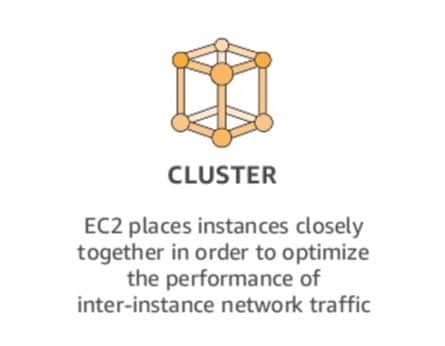
  • Cluster: works by packing instances close to each other in one Availability Zone. It allows for workloads to reach the low-latency network performance that is needed for the sake of achieving tightly-coupled node-to-node communication which is normal out of HPC apps.
  • Partition: sends instances over logical partitions in a way that enables groups of instances in one partition to not share the underlying hardware with other groups of instances that are found in differing partitions. It is utilized by enormous distributed and replicated workloads, like Cassandra, Hadoop or Kafka.
  • Spread: places a small group of instances in a strict manner over unique underlying hardware in order to lessen correlated failures.

No fees are taken for the creation of placement groups.


AWS EC2 Cluster Placement Groups
EC2 Placement Groups - cluster placement groups

EC2 Placement Groups – cluster placement groups

A logical grouping of instances in one Availability Zone.

Capable of spanning peered VPCs in the same Region.

Instances sharing this same group get a greater per-flow throughput limit of 10 Gbps for TCP/IP traffic + they get added to the network where there is exact high-bisection bandwidth segment.

The below picture highlights instances of a cluster placement group.
EC2 Placement Groups - cluster availability zone

EC2 Placement Groups – cluster availability zone

They are ideal for apps that work with both low network latency and high network throughput, or one of them. Also ideal for cases where the biggest part of the network traffic is spread between the instances. For offering the least latency and the greatest network performance for packet-per-second for your chosen placement group, select one instance type which works with enhanced networking.

It is best to launch an instance through this procedure:

  • Single launch request for the sake of launching as much instances as required in your chosen placement group.
  • Exact instance type for every instance found in your chosen placement group.

In case after a while you decide to add even more instances into your placement group, or in case you choose to start launching multiple instance types in your chosen placement group, you are going to have to raise your possibility of acquiring an error of insufficient capacity.

In case of you stop one instance from your chosen placement group and later want to start it once again, it will keep on running in your chosen placement group. Yet, this start will fail in the case that there wasn’t enough possible capacity for this instance.

In case of receiving an error for capacity upon the launching of an instance found in your placement group that contains instances which are already running, you will have to stop and start every single one of your instances that are located in this placement group, and then go ahead with performing the launch again. The start of instances might actually send them to hardware which possesses capacity for every one of your requested instances.

AWS EC2 Partition Placement Groups
EC2 Placement Groups - partition placement groups

EC2 Placement Groups – partition placement groups

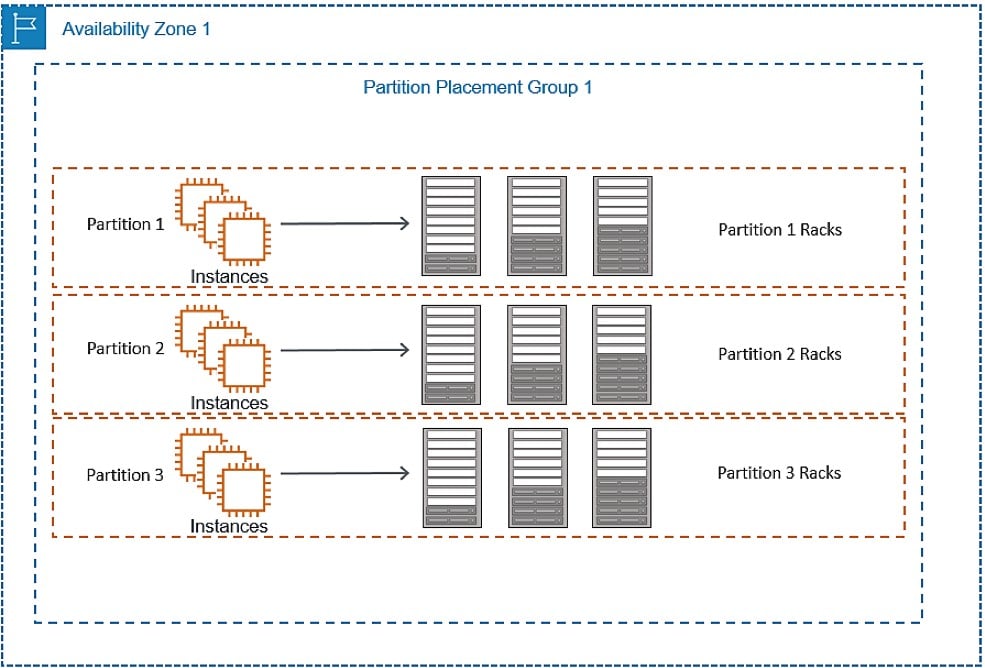
These placement groups help reduce the likelihood of correlated hardware failures for your application. With partition placement groups, EC2 will tend to divide every group into logical segments [partitions]. EC2 makes sure that every one of these partitions falls into a placement group which maintains its very own set of racks. Every rack includes its unique network + power source. There cannot be any 2 partitions found in the same placement group while sharing the exact racks, making you capable of isolating the effect of hardware failure within your application.

The below picture shows a partition placement group located in the same Availability Zone. It presents instances being placed in one partition placement group that contains 3 partitions: Partition 1Partition 2Partition 3. Every one of the partitions has a number of instances. Instances in one partition are not able to share racks with instances of other partitions, making it possible for you to hold the effect of just one hardware failure merely to the associated partition.
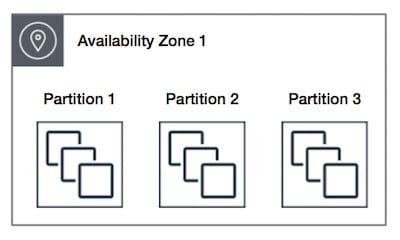
EC2 Placement Groups - partition availability zone

EC2 Placement Groups – partition availability zone

– Deploys huge distributed and replicated workloads, like: HBase, Cassandra and HDFS, over unique racks.

– Distributes the instances in an even manner over a number of partitions specified by you.

– Take more control over the place where instances get placed.

A partition placement group:

– Partitions in various Availability Zones found in one same Region.

– Seven partitions per Availability Zone as a maximum.

– Possible number of instances launched into a partition placement group: merely limited by the limits of the user’s account.

– Offer visibility into the partitions to check the instances’ placement in partitions.

– Sharing data with topology-aware applications, like: Cassandra, HBase and HDFS. Such apps take this data in order to perform some intelligent data replication decisions for the sake of raising data to become more available and durable.

In case there was insufficient unique hardware to take on your launching request, this request will end in failure. Yet, extra distinct hardware will become available as time goes by, hence it is possible for you retry your request at another time.


AWS EC2 Spread Placement Groups

AWS EC2 Placement Groups - spread placement groups

AWS EC2 Placement Groups – spread placement groups

It’s a group of instances which get placed on different racks, possessing their very own unique network + power source.

The below picture illustrates seven instances in one same Availability Zone where they are placed with a spread placement group. Each instance is placed on differing racks.

These groups are perfect for apps containing a small number of critical instances which need to stay separated one another. Launching instances in a spread placement group instances launched will minimize the danger of continuously occurring failures which can happen as instances tend to share the exact same racks.

AWS EC2 Placement Groups - spread availability zone 1

AWS EC2 Placement Groups – spread availability zone 1

Spread placement groups:

– Offer access to unique racks

– Perfect for the sake of mixing instance types or tending to launch instances as time goes by

– Possible to span various Availability Zones in the exact Region

– Maximum number of 7 running instances for every Availability Zone of a group.

In case in a spread placement group there was insufficient unique hardware to take on your launching request, this request will end in failure. Yet, extra distinct hardware will become available as time goes by, hence it is possible for you retry your request at another time.
ec2 placement groups

AWS EC2 Placement Groups

EC2 Placement Groups: Rules and Limitations

General Rules:

Prior to using placement groups, you must know the below rules:

  • Name of placement groups: unique within the account for each Region.
  • Placement groups cannot be merged.
  • Instance: launched in 1 placement group at a time, and it’s not possible to span various placement groups.
  • On-Demand Capacity Reservation + zonal Reserved Instances offer a capacity reservation for instances in one Availability Zone. This may be utilized by instances in a placement group. (cannot explicitly reserve capacity for a placement group).
  • Instances having a tenancy of host may not possibly get launched in placement groups.

Rules for Cluster Placement Groups:

  • One of the below instance types need to be utilized upon the launching of a cluster placement group:

– A1, M4, M5, M5a, M5ad, M5d, M5dn, and M5n [General Purpose]

– C3, C4, C5, C5d, C5n, and cc2.8xlarge [Compute Optimized]

– cr1.8xlarge, R3, R4, R5, R5a, R5ad, R5d, R5dn, R5n, X1, X1e, and z1d [Memory Optimized]

– D2, H1, hs1.8xlarge, I2, I3, and I3en [Storage Optimized]

– F1, G2, G3, G4dn, Inf1, P2, P3, and P3dn [Accelerated Computing]

  • Cluster placement group: no spanning of multiple Availability Zones.
  • Max network throughput speed of traffic (between 2 instances): limited by the one which is slowest. Apps having high-throughput requirements: instance type must have network connectivity meeting your needs.
  • Instances for enhanced networking have the below rules:

– May utilize 10 Gbps for single-flow traffic. Instances outside of a cluster placement group: 5 Gbps for single-flow traffic.

– Traffic going to and from S3 buckets sharing the same Region – over public IP address space or by VPC endpoint – get the chance to utilize every available instance aggregate bandwidth.

  • Various instance types may be launched in a cluster placement group. It will cause a reduction in the possibility that the needed capacity is available so that your launching succeeds. (utilize same instance type in all the instances found in a cluster placement group).
  • The network traffic to the internet – over a Direct Connect connection – to on-premises resources: 5 Gbps.

Rules for Partition Placement Groups:

  • Supports a max of 7 partitions/Availability Zone. Instances number launched in a partition placement group: merely limited by account limits.
  • Instances launched in a partition placement group get evenly distributed across all partitions. Instances may not be evenly distributed across all partitions.
  • Dedicated Instances in a partition placement group: max of 2 partitions.
  • Dedicated Hosts: do not support Partition Placement Groups.

Rules for Spread Placement Groups:

  • Supports a max of 7 running instances/Availability Zone. In case of starting an 8th instance sharing same Availability Zone + same spread placement group, it shall not be launched. In case you require over 7 instances in one Availability Zone, utilize various spread placement groups. This does not guarantee the spread of instances between groups, but it makes sure that each group is spread, which limits the effect from specific classes of failures.
  • Dedicated Instances + Dedicated Hosts: do not support spread placement groups.


How to Create a Placement Group?

Placement groups can be created through:

  • New console
  • Old console
  • AWS CLI
  • PowerShell

Creating placement group through the console

EC2 Placement Groups - create placement group

EC2 Placement Groups – create placement group

  1. Go to the EC2 console by this link https://console.aws.amazon.com/ec2/.
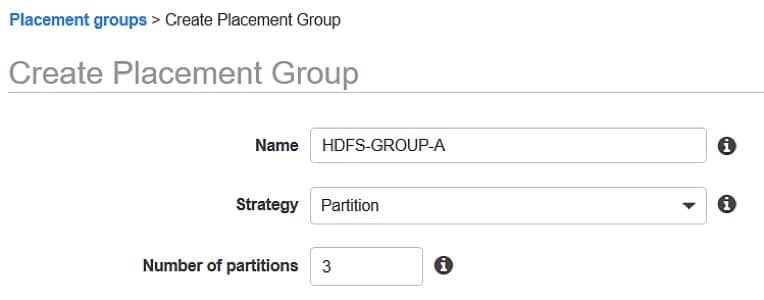
  2. From under navigation pane, select Placement Groups, Create placement group.
  3. Fill in a unique name for your group.
  4. Select the placement strategy you want for your chosen group. When selecting Partition, specify how many partitions you need within the group.
  5. Select option Create group.

How to Launch Instances in a Placement Group?

It is possible to launch an instance which meets the rules and limitations through one of the below methods:

  • Console
  • AWS CLI
  • PowerShell

Launching instances in a placement group through the console

  1. Go to the EC2 console through this link https://console.aws.amazon.com/ec2/.
  2. From under the navigation pane, select Instances.
  3. Select Launch Instance. Finish the wizard as asked of you, while taking into consideration following the below directions:


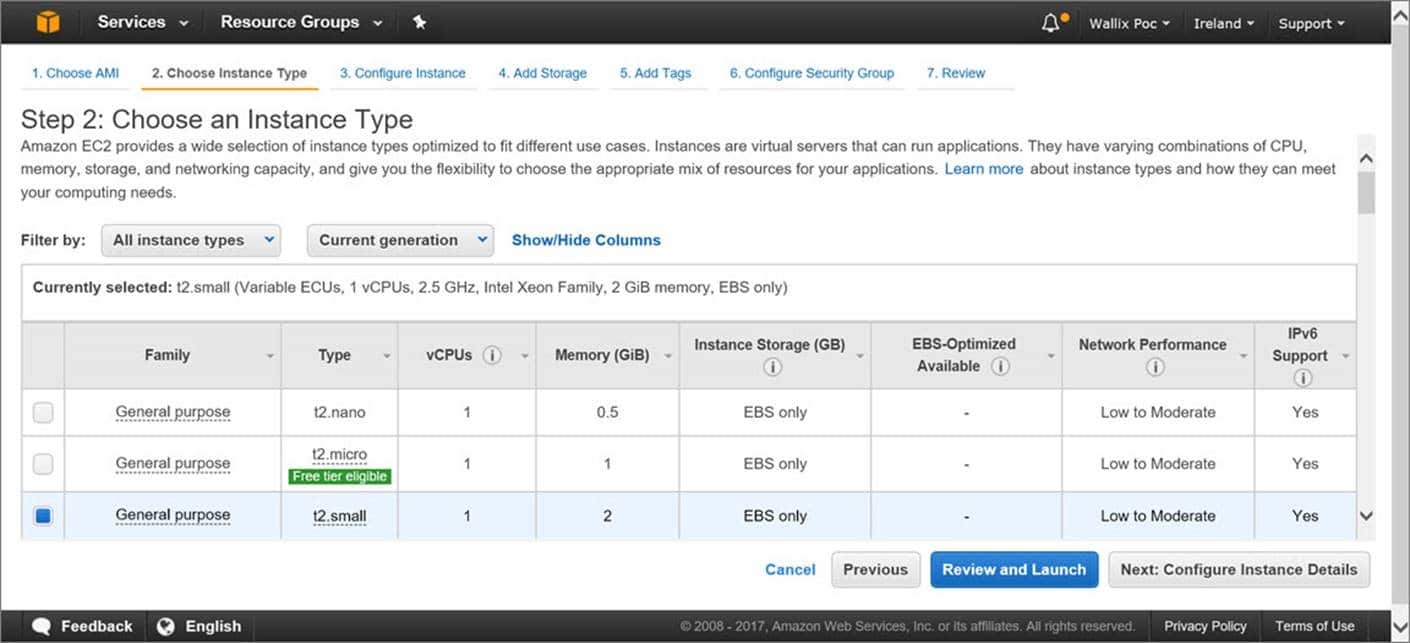
  • From Choose an Instance Type page, choose the instance type you want which is possible to get launched into a placement group.
EC2 Placement Groups - choose an instance type

EC2 Placement Groups – choose an instance type

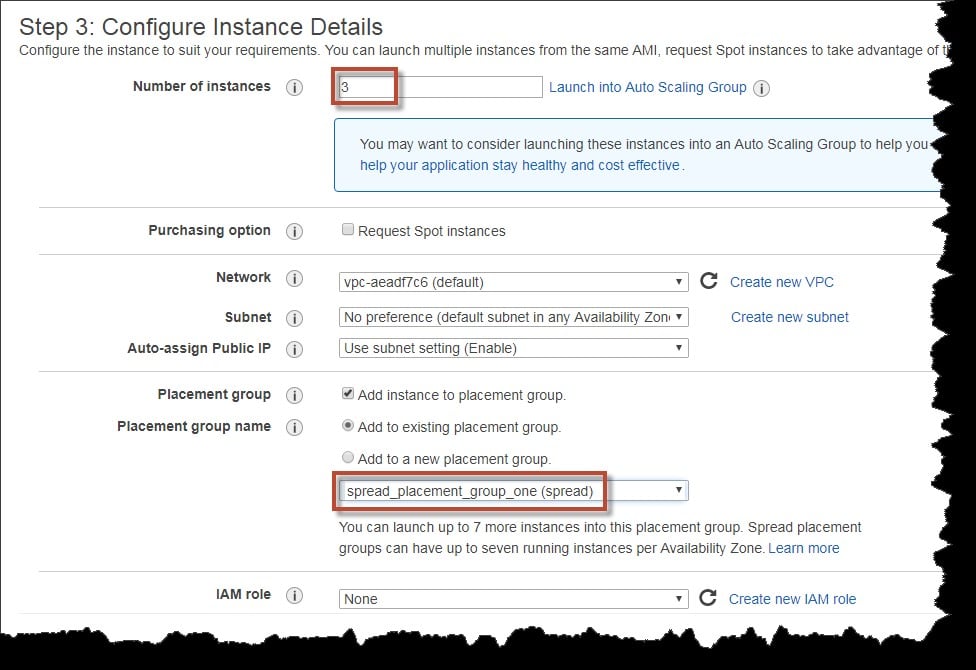
  • From Configure Instance Details page, you will get the below fields:
EC2 Placement Groups - configure instance details

EC2 Placement Groups – configure instance details

Number of instances: fill in the total number of instances you require for this placement group (it may not be possible to add more instances to the placement group later on).

Placement group: choose Add instance to placement group box. In case of not noticing Placement group on the page, make sure of selecting an instance type which allows for being launched in a placement group, or such an option won’t be available.

Placement group name: select adding the instances to an already found placement group or rather to a newly created placement group by you.

Placement group strategy: select the right strategy. In case of selecting the partition, for Target partition, pick Auto distribution so that EC2 performs the perfect effort for evenly distributing your instances over every one of the partitions found in the group. Otherwise, it’s possible to set what partition to get your instances launched in.

Describing Instances in a Placement Group

It’s possible to view the placement data of instances through below methods, or filter them by partition number through CLI.

  • Console
  • AWS CLI

For viewing placement group + partition number through the console

  1. Go to the EC2 console by the following link https://console.aws.amazon.com/ec2/.
  2. From under navigation pane, select Instances.

    EC2 Placement Groups - launch instance

    EC2 Placement Groups – launch instance

  3. Choose your instance and details pane, go ahead and inspect the Placement group. In your instance is not found in a chosen placement group, this field will be empty, or in the other case the placement group name will be shown. In case the placement group is a partition placement group, head to check the Partition number to see the partition number of your instance.

How to Change the Placement Group of an Instance?

It can be done through one of the below ways:

  • Send an already found instance to a placement group
  • Send an instance to a different placement group
  • Delete an instance from a specific placement group

Before you sending or deleting an instance, it should be in stopped state. This can be done through CLI or SDK.

  • AWS CLI
  • PowerShell

For moving your instance to a placement group through the CLI

  1. Stop your instance through stop-instances
  2. Utilize modify-instance-placement command + set a name for the placement group where you want the instance to be moved.

aws ec2 modify-instance-placement –instance-id i-0123a456700123456 –group-name SpreadGroupTrial

  1. Start your instance through start-instances

For removing your instance from a placement group through the CLI

  1. Stop your instance through stop-instances
  2. Utilize modify-instance-placement command + set an empty string as a name for your placement group.

aws ec2 modify-instance-placement –instance-id i-0123a456700123456 –group-name “”

  1. Start your instance through start-instances

How to Delete a Placement Group?

For the sake of replacing a placement group or getting rid of it because it not needed anymore, you may simply delete it. This can be done through one of the below methods.

  • New console
  • Old console
  • AWS CLI
  • PowerShell

For deleting a placement group through the console

EC2 Placement Groups - placement groups

EC2 Placement Groups – placement groups


  1. Go to the EC2 console by the following link https://console.aws.amazon.com/ec2/.
  2. From under navigation pane, select Placement Groups.
  3. Choose your placement group and select Delete.
  4. Upon being asked for confirmation, fill in the Delete field and select Delete.


AWS EC2