Starting with AWS Batch
For the sake of going through with the process of starting with AWS Batch features, you will need to go through the below steps.
Defining a Job in AWS Batch:
In the following tutorial, you will learn how to define your job definition; otherwise, choose to go on with the creation of a job queue and a compute environment with no job definition.
For the sake of configuring job options, go through the below steps:
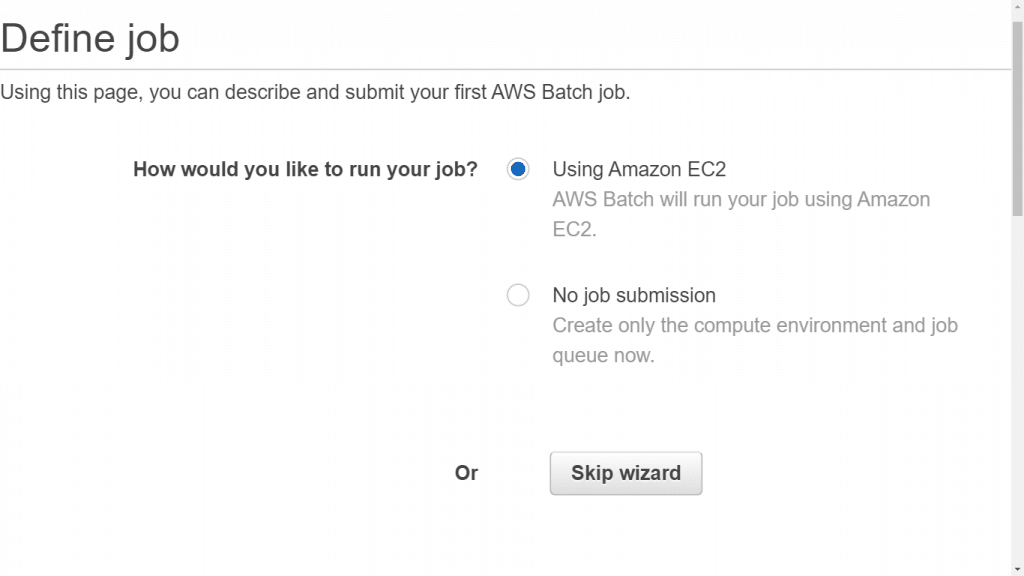
Starting with AWS Batch – Configuring Job Options
- Go to the Batch console first-run wizard using the following link https://console.aws.amazon.com/batch/home#/wizard.
- For the sake of creating a Batch job definition, a compute environment, as well as a job queue, then after that, going ahead with submitting your job, select the option Using Amazon EC2. For the sake of merely creating the compute environment as well as the job queue with no job submission, select No job submission.
- In case you decide to select the choice of creating a job definition, this will require you to go over the upcoming 4 sections of the first-run wizard, Job run-time, Environment, Parameters, and Environment variables and then choose Next.
For the sake of specifying job run time, go through the below steps:
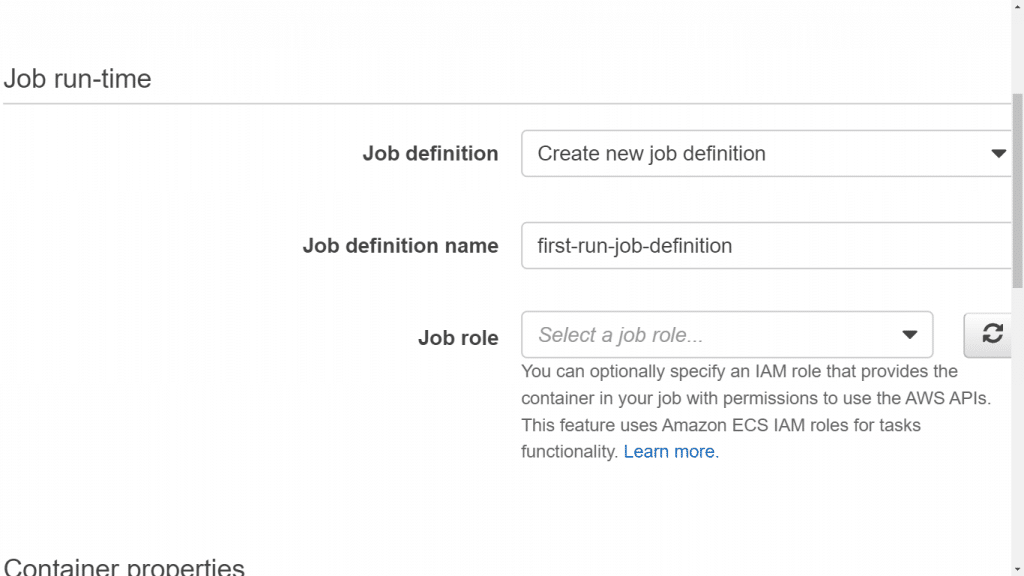
Starting with AWS Batch – Specifying Job Runtime
- In case you’re getting a new job definition created, you will need to set a name for your job definition in the section of the Job definition name.
- In the section Job role, it’s possible to set an IAM role capable of giving your job’s container permissions for using APIs that utilize ECS IAM roles for the sake of task functionality.
- In the section of Container Image, select the Docker image you’d like to set for the job.
For the sake of specifying resources for the environment, go through the below steps:
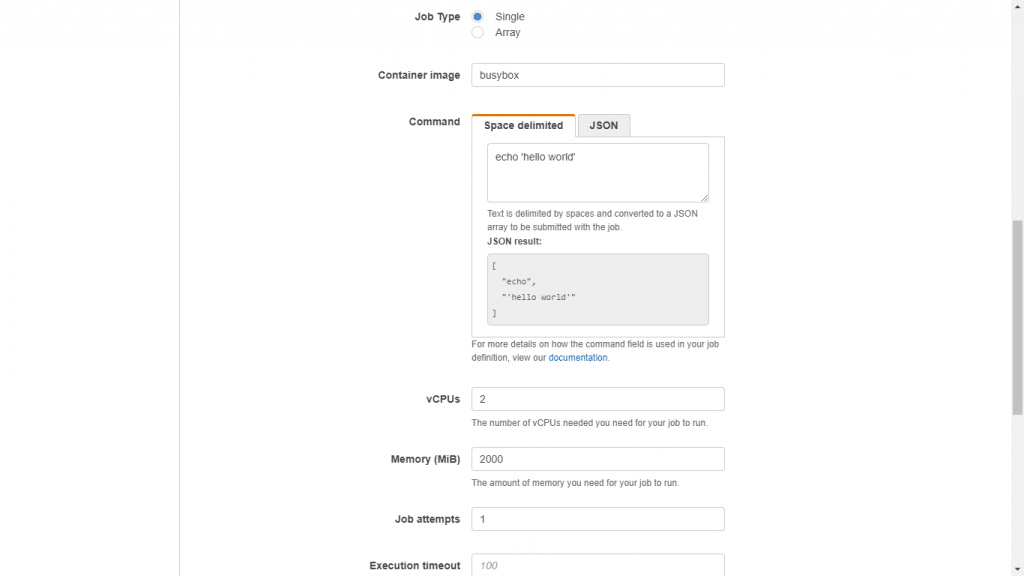
Starting with AWS Batch – Specifying Resources for the Environment
- In the section of Command, specify which command you’d like to give the container, and such a parameter will start mapping to Cmd in the section of Create a container found in Docker Remote API and the parameter of COMMAND to docker run.
- In the section of vCPUs, set how many vCPUs you’d like to reserve for your selected container.
- In the section of Memory, set the number of MiB for hard limit of memory for the sake of presenting it to the container of your job. If your container attempts to exceed the memory specified here, the container is killed.
- In the section of Job Attempts, set the max allowed number of times when a failure occurs for attempting your job.
Parameters

Starting with AWS Batch – Setting Parameters
It is possible to set some parameter substitution placeholders and default values in the command.
- Key: setting a key for the parameter.
- Value: setting a value for the parameter.
For the sake of specifying AWS Batch environment variables, go through the below steps:
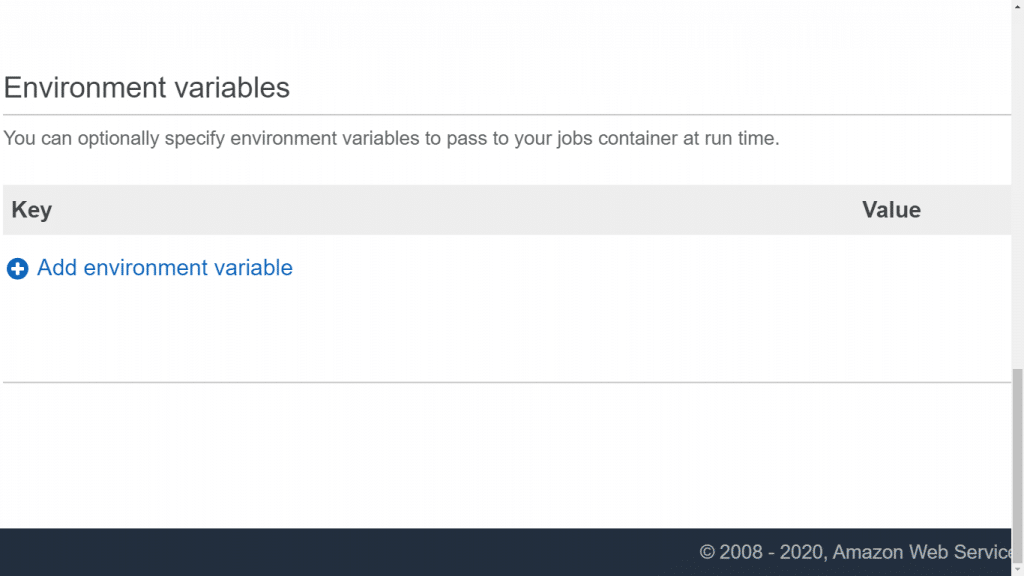
Starting with AWS Batch – Specifying Environment Variables
It is possible to set some environment variables for passing to the container of your job.
Keep in Mind:
It’s not advised to utilize plain text environment variables when working with sensitive information like passwords and credential data.
- In the section of Key, you will need to set the environment variable’s key.
- In the section on Value, you will need to set the environment variable’s value.
Configuring the Job Queue and Compute Environment of you AWS Batch
For the sake of configuring your compute environment type, go through the below steps:
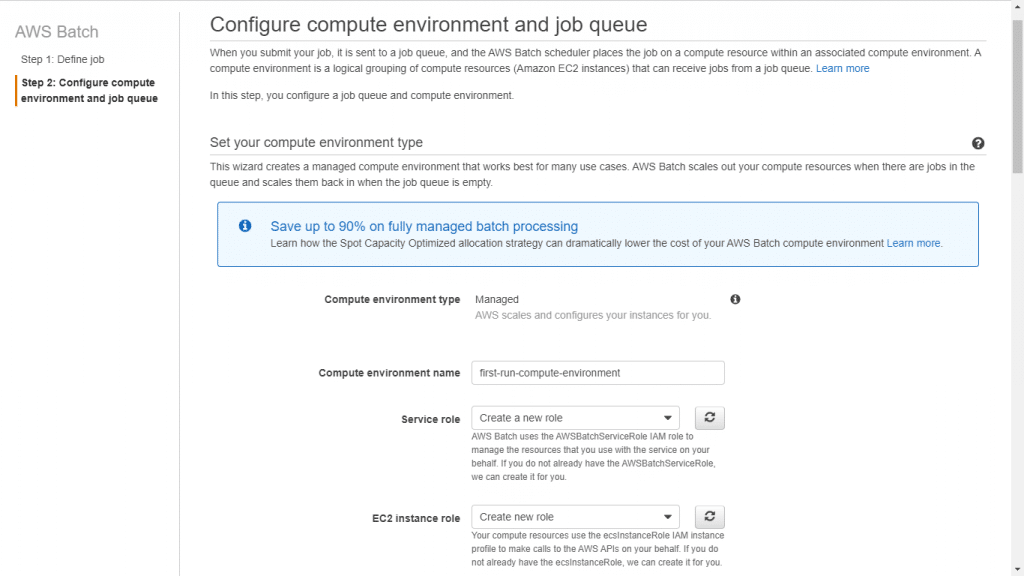
Starting with AWS Batch – configuring your compute environment type
- In the section Compute environment name, you will need to set a special name for the compute environment.
- In the section Service role, you can either go with the option of getting a new role created or simply using one of the already existing roles which will provide Batch service the capability to perform calls on your behalf to necessary APIs. In case you would like to get a new role created, you will find that the needed role of AWSBatchServiceRole will get created.
- In the section of EC2 instance role, you can either go with the option of getting a new role created or simply using one of the already existing roles which will provide the ECS container instances, which will be created for your compute environment, with the ability to perform calls to the needed APIs. In case you would like to get a new role created, you will find that the needed role of ecsInstanceRole will get created.
For the sake of configuring instances, go over the following steps:
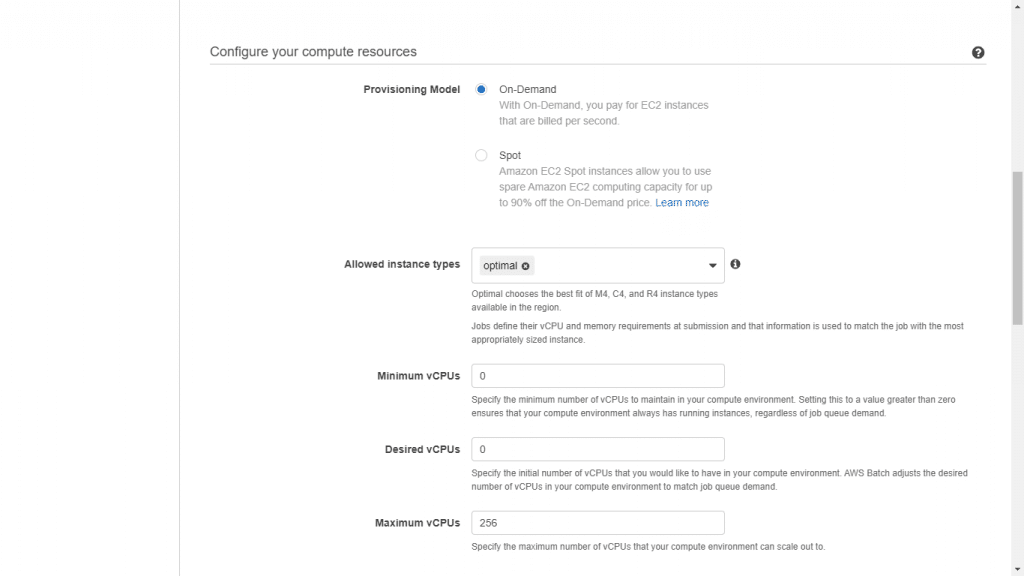
Starting with AWS Batch – Configuring Instances
- In the section of Provisioning model, select the option On-Demand for launching EC2 On-Demand instances; otherwise, choose the option Spot for using EC2 Spot Instances instead.
- In the case of selecting EC2 Spot Instances:
– For the section of Maximum bid price, you will need to select the max % for the Spot Instance price in comparison with On-Demand prices for the same instance type prior to launching the instances.
– For the section of Spot fleet role, you can either select the option for creating a new role otherwise utilizing an already existing EC2 Spot Fleet IAM role for the sake of applying it to the Spot compute environment.
- For the section of Allowed instance types, you will need to select the Amazon EC2 instance types that may launched.
- For the section of Minimum vCPUs, you will need to select the min of EC2 vCPUs for your compute environment to maintain without taking into consideration the job queue demand.
- For the section of Desired vCPUs, you will need to select the amount of EC2 vCPUs for launching your compute environment.
- For the section of Maximum vCPUs, you will need to select the max of EC2 vCPUs which may be scaled out to by your compute environment, without taking into consideration the job queue demand.
For the sake of setting up networking, go over the below steps:
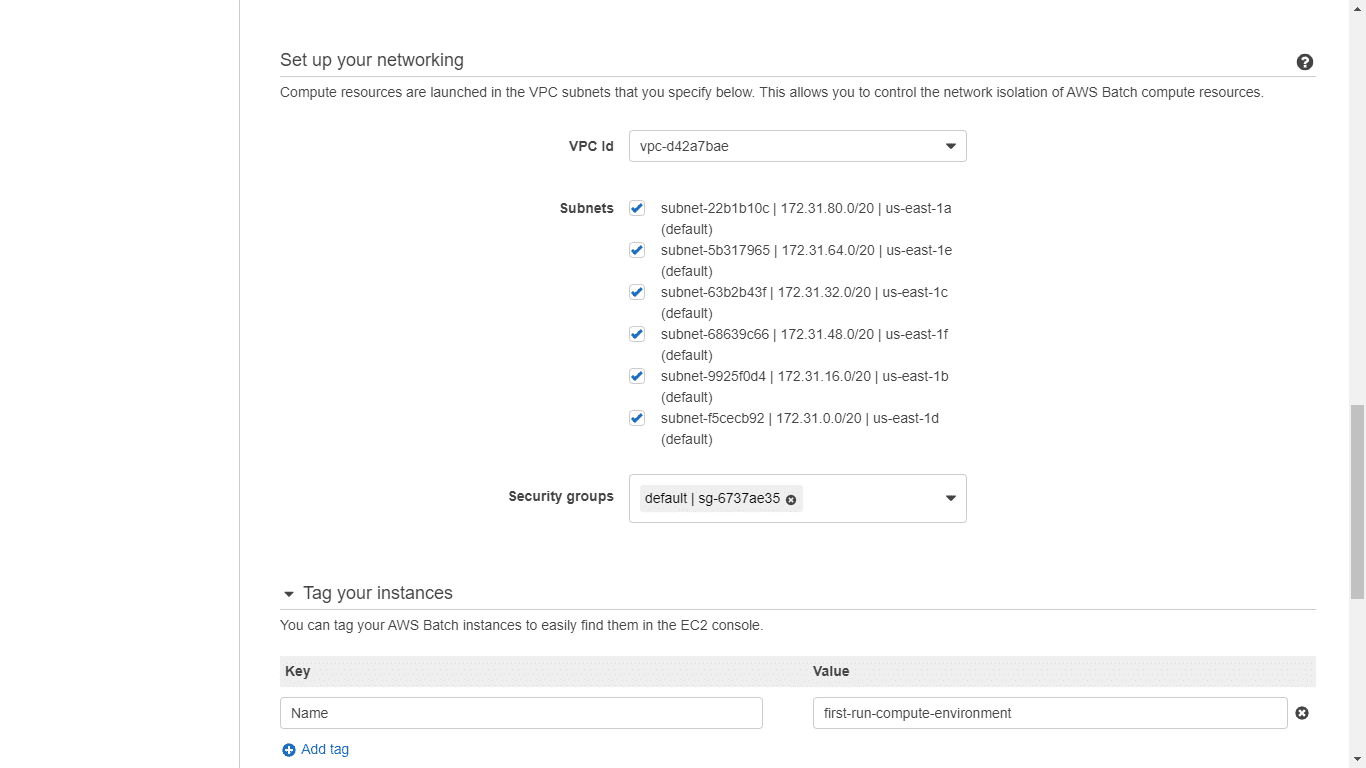
Starting with AWS Batch – Setting Up Networking
Compute resources will get launched into your VPC along with the subnets that are going to be set now. Doing so will provide you with the ability to take control over the network isolation of your Batch compute resources.
Keep in Mind:
Compute resources will require to get access in order to be able to communicate with the ECS service endpoint. Such a process may be performed using an interface VPC endpoint otherwise using compute resources that include public IP addresses.
In case no interface VPC endpoint is found configured and you have to compute resources without public IP addresses, then you will need to rely on network address translation in order to get the required access.
- In the section of VPC Id, you will need to select which VPC you’d like to get your instances launched with.
- In the section of Subnets, you will need to select the specific subnets from the chosen VPC for hosting the instances. Every single subnet found in the chosen VPC is thus selected.
- In the section of Security groups, you will need to select a security group for the sake of attaching it to the instances. The default security group for this VPC will be chosen by default.
For the sake of tagging your instances, go over the below steps:

Starting with AWS Batch – Tagging Instances
It is optional for you to apply key-value pair tags for your instances that get launched in your chosen compute environment.
As an example, it is possible to set “Name”: “Batch Instance – C4OnDemand” as one of your tags to give every instance found in your compute environment this same name which will grant you the capability to determine and differentiate between your Batch instances. Your compute environment name will be the one utilized by default for tagging instances.
- In the section Key, you will need to set the tag’s key.
- In the section Value, you will need to set the tag’s value.
For the sake of setting up a job queue, go over the following steps:
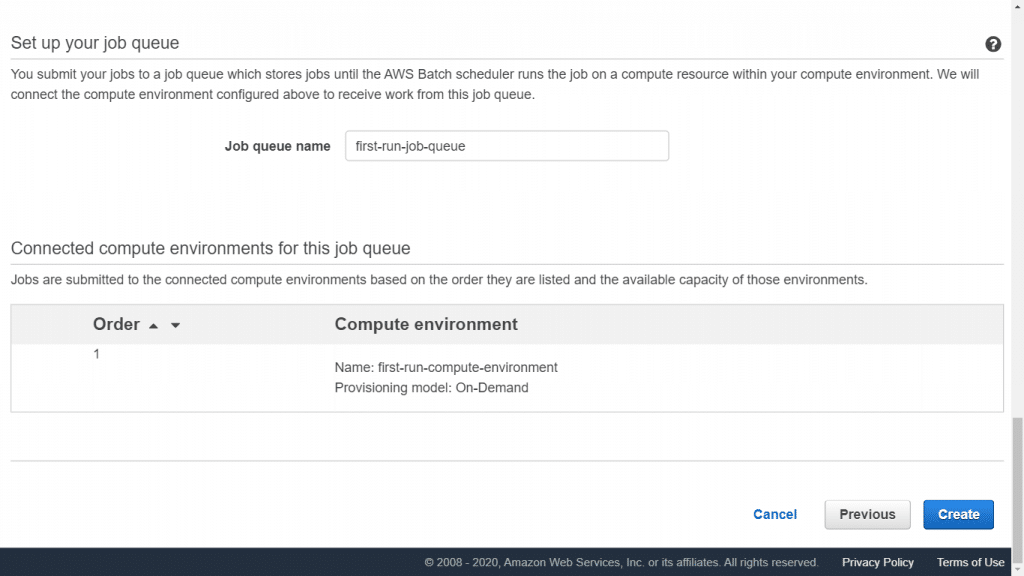
Starting with AWS Batch – Setting Up Job Queue
Now, you will need to get your job submitted to a job queue that is capable of storing jobs till when the Batch scheduler starts running your job on one of the compute resources that are found in your chosen compute environment.
- For the Job queue name, choose a unique name for your job queue.
For the sake of the AWS Batch step of reviewing and creating, go through the below:
In the section of Connected compute environments for this job queue, you can see that the newly created compute environment is going to be associated with the new job queue and the order accompanied by it.
After that, it’s possible to get different compute environments associated with this same job queue. Your job scheduler will utilize the order of your compute environment for the sake of choosing the right compute environment for getting your selected job executed. Your compute environments need to change to the VALID state so that you will be able to get them associated with a specific job queue. A number of 3 compute environments may be associated with your job queue.
- Go over the compute environment as well as the job queue configuration, then go ahead and select Create in order to get the compute environment created.