Terraform AWS RDS
What is Terraform AWS RDS?
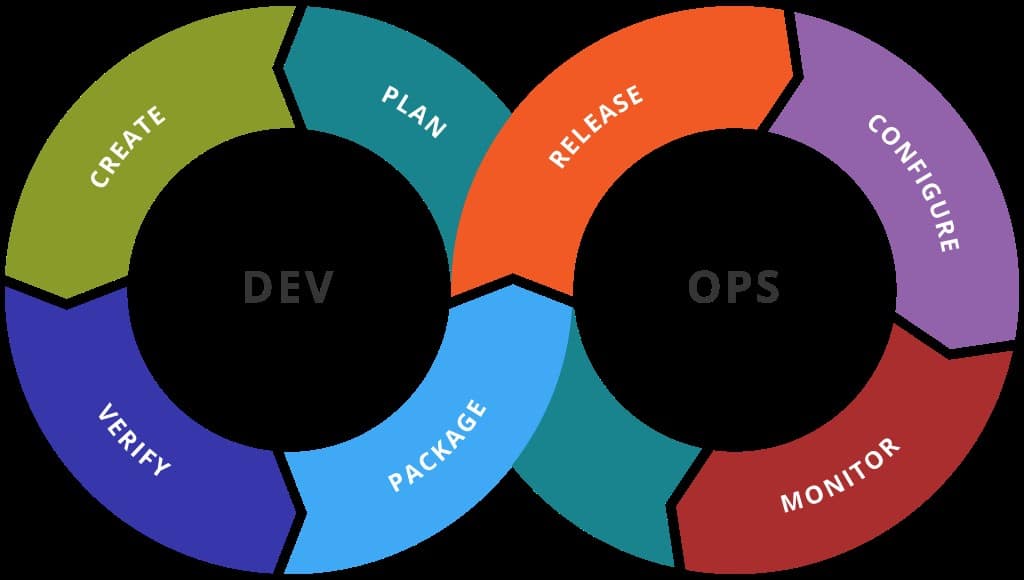
Terraform AWS RDS – Terraform AWS RDS Process
Terraform is a tool utilized for the following purposes:
– Building infrastructure
– Versioning infrastructure
– Changing infrastructure
– Treating infrastructure as if it were code
– Defining infrastructure through HashiCorp’s HCL language
– Checking configurations into source control
– Updating resources through Terraform for planning and applying changes
– Acting as an abstraction layer of infrastructure
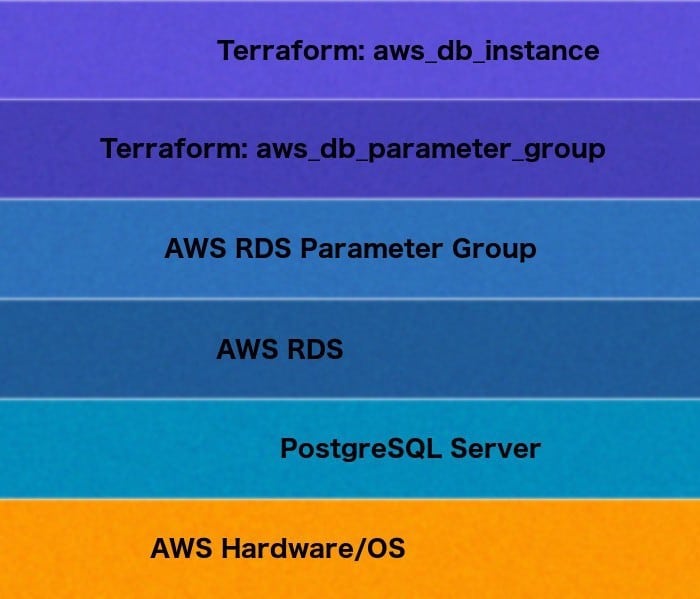
Terraform AWS RDS – Terraform AWS RDS Infrastructure Layer
Terraform AWS RDS Characteristics:
– Terraform is Not a strong abstraction
– Terraform makes use of various providers for differing services.
– Terraform isn’t agnostic
– Gives the ability to easily alter your provider to be Google Cloud then to apply the exactly similar Terraform
– Gives you an organized description of infrastructure
– Gives you the ability to port infrastructure code to another provider exactly like porting your software to another language
What are Terraform AWS RDS modules?
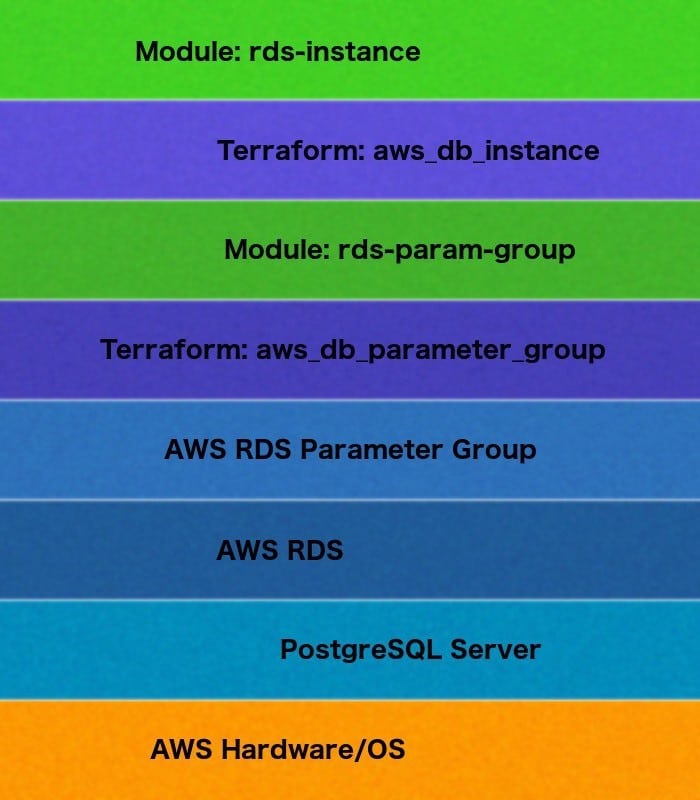
Terraform AWS RDS – Terraform AWS RDS Module
A lot of instances are going to get configured for every single type of resource which means it’s certain that there will be a lot of copies of your code.
Further, you may want to create Specific resources together like parameter groups, database instances or PGBouncer services.
For the sake of supporting such types of reuse, Terraform gives you the ability to start creating something called “modules”.
Terraform modules are reusable blocks of Terraform code having both inputs and outputs (similar to a function in software).
Terraform modules add an even additional layer of abstraction between you and resources. Which means that the layer is capable of getting as deep as required because modules may reference different modules.
How to use Terraform and RDS defaults?
Is a truly simple process when creating an RDS instance by placing the below in an HCL file (like rds.tf):
resource “aws_db_instance” “muffy-test” {
allocated_storage = 100
db_subnet_group_name = “db-subnetgrp”
engine = “postgres”
engine_version = “11.5”
identifier = “muffy-test”
instance_class = “db.m5.large”
password = “password”
skip_final_snapshot = true
storage_encrypted = true
username = “postgres”
}
A lot of additional attributes may be specified, but the ones stated above are good enough to begin with.
What is Terraform AWS RDS plan?
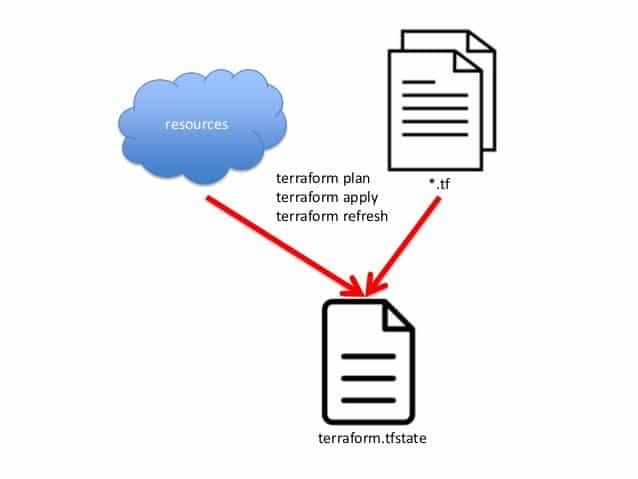
Terraform AWS RDS – Terraform AWS RDS Plan
Right now, it’s time to start running the terraform plan. The plan displays the Terraform to be created in AWS. Acknowledge the values which did not get set in rds.tf which are going to be set or going to be “known after apply”. Those will be supplied using Terraform provider in italics or the RDS in simple plain text. Values which are set in HCL will turn bold.
Below you can find a generated execution plan.
The following symbols show resource actions:
+ create# aws_db_instance.muffy-test will be created
+ resource “aws_db_instance” “muffy-test” {
+ address = (known after apply)
+ allocated_storage = 100
+ apply_immediately = (known after apply)
+ arn = (known after apply)
+ auto_minor_version_upgrade = true
+ availability_zone = (known after apply)
+ backup_retention_period = (known after apply)
+ backup_window = (known after apply)
+ ca_cert_identifier = (known after apply)
+ character_set_name = (known after apply)
+ copy_tags_to_snapshot = false
+ db_subnet_group_name = “db-subnetgrp”
+ endpoint = (known after apply)
+ engine = “postgres”
+ engine_version = “11.5”
+ hosted_zone_id = (known after apply)
+ id = (known after apply)
+ identifier = “muffy-test”
+ identifier_prefix = (known after apply)
+ instance_class = “db.r5.large”
+ kms_key_id = (known after apply)
+ license_model = (known after apply)
+ maintenance_window = (known after apply)
+ monitoring_interval = 0
+ monitoring_role_arn = (known after apply)
+ multi_az = (known after apply)
+ name = (known after apply)
+ option_group_name = (known after apply)
+ parameter_group_name = (known after apply)
+ password = (sensitive value)
+ performance_insights_enabled = false
+ performance_insights_kms_key_id = (known after apply)
+ performance_insights_retention_period = (known after apply)
+ port = (known after apply)
+ publicly_accessible = false
+ replicas = (known after apply)
+ resource_id = (known after apply)
+ skip_final_snapshot = true
+ status = (known after apply)
+ storage_encrypted = true
+ storage_type = (known after apply)
+ timezone = (known after apply)
+ username = “postgres”
+ vpc_security_group_ids = (known after apply)
}Plan: 1 to add, 0 to change, 0 to destroy.
What is Terraform AWS RDS apply?
After everything, you must go and apply the plan through using terraform apply.
% terraform apply .terraform.output
Time to acquire the state lock. This could require a couple of moments waiting…
aws_db_instance.muffy-test: Creating…
aws_db_instance.muffy-test: Still creating… [10s elapsed]
aws_db_instance.muffy-test: Still creating… [20s elapsed]
aws_db_instance.muffy-test: Still creating… [30s elapsed]
aws_db_instance.muffy-test: Still creating… [40s elapsed]
[…]
aws_db_instance.muffy-test: Still creating… [2m20s elapsed]
aws_db_instance.muffy-test: Still creating… [2m30s elapsed]
aws_db_instance.muffy-test: Creation complete after 2m39s [id=muffy-test]Apply complete! Resources: 1 added, 0 changed, 0 destroyed.
time to release the state lock. This could require a couple of moments waiting…
The creation of the above instance merely needed a couple of minutes to finish, but a lot of the instances created will take up to thirty to forty minutes. To view how the creation takes place using your command line will be a lot simpler than constantly refreshing the console in browser.
What is Terraform AWS RDS state?
Terraform AWS RDS – Terraform Logo
Upon the results of the apply finally appearing, you will notice that Terraform will not let you check all the values set on the instance. This means that you would have to view the created values using the console or through the use of terraform state show.
Check out the output of show down below and look at the number of values which had been set for you through either Terraform provider in italic or using the RDS itself in plain text. Merely values written in bold had been clearly set in the following rds.tf file:
% terraform state show aws_db_instance.muffy-test
# aws_db_instance.muffy-test:
resource “aws_db_instance” “muffy-test” {
address = “muffy-test…..com”
allocated_storage = 100
arn = “arn:…:db:muffy-test”
auto_minor_version_upgrade = true
availability_zone = “us-east-1b”
backup_retention_period = 0
backup_window = “04:40-05:10”
ca_cert_identifier = “rds-ca-2019”
copy_tags_to_snapshot = false
db_subnet_group_name = “db-subnetgrp”
delete_automated_backups = true
deletion_protection = false
endpoint = “muffy-test…:5432”
engine = “postgres”
engine_version = “11.5”
hosted_zone_id = “Z2R2ITUGPM61AM”
iam_database_authentication_enabled = false
id = “muffy-test”
identifier = “muffy-test”
instance_class = “db.m5.large”
iops = 0
kms_key_id = “arn:…:key/…”
license_model = “postgresql-license”
maintenance_window = “sat:08:12-sat:08:42”
max_allocated_storage = 0
monitoring_interval = 0
multi_az = false
option_group_name = “default:postgres-11”
parameter_group_name = “default.postgres11”
password = (sensitive value)
performance_insights_enabled = false
performance_insights_retention_period = 0
port = 5432
publicly_accessible = false
replicas = []
resource_id = “db-EJHF7…W6VLWRE”
skip_final_snapshot = true
status = “available”
storage_encrypted = true
storage_type = “gp2”
username = “postgres”
vpc_security_group_ids = [
“sg-81f064e5”,
]
}
Hence the whole process of Terraform AWS RDS includes the previously mentioned steps:
– Terraform Plan
-Terraform Apply
– Terraform Refresh
– Terraform State