AWS Lightsail: Create A Disk
More block storage disks may be created and attached to chosen Lightsail instances.
More block storage disks may be created and attached to chosen Lightsail instances.
Creating a Disk and Attaching it to a Lightsail Instance:
- From the Lightsail home page, click on the Storage tab.
- Click on Create disk.
- Select the Region along with the Availability Zone for the location of your Lightsail instance.
- Select a specific size.
- Fill in a particularly unique name for this disk.
6. Select an action of the below options for adding some tags to the disk:
- Add or Edit some key-only tags. Fill in a tag in the tag key text box, then click on Enter. Click on the button Save if you finish with filling in your tags to get them added, or select the option Cancel if you wish not to get them added.

- Get a key-value tag created, and fill in a key for the Key text box, along with an accompanying value for the Value text box. Click on the Save button as soon as you finish adding tags. Otherwise, click on Cancel if you don’t want to get them added.
Key-value tags may merely get added one by one and prior to saving. For the sake of adding multiple key-value tags to your disk, go over the steps mentioned before.

7. Click on Create disk.
When a couple of seconds pass, the disk will be created and you will be taken to a new page for disk management.
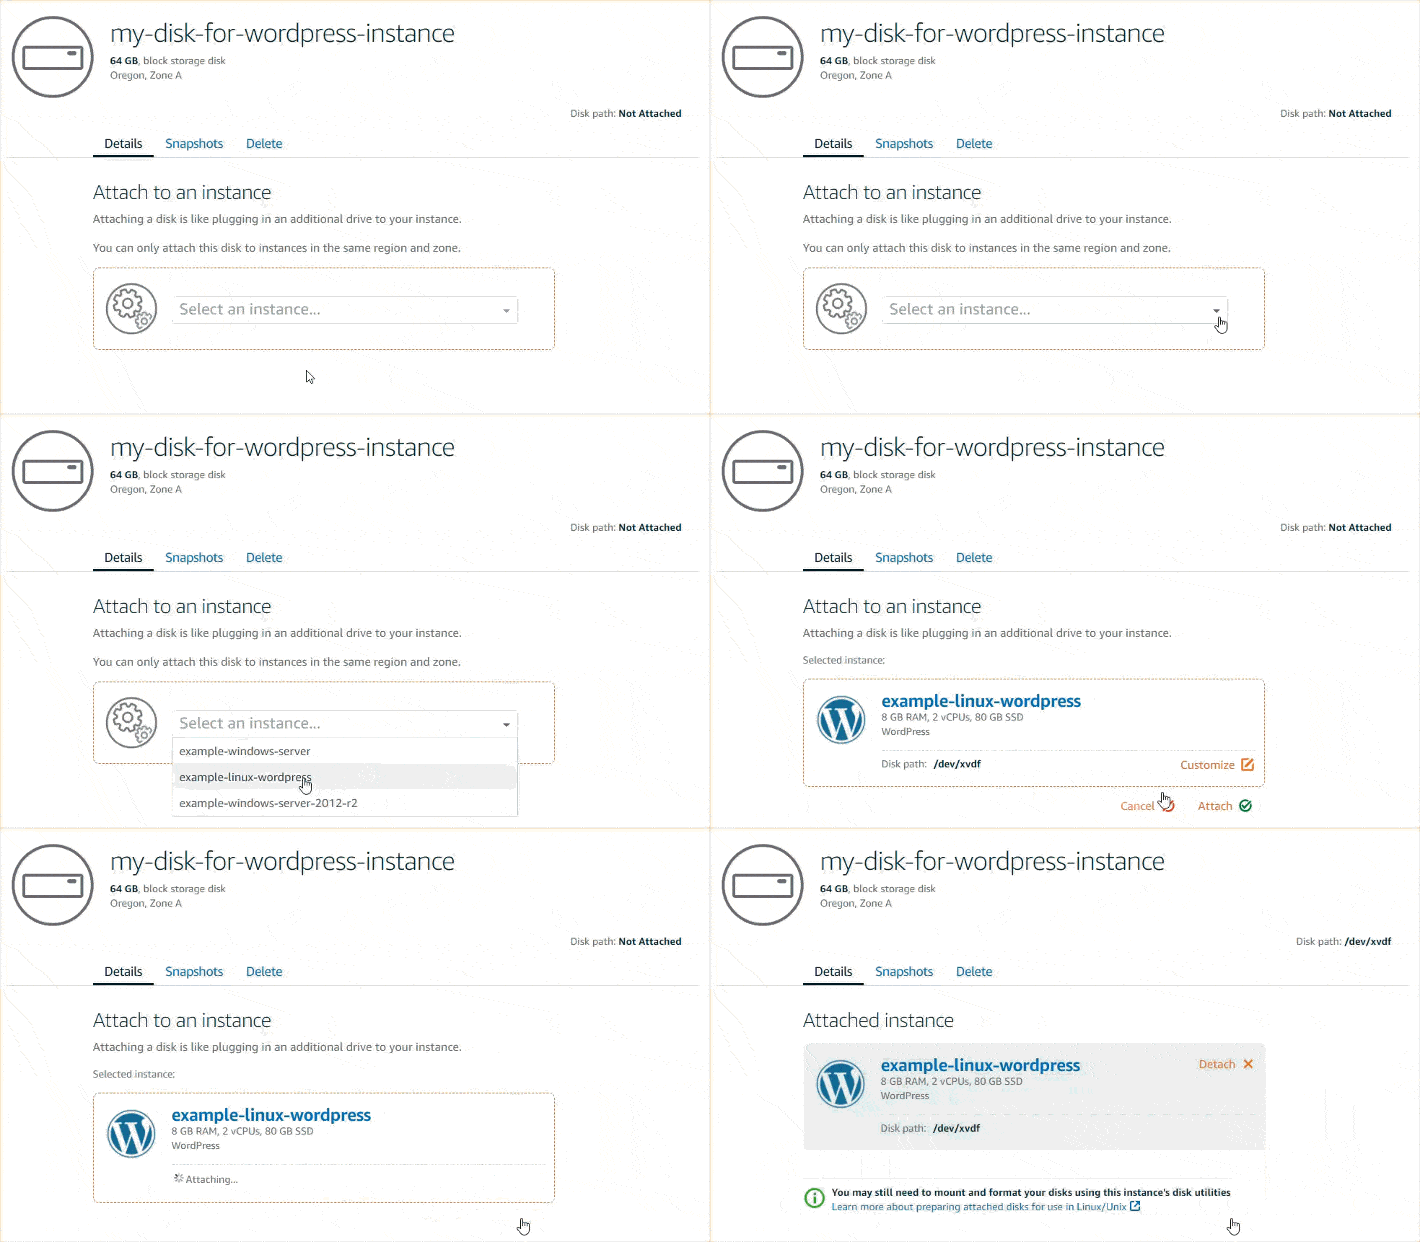
8. Select which Lightsail instance you’d like from this list, then click on the button “Attach” in order to get your new disk attached to this Lightsail instance.

AWS Lightsail
Connecting to the Instance for Formatting & Mounting your Disk:
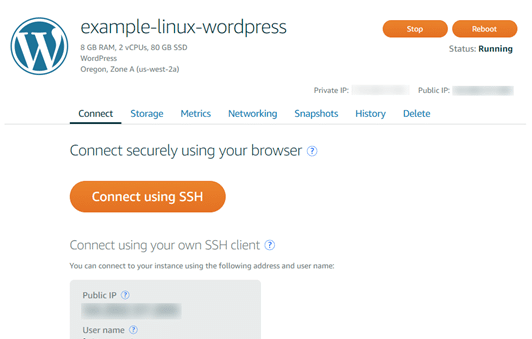
- Upon creating and attaching the disk, you will need to head back to “instance management” page located in Lightsail.
You will see that the Connect tab will be shown by default.

2. Click on the button Connect using SSH in order to connect to the Lightsail instance.
3. Enter the below:
lsblk
You will be able to spot an output similar to the below.
NAME MAJ:MIN RM SIZE RO TYPE MOUNTPOINT
xvda 202:0 0 80G 0 disk
└─xvda1 202:1 0 80G 0 part /
xvdf 202:80 0 64G 0 disk
This output that we get for lsblk takes out the /dev/ prefix out of your disk paths.
4. Make up your mind if you’d like to get a file system created on your disk because new disks will be something like raw block devices, which means you will need to preferably get a file system created on them prior to mounting and utilizing them. The disk which is restored from a snapshot will probably already contain a file system on it. In case you get a new file system created over an already found file system, this action will get your data overwritten. Enter the below command in order to get special information shown, including file system type.
sudo file -s /dev/xvdf
The below output should be displayed on a new disk.
/dev/xvdf: data
In case you get an output similar to the one below, this illustrates that this disk has an already existing file system.
/dev/xvda1: Linux rev 1.0 ext4 filesystem data, UUID=1701d228-e1bd-4094-a14c-12345EXAMPLE (needs journal recovery) (extents) (large files) (huge files)
5. Enter the below command if you wish to get an ext4 file system created on your disk. Change device name (like /dev/xvdf) into: device_name. It is possible for you to select from various file system types like ext3 or XFS, depending on what your app needs and what the limitations of your operating system are.
sudo mkfs -t ext4 device_name
A similar output to the one below should be shown.
mke2fs 1.42.9 (4-Feb-2014)
Filesystem label=
OS type: Linux
Block size=4096 (log=2)
Fragment size=4096 (log=2)
Stride=0 blocks, Stripe width=0 blocks
4194304 inodes, 16777216 blocks
838860 blocks (5.00%) reserved for the super user
First data block=0
Maximum filesystem blocks=4294967296
512 block groups
32768 blocks per group, 32768 fragments per group
8192 inodes per group
Superblock backups stored on blocks:
32768, 98304, 163840, 229376, 294912, 819200, 884736, 1605632, 2654208,
4096000, 7962624, 11239424
Allocating group tables: done
Writing inode tables: done
Creating journal (32768 blocks): done
Writing superblocks and filesystem accounting information: done
6. Rely on the below command in order to get a mount point directory created for your disk. A mount point refers to the location of the disk in the file system tree and the location from where you read and write files upon mounting your disk. Change the location of mount_point, to become something like /data.
sudo mkdir mount_point
7. You are capable of making sure of your disk having a file system on it through entering the below command.
sudo file -s /dev/xvdf
In the place of /dev/xvdf: data, an output that looks like the below will be displayed.
/dev/xvdf: Linux rev 1.0 ext4 filesystem data, UUID=0ee83fdf-e370-442e-ae38-12345EXAMPLE (extents) (large files) (huge files)
8. At last, get the disk mounted through entering the below command.
sudo mount device_name mount_point
Getting the Disk Mounted whenever you reboot your instance:
It’s possible that you might need to get this disk mounted whenever you try to reboot a Lightsail instance. In case you choose not to mount it, then this will be an optional step for you.
1. For mounting your disk on all system reboots, get an entry added for your device to the file /etc/fstab.
Get a backup created for your /etc/fstab file which is possible for you to use in case of getting your file deleted or destroyed by accident when you edit it.
sudo cp /etc/fstab /etc/fstab.orig
2. Get the /etc/fstab file opened through whatever text editor you’d like to use, for example “vim”.
The word sudo should be typed prior to getting the file opened in order to be allowed to get your changes saved.
3. Get a new line added at the end of your disk’s file having the below shown format.
device_name mount_point file_system_type fs_mntops fs_freq fs_passno
Finally, this is how your newly added line may look similar to.
/dev/xvdf /data ext4 defaults, nofail 0 2
4. Finish by saving your file then exiting the text editor.
See Also