AWS Java Application
In the following article, you will learn the steps for building and running a local AWS Java Application for AWS resources. You will be working with the AWS Toolkit for Eclipse.
Keep in mind
The samples directory in the SDK download gives you the SDK for Java Samples. The SDK for Java Samples may be seen on GitHub as well.
How to Build and Run the Simple Queue Service Sample for your AWS Java Application?
For the sake of building and running the Simple Queue Service sample for your AWS Java Application, go through the below steps:
1. Select from the Eclipse toolbar the AWS icon, then choose the option New AWS Java Project.
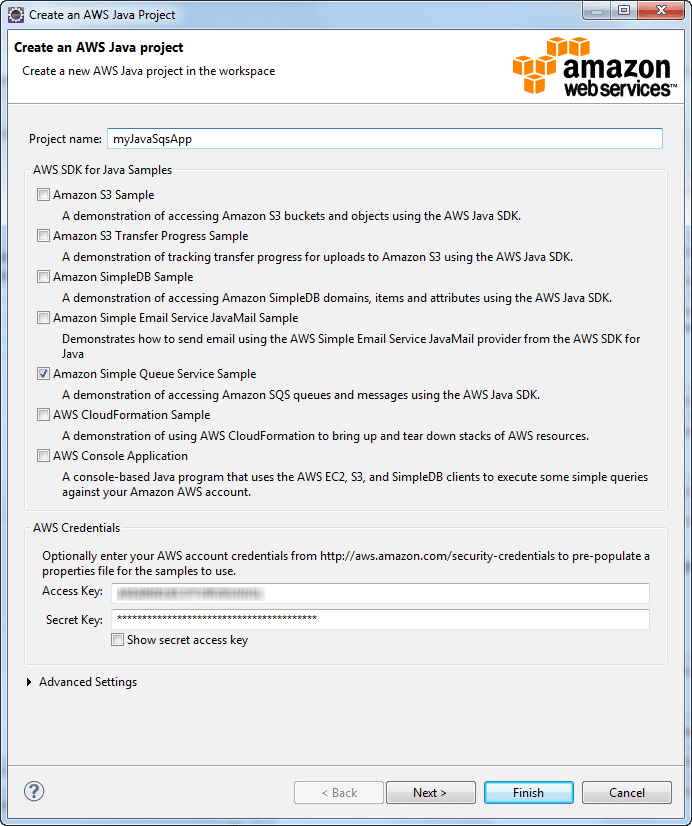
2. Enter a unique name in the box of Project name box then select the option Amazon Simple Queue Service Sample.

AWS Java Application – Create an AWS Java Project
3. Select Finish.
4. Project Explorer will show you the sample application. Start expanding this project’s tree view.
5. Click two times on the SimpleQueueService.java source file, under src node. Once you access it from editor pane, search for the below code line:
System.out.println(“Receiving messages from MyQueue.\n”);
6. Use the right-click mouse button to press on editor pane’s left margin, then choose Toggle Breakpoint.
7. Now right-click in Project Explorer on the project node. Choose the Debug As > Java Application.
8. For the box of Select Java Application, pick the SQS application then choose the OK action.
9. As soon as this application reaches the breakpoint and stops, you will be asked if you’d like to go to Debug perspective. When this happens, select the option No.
10. Open AWS Explorer then get the node for Amazon SQS expanded.
11. Click two times on MyQueue then check the queue’s created contents.

AWS Java Application – AWS Explorer MyQueue
12. Click on the F8 keyboard command. You will see as the Java client application keeps on running then naturally get terminated.
13. When you’re in AWS Explorer click refresh. Now, you can find that MyQueue queue has disappeared; The queue gets deleted by the application prior to its exiting.
Keep in mind
There should be a minimum of 60 seconds wait between the deletion of a queue and the creation of a new one holding its name.
Naming of AWS Resources for your AWS Java Application:
When creating products, you can simplify things by making sure that your resources are being kept separate. The ones that are for development should be separate from those that are for production purposes. A particular way to do so was mentioned in the article of Setting AWS Credentials, which talked about utilizing separate accounts, ones for development and ones for production resources. This can be very helpful when working with AWS Explorer, since your resources will be shown according to your account credentials. Here we will talk about a different method that can be used in terms of coding as well.
The whole purpose is to uniquely identify resources, like S3 buckets or SimpleDB domains, with a designated string value to each resource name.
This means that you should name your Amazon SimpleDB domain as “customers-dev” instead of giving it a general name like “customers”. Hence, you name your domain as “customers-dev” when it is meant for development purposes, and “customer-prod” when it is intended for production purposes.

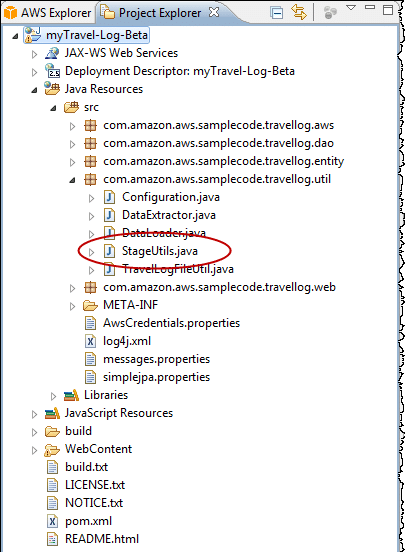
AWS Java Application – Project Explorer
The below method gets exposed by StageUtils:
public static String getResourceSuffixForCurrentStage()
The method of getResourceSuffixForCurrentStage gets back a string corresponding to the “stage” of a specific resource which could be for example “prod” or “beta” or “dev”. This means that the getResourceSuffixForCurrentStage may be used for setting resource names.
private String getTopicName (Entry entry) {

return "entry" + StageUtils.getResourceSuffixForCurrentStage() + "-" + entry.getId();

}
The Java system property gets you the value which is an output of getResourceSuffixForCurrentStage, “application.stage”. This value may be declared when you set the system property in the Elastic Beanstalk container configuration.
How to access the Container/JVM Options panel?
- Open AWS Explorer, click the node for AWS Elastic Beanstalk and then the node of your application.
- Under your application node, click two times on your Elastic Beanstalk environment.
- Scroll to the end of the Overview pane, and go to the tab labeled Configuration.
- Inside Container, start configuring the options of the container.
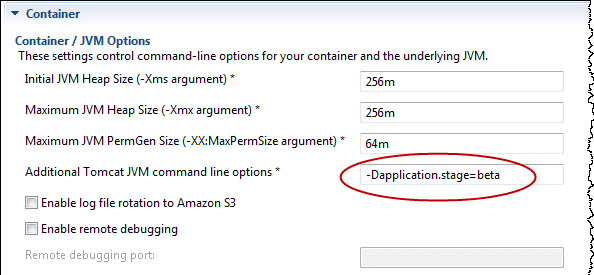
- For Additional Tomcat JVM command line options, add a -D command line option for entering a value for the application.stage system property. The below syntax specifies the need of the string value to be set as “-beta”.
-Dapplication.stage=beta
getResourceSuffixForCurrentStage will prepend a hyphen to a chosen string value.

AWS Java Application – Container JVM Options
6. Upon adding the value for the system property, open File menu, then select Save. Your new configuration will be saved, and your application restarts. To see the event for the deployment of the configuration to the environment, head to the bottom Eclipse editor at Events tab.
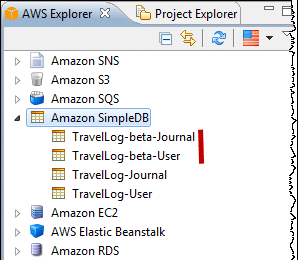
7. When the application finishes restarting, select to open the node for Amazon SimpleDB under the AWS Explorer. The new domains which you set shall be displayed now having the same string value you entered.

AWS Java Application – Amazon SimpleDB under AWS Explorer
To access your AWS Elastic Beanstalk console and create an environment, go to this link https://us-east-2.console.aws.amazon.com/elasticbeanstalk/home?region=us-east-2#/welcome.