Amazon WorkSpaces
Amazon WorkSpaces is a completely managed desktop computing service which grants customers the ability to offer cloud-based desktops to end-users.
With this service, end users will get the ability to access resources, apps and documents with the devices that they choose like Kindle Fire, Android Tables, iPad or laptops.
It was launched for the sake of meeting the increasing customer demand for Cloud based DaaS.
How Does Amazon WorkSpaces Work?
Every WorkSpace is a persistent Windows Server 2008 R2 instance which resembles Windows 7, hosted on AWS cloud.
Desktops get streamed to the users through PCoIP and backed up data is going to get taken on by default each 12 hours.
Its Requirements for the users:
Internet connection having TCP and UDP open ports.
Downloading a free Amazon WorkSpaces client app for device.
How to Create Amazon Workspaces?
- Start by creating and configuring the VPC. (To learn about VPC Data Transfer Pricing, check out our available article.)
- Create an AD Directory with the steps below.
- Go to Amazon WorkSpace Console using the following link: https://console.aws.amazon.com/workspaces/
- Choose Directories, and click on Setup Directory from the navigation panel.
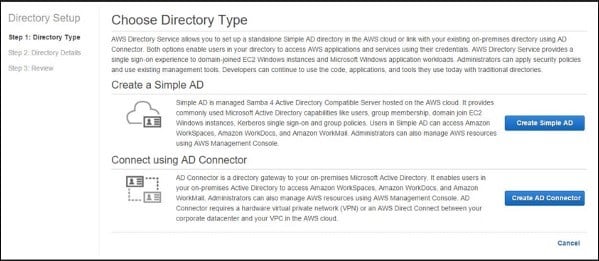
- You will get a new page opened. Click on the Create Simple AD button, and start entering the needed details.

Amazon WorkSpaces – Choose Directory Type
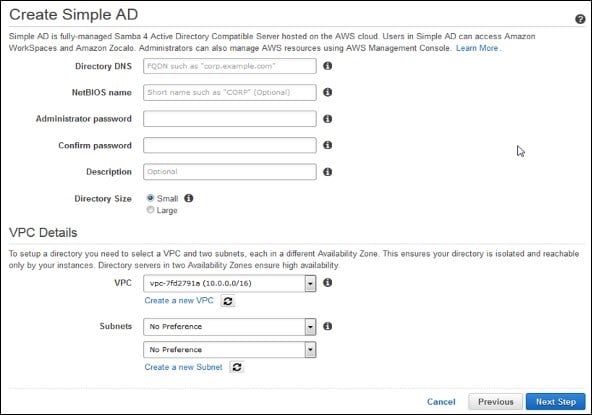
- For the section of VPC, type in the required VPC details and click on Next Step.

Amazon WorkSpaces – Create Simple AD
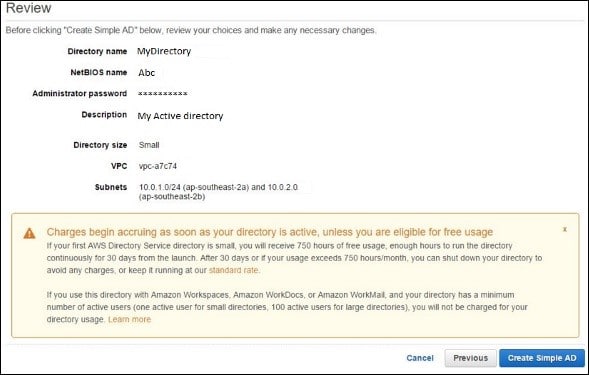
- The Review page is going to be displayed for you to go over your selected information. In case there is something wrong, perform the required changes. When everything is correct, click on the button Create Simple AD.

Amazon WorkSpaces – Review
- Start creating a WorkSpace with the below steps.
- Open the Amazon WorkSpace Console using the following link: https://console.aws.amazon.com/workspaces/
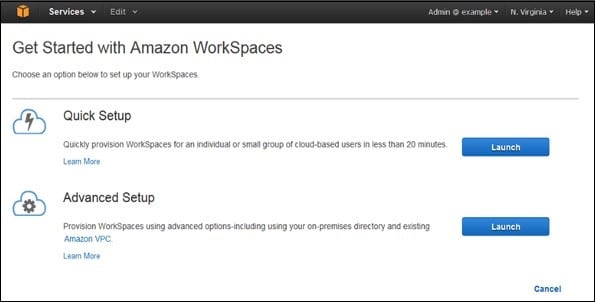
- Click on Workspaces then launch WorkSpaces option from the navigation panel.

Amazon WorkSpaces – Launch WorkSpaces
- Choose the cloud directory. Select enable/disable WorkDocs for all users found in this directory. Once done, click on Yes, Next.
- You will get a new page displayed. Enter the new user’s details, then click on the Create Users button. As soon as the user gets added to the WorkSpace list, click on Next.

Amazon WorkSpaces – Create users
- Type in the needed number of bundles inside the value field of WorkSpaces Bundles page, and click on Next.
- You will find a review page displayed in front of you. Go over the supplied details, then perform any needed changes. Click on Launch WorkSpaces.
You will get a message for the sake of confirming the account, and you will then be able to start using WorkSpaces.
- Start testing your WorkSpaces by going over the below steps.
First you will need to download and install the Amazon WorkSpaces client app from this link: https://clients.amazonworkspaces.com/.
- Start running the app. As a first time, you must type in the registration code which you will get by email. Then, click on Register.
- Now, it’s time for connecting to the WorkSpace through typing in the user name and password for the user. Click on Sign In.
- At this point, you will see WorkSpace desktop. Head to the following link http://aws.amazon.com/workspaces/on web browser. Navigate and make sure that the page is capable of being viewed.
- You will get a message stating the following “Congratulations! Your Amazon WorkSpaces cloud directory has been created, and your first WorkSpace is working correctly and has Internet access”.
What are the Features of Amazon WorkSpaces?
Check-Up for Network Health
By using this feature, you can verify whether your network and Internet connections are working perfectly well, check whether WorkSpaces along with their associated registration services are accessible, and check whether the port 4172 is open for UDP and TCP access.
Auto Resume Session
This feature provides the client with the ability to resume a disconnected session because of whatever reason in network connectivity within a period of 20 minutes. Users are capable of disabling this feature whenever they want in group policy section.
Console Search
Using this feature, Administrators are capable of searching for WorkSpaces through their directory, bundle type or user name.
Client Reconnect
Using this feature, users can access their WorkSpace with no need to fill in their credentials each time they disconnect. An access token is saved in a secure store and remains valid for a period of 12 hours to authenticate the correct user. Users may simply click the Reconnect button shown on the app for gaining access. This feature may be disabled at any time.
What are the Benefits of Amazon WorkSpaces?
- Selectable apps and devices
- Ease of set up
- Cost-effectiveness