AWS S3 Bucket Cost

AWS S3 Bucket Cost

AWS’ Simple Storage Service- AWS S3 is the most popular service type on the platform designed for web users. What makes this service different from other storage services is you will be charged only for what you use. You don’t have to buy any kind of subscription plan or dedicated storage space. AWS S3 stores data in Buckets and each bucket lets you store a variety of data. AWS S3 Bucket Cost is explained in this article.

AWS S3 Cost Optimization

AWS Simple Storage Service asks to pay for the storage used by the users. The billing cycle of AWS S3 service is a little complicated as there are a variety of services and storage plans available for the users. The only reason why more and more clients are attracted to this service is its flexible billing cycle. This lets users pay for what they use without additional charges.

Most bloggers have started utilizing Amazon’s service for storing their blog data. AWS S3 is one of the top five offerings by Amazon Web Services just because of its flexible pricing. You will be charged for the buckets that you create on the platform. The AWS S3 Bucket Cost can be easily found by the users.

Clients can explore the buckets and the value for each bucket to track the actual cost for that particular bucket. If you wish to know about the value of the S3 Bucket, then follow these below-given steps now!

AWS S3 Bucket Cost: Step-by-Step Guidelines

One can easily determine the cost of an S3 Bucket by using the AWS Cost Explorer tool. The tool is available to access from the AWS Console page. Just log in to the AWS Console, select the AWS Cost Explorer Tool and enter the appropriate data to determine the cost for each bucket created by the client under the same profile.

Steps to Determine the Cost of AWS S3 Bucket

Step 1:

Log into the AWS console. Since you have created an S3 Bucket, you must have the login credentials to access the AWS Console. Enter the username and password of your account to log in there.
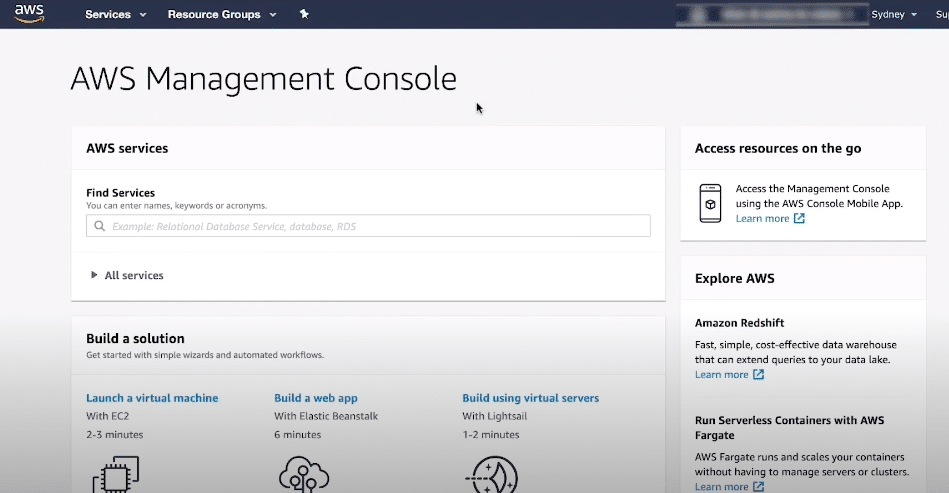
Steps to Determine the cost of AWS S3 Bucket - Step 1

Steps to Determine the cost of AWS S3 Bucket – Step 1

Step 2:

Select the Buckets option where you would see the list of the Buckets created by you. Now, to determine the cost for a bucket, you need to select one bucket from the list.
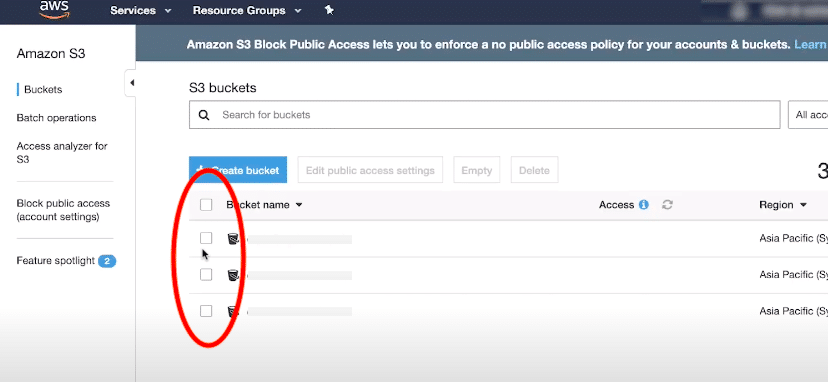
Steps to Determine the cost of AWS S3 Bucket - Step 2

Steps to Determine the cost of AWS S3 Bucket – Step 2

Step 3:

From the available tabs, select the Properties tab.
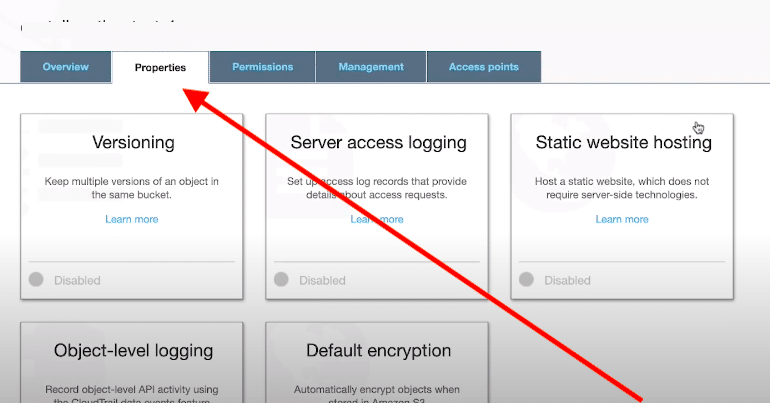
Steps to Determine the cost of AWS S3 Bucket - Step 3

Steps to Determine the cost of AWS S3 Bucket – Step 3

Step 4:

Here, you could see the Advanced Settings option. Select this option and then select the Tags option to add tags that will help you track down the actual cost of that bucket. From the Tags menu, select the Add tag option.
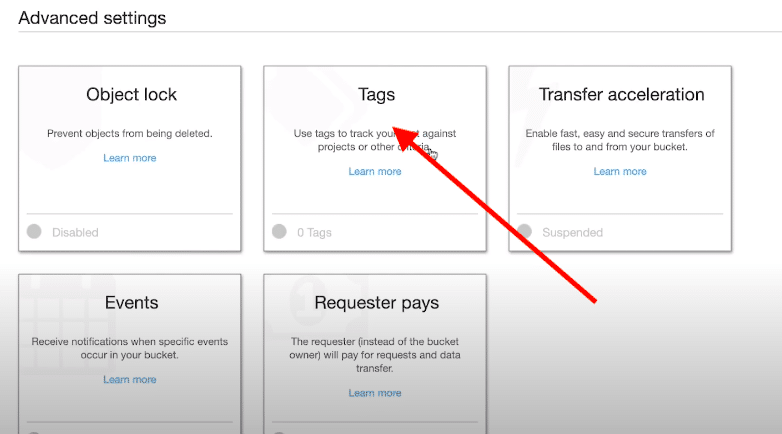
Steps to Determine the cost of AWS S3 Bucket - Step 4

Steps to Determine the cost of AWS S3 Bucket – Step 4

Step 5:

Select the Key option and enter the Tag for each bucket to know the cost. After creating tags, you need to activate them to track down the usage and the actual cost for that bucket.
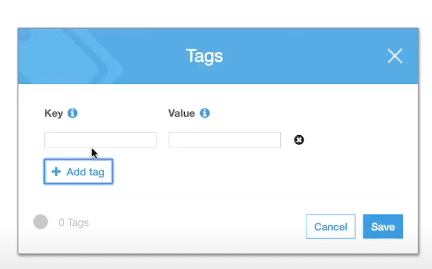
Steps to Determine the cost of AWS S3 Bucket - Step 5

Steps to Determine the cost of AWS S3 Bucket – Step 5

Step 6:

Go to the console and select Billing and Cost Management Console from there.
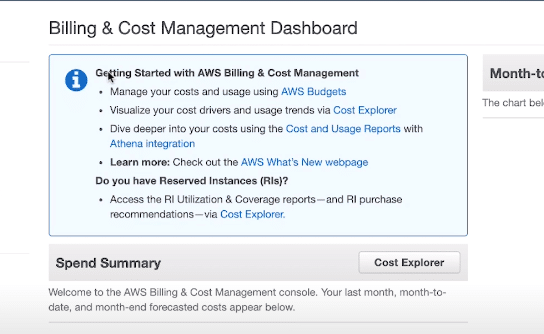
Steps to Determine the cost of AWS S3 Bucket - Step 6

Steps to Determine the cost of AWS S3 Bucket – Step 6

Step 7:

From the given navigation menu, select the Cost Allocation tags. This will help you select and activate the newly created tags by you.
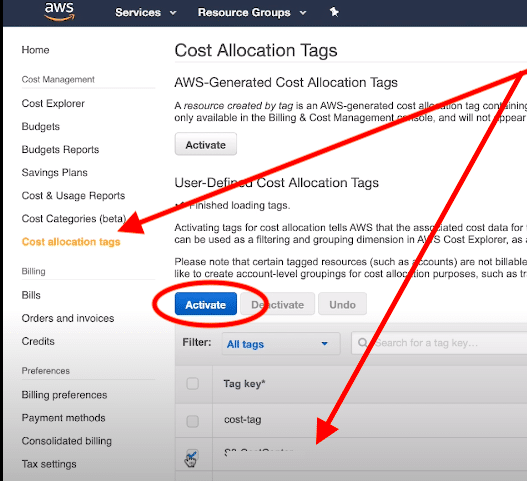
Steps to Determine the cost of AWS S3 Bucket - Step 7

Steps to Determine the cost of AWS S3 Bucket – Step 7

Step 8:

From the Search menu, search for the tag name created by you. Select the tag and click the Activate button to activate the tag created by you.
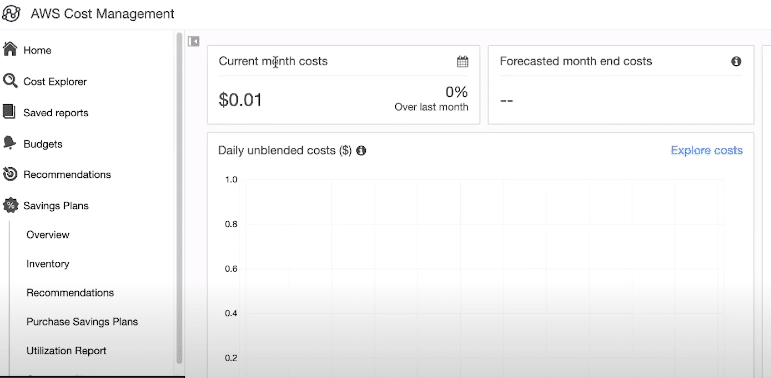
Steps to Determine the cost of AWS S3 Bucket - Step 8

Steps to Determine the cost of AWS S3 Bucket – Step 8

That’s all you have to do to track down the cost of each bucket created by you on the AWS platform. You can also create the cost report for the AWS S3 Buckets and create price tracking tags. Each report can be used by the client to generate the costing report for the buckets.

Make sure that you create and activate the cost allocation tags for each bucket. This will help you keep track of each bucket under the AWS S3 environment. It will take some time to create and activate the tags for each bucket. Once created, you can easily generate the cost reports for each bucket to track down their pricing.

Moreover, a client can also make use of the regular cost and usage with an hourly or daily period. The setup can be done easily by the users to know how much data are stored in an hour or a day in a particular bucket. This will also help them know about the cost of each bucket at the end of the billing cycle.

Conclusion:

One can easily determine the cost of each AWS S3 Bucket by setting up the cost allocation tags. The process is a bit complicated for new users; however, if you are using this service already, it will take only a few seconds to allocate a tag and activate it for a particular Bucket. Go through the steps, create Tags, and Activate them now to keep an eye on the Bucket cost.

See Also

S3 Digital Asset Management

How to configure s3 bucket for webhosting

Uploading Files and Folders to S3 bucket

S3 Bucket Versioning

AWS S3 Bucket


Posted in S3
Amazon S3 Digital Asset Management

Amazon S3 Digital Asset Management 

Digital Asset means the important data and files that you keep on the digital platform. When it comes to storing files on the digital medium, cloud-platform is the first choice. Amazon Web Services offers numerous types of Cloud-based services for web users. Amazon S3 is the most popular cloud-storage service offered by Amazon. Amazon S3 Digital Asset Management explained in this guide. 

AWS platform is the most advanced platform for web users and web developers from which they can get reliable cloud-based services at reasonable rates. Many AWS partners provide digital asset management through their software or tool that can be integrated with the existing data management software of the firm. 

Digital Asset Management

Digital Asset Management (DAM) is a system that is designed for web users to store and manage big data. The same system helps users in organizing multiple files and data with ease. The system stores all types of data such as documents, videos, images, audio files, etc. Apart from this, the same system can be used to share data between the users with a quick-share option. 

Digital Asset Management

Digital Asset Management

With the help of DAM, enterprises can solve data-related problems easily. The solution gives a unique description to each type of data stored within the environment making it easier for the users to search, manage, and organize it the way he wants. DAM is highly recommended to enterprises where big data has to be managed. 

Content marketers and enterprises have to use the platform or the service where they can manage and organize files easily. The service has to come with a quick search option so that one can easily locate the required file. Additionally, the same data can be used by marketers for digital promotional campaigns. 

Key Benefits of Digital Asset Management 

  • Easy-to-use user-interface for quick data handling and management even for a beginner user
  • Stores, Manages and Organizes Digital Assets in one place
  • Quick access to data with an easy exploration of folders and files 
  • Users can search and locate the suitable file with the built-in Search option
  • Integrates with Amazon Web Services as well as the existing system software of an enterprise 
  • Enhances creativity and productivity by automating the workflow 
  • Also manages pictures and other media files
  • Provides unique description to each asset stored within the environment for quick search 
  • Manages to watermark for images uploaded through the software 

Amazon S3

Amazon’s Simple Storage Service i.e. Amazon S3 is undoubtedly the most popular service type on the AWS platform. It’s an object storage service that stores data in buckets. Users can create buckets to store specific data over the cloud. Most enterprises have started using Amazon S3 for storing different types of data as objects within the Buckets. 

The service offers great stability and better performance unlike other data storage services making it the most efficient one in the market. Moreover, the monthly bill cycle can also be reduced by the user as the service charges only for the data consumption by users. 

How does Amazon S3 Digital Asset Management Work for Enterprises?

Amazon S3 works well with third-party software and tools. The same service can be integrated with the existing software or system of enterprises for storing different types of data over the cloud. The service can be combined with the Digital Asset Management Software. 

How does Amazon S3 Digital Asset Management Work for Enterprises

How does Amazon S3 Digital Asset Management Work for Enterprises

The AWS platform offers a variety of digital asset management software from trusted providers. The best part about these providers are they are well experienced in the market and have been providing their services for years. They also provide top-notch customer care support to solve different types of queries of the users. 

Once a reliable digital asset management software implemented, users can integrate the software with the S3 Buckets. The data stored in different buckets of Amazon S3 can be accessed from this platform and users can easily manage and organize it. 

The best thing about Digital Asset Management Software is it also lets you have full access to your computer system. You can use the software with the existing system and can fetch data from the external hard drives also. The software is designed to work with all types of data and hence the users of Amazon S3 can also manage their data with it. 

Conclusion:

If you are worried about the management of your data, then you should start organizing the data with the help of DAM i.e. Data Asset Management Software. Since the software is compatible with all types of third-party data storage tools and services, you can easily integrate and sync the previous data stored on these platforms with the DAM. 

Amazon S3 users always look for a reliable tool or software to manage multiple Buckets. The buckets can be fetched easily and the stored data can be organized smoothly with the integrated Data Asset Management Software. 

AWS S3 File Explorer

How to Configure AWS S3 CLI

How to Configure AWS S3 CLI

AWS S3 CLI – Overview

AWS CLI is a Command Line Interface designed for Amazon Web Services clients. The team has recently updated the interface and launched an upgraded version i.e. AWS CLI 2, with an improved layout and extra features and compatibility. The high-level commands of AWS S3 can be easily configured with the Command Line Interface. This tutorial explains the AWS S3 CLI Configure process so that one can easily make use of its different commands of it for quick implementation of objects automatically.

To configure AWS S3 CLI on your computer system, you need to follow three different steps, which are listed below. Anyone can easily get started with this command-line interface which is very helpful for clients to check out things and to implement objects and other parts automatically within the project.

How do I get started with AWS S3 CLI?

Step 1: Installation of AWS S3 CLI

To install the AWS S3 CLI on your computer system, your system needs to have the latest version of python. If your system doesn’t have python’s latest version installed, do it now, as we are going to install the AWS S3 CLI through the pip installation method.

Go to your system’s terminal window and enter the following command to get the latest version of python.

Pre-req:Python 2 version 2.6.5+ or Python 3 version 3.3+

Pre-req: pip is installed

Now, come back to the main Terminal Window and enter the following command to install the AWS S3 CLI on your system.

Sudo pip install awscli

The latest version of the CLI is now installed on your system. We can move on to the second step i.e., the configuration step.

To check whether it is installed or not, just type in AWS and press the enter key. You will see that the CLI has now been installed. You should be able to use the quick commands of CLI that will be helpful to all the developers and clients who use Amazon’s S3 service.

Step 2: Configure AWS S3 CLI

In order to configure the AWS S3 CLI on your computer system, you need to first configure its credentials with the system. You could try entering the CLI commands for AWS and you would be prompted with an error message in the Terminal Window. So let’s configure its credentials first.

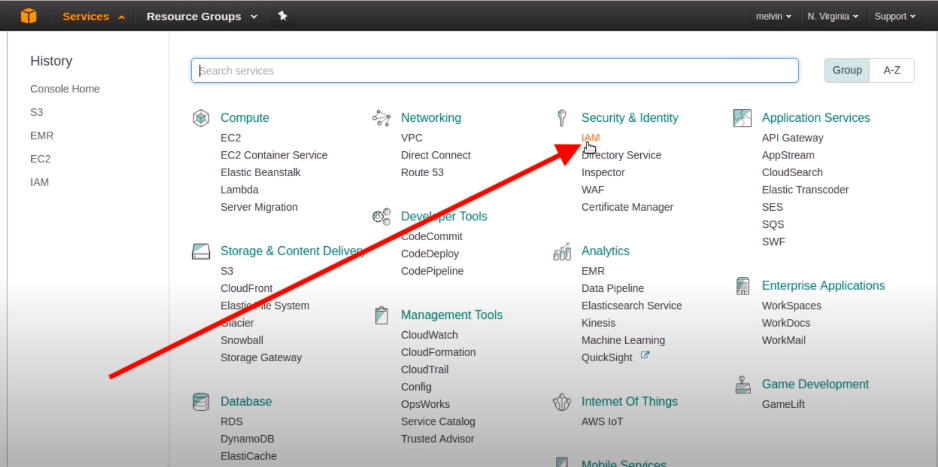
Go to the main page of AWS Web Console, where you will be presented with all the services that are made available to you. Explore the listed services and click the IAM i.e., Identity and Access Management.

Configure AWS S3 CLI

How to Configure AWS S3 CLI

Credit @YouTube

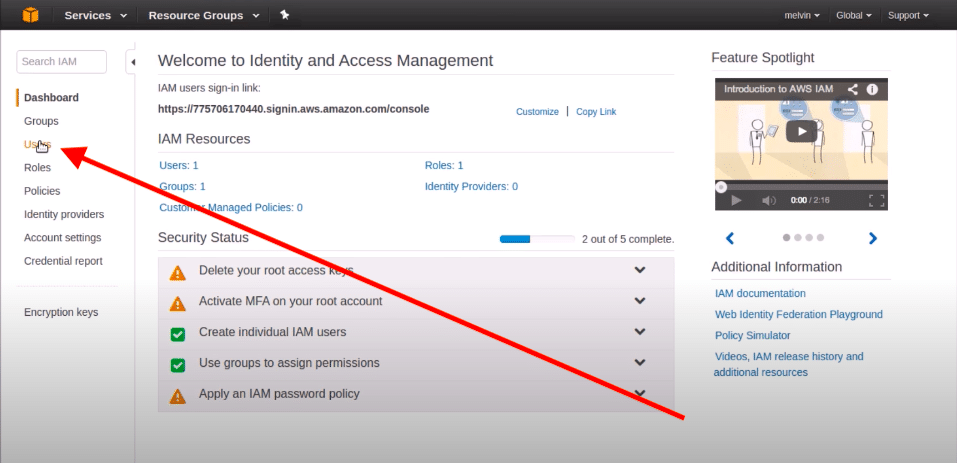
From the left sidebar, click the Users option to create a new user. If you do not have the users there, you need to create one by clicking on to the Add User button.

Configure AWS S3 CLI - Add User button

How to Configure AWS S3 CLI – Add User button

Credit @YouTube

The next page will ask you to type in the name of the user and then you will be asked to create a group as well. Since we are going to configure it with the S3 service, search for the S3 service to have access to its objects. The list will show you the folder which you just need to tick mark using the trackpad.

You will be asked to review your details i.e., the username and the group name and other information that you have entered for the creation of a new account.

After reviewing your details, you will be presented with a Success message. This means you have just created a new user and a group associated with it. Now, just click the Create User button. The user will be created with new access credentials. You will be asked to download the CSV file of credentials. Make sure to copy the credentials so that you can paste them directly into the Terminal window.

Go to the Terminal Window, and paste the copied command of AWS configure there. The system will ask you to enter the access key and other credentials. Make sure you enter the correct information here as you are configuring it with your system.

AWS S3 CLI has now been configured. You can now start using the AWS S3 commands to get quick information about the useful commands.

Step 3: AWS S3 Commands

Since you have configured your system with AWS s3, you can now run AWS S3 CLI commands. The most common commands used by the clients are for creating and removing S3 buckets, copying and syncing files to S3 objects, and other common commands for viewing files and their data, etc.

At present, there are nine useful commands available for the clients to use with this AWS S3 command-line interface on your computer system. Here, we have enlisted all the available commands which you can use directly in the Terminal Window for retrieving the information quickly.

cp

ls

mb

mv

presign

rb

rm

sync

website

All of these commands are available for clients who can use them to improve their productivity while working with the S3 objects. All these high-level S3 Commands are available for professionals. The high-level S3 Commands are used to manage S3 Objects.

If you are working on multiple projects and have to manage multiple S3 Objects, then you have to use high-level S3 Commands. The high-level S3 commands help you to manage the contents stored in the S3 Objects within the directories and within the objects.

While typing in a new command, you need to enter the source and target keys to get the required results. It requires a lot of practice and regular use of the AWS S3 CLI to get the best results quickly. For quick use of these commands, you can keep a note of all these commands. Whenever you need to use a particular command, just open the note, copy the command, and paste it directly to the terminal window.

Conclusion:

Working with the command-line interface to manage Amazon S3 objects is quite easy; all it requires is a bit of knowledge to use the existing commands and, of course, the configuration process. If you are new to this service and want to configure AWS S3 CLI, then follow the above-listed steps to get your system configured.

See Also

Cloud Purchasing Saving Plans

Posted in AWS
AWS S3 File Explorer

AWS S3 File Explorer

Amazon Simple Storage Service i.e. AWS S3 is the best cloud-storage solution for web users who can store a variety of data easily. The service lets users create different buckets for storing objects and all the other types of data with easy management. The AWS S3 File Explore lets AWS Clients interact with S3 Buckets through a user-friendly interface. 

AWS S3: The Concept

Amazon’s S3 uses buckets to store different types of data. The service looks similar to the native file storing devices or hard drives that you use on your computer system. The AWS Toolkit for Visual Studio is the software designed to manage multiple services of the Amazon Web Services platform. Fortunately, you can easily work with AWS S3 Buckets with File Explorer on the Visual Studio. 

To understand the concept of managing the AWS S3 Buckets through File Explorer, you should know about creating buckets first. 

Creating S3 Buckets

To create a new bucket, go to the main page of AWS Explorer and right-click on Content Menu. From here, you need to choose the Create Bucket option. 

In the dialogue box of S3 Bucket, you need to create the bucket manually here by entering the name for the bucket along with other required details. You need to keep a unique name for the bucket that you are going to create. You won’t be allowed to keep the same name for the new bucket that you are creating. 

At last, click the Ok button to create a new bucket within File Explorer through AWS Toolkit for Visual Studio. 

Managing the S3 Buckets for storage objects is super easy with the built-in AWS Explorer. The AWS Explorer is the most crucial tool for AWS clients to manage and use S3 Buckets and other types of data storage tools over the cloud. Let’s see how can we manage the AWS S3 Buckets with AWS Explorer. 

How to Manage S3 Buckets on AWS Explorer?

Open the Context Menu by right-clicking on the option. This will open up the main menu for managing and customizing the S3 Buckets. If we talk about the options, you will see various functions such as Browse, Properties, Policy, Pre-signed URL, Multi-part Uploads, Delete. All of these functions can be used with the existing AWS S3 Buckets. These functions work with the data stored as objects in the S3 Buckets. 

Apart from these common functions, you can also use the same File Explorer for uploading files and folders to Amazon S3. The same tool can be used to transfer files or the entire folders from your local drive to the selected S3 Bucket. While transferring files or folders, make sure to keep the names of your files and folders unique. If you keep the same names for the files and folders, then the File Explorer tool will overwrite the existing files resulting in losing your important data. 

The simple user-interface of AWS File Explorer can be seen here. You can see different tabs for managing the files here. Upload File, Upload Folder, Create Folder, Refresh- all these tabs can be used to upload files from local drives to your main Bucket. To manage the uploading of files and folder, you can customize the way how you want to do so. The Upload Settings menu will help you to customize and manage the files and folders that you want to work with. 

From the main Context Menu, you need to select the Upload Settings option. This option allows you to set metadata and other permissions while uploading new files to the buckets. For better management and easy handling of the data, keep the files and folders uploading option set to Everyone. 

This is an important function you need to customize while using the AWS File Explorer tool as it helps you to reduce the overall data consumption. When you finish uploading the file, you could see it on the main page of the Explorer. 

Now, if you want to clear or delete a particular file from the S3 Bucket, you need to go to the main menu of the page where you could see all the available files stored in the Buckets. Just select the file and click the Clear button to remove the selected files from that particular folder in S3 Bucket. 

The basic functions such as creating a folder, uploading files, opening up a document, downloading the existing file, make files public, changing of storage class, change encryption, rename files, and exploring the properties of each class- all these functions are easily available for the users to manage files and folders with AWS S3 Buckets. 

Conclusion:

This is how you can get started with Amazon S3 File Explorer. The File Explorer tool is included with the Toolkit that needs to be installed by every AWS Client. One can easily start using this File Explorer as it doesn’t ask for any type of special skills or tools. 

The above article explains the basic concepts of working with the AWS S3 File Explorer.  Follow the same steps to manage multiple buckets of S3 for big data and small data over the cloud platform. 

S3 Lifecycle Management

Posted in S3
S3 Lifecycle Management

S3 Lifecycle Management 

This article provides a detailed overview of implementing AWS S3 Life-Cycle Management and how to get started with S3 Life-Cycle Configurations.


What are S3 Storage Classes?

AWS offers a variety of cloud-based services for clients working in different industries. AWS S3 is the most popular service which is used for storing data. With the S3 Lifecycle Management, managing of the S3 Objects becomes super easy. If you are new to this service and want to know about configuring the S3 Lifecycle Management, then here’s the step by step tutorial for you. 

The S3 Storage Classes are relatively cheaper than other services when it comes to storing objects of the users. The different storage classes have different limitations of storing files. Users can set up a lifecycle configuration for each class depends upon their requirements through Lifecycle Management. 

Each object stays there for up to 30 days in an S3 Bucket. The users will be charged for a minimum of 30 days of the cycle period. After completing this period, the objects will be moved to different storage classes that can be managed by the S3 Lifecycle Management policies. You can customize object lifecycle & its rules while configuring it for the first time.


S3 Lifecycle Management Configuration Process

Before we jump on to the main configuration process for the S3 Objects, you need to check the versioning for the object. If the versioning is not enabled, then you won’t be able to add that particular object or class into the lifecycle as it voids the policies. So the first thing you need to check here is whether the versioning for S3 Objects is enabled. 

Login to AWS Console

The first thing you need to do is log into the AWS Console. Once logged in, Navigate to Services panel and select S3. Or you can directly search for the S3 service by typing in in the search bar. 

List of the S3 Buckets

In this window, you would see the list of the previously created buckets. The Amazon S3 page will show you the buckets created under the same account. If you haven’t created any buckets yet, you need to create them to add them to the lifecycle for the management. 

Check Overview

From the given list of S3 buckets, click on to a particular Bucket to check the details. The Overview Window of that bucket lets you manage a variety of things such as adding files or removing files within the object etc. 

Enable Versioning

After getting the overview of that bucket, the next thing you need to check here is whether the versioning for the selected bucket is enabled or not. To do so, select the Properties tab from the same page. 

  • The Properties tab will show you a list of sections associated with the selected bucket and its storage.
  • You could see Enabled text under the Versioning section on this page.
  • If it shows a disabled option, click the option to enable it instantly.
  • The S3 Bucket stores multiple versions of the same files.
  • You could de-select this multiple versions option from this window.
  • By selecting this option, the overall storage space for the required files will be reduced. As a result, you will save a lot of money during the lifecycle.
Select Management Policy

Select the Management tab from the same Window. The Management tab is the fourth tab on the same page. You can access the information and setting up the management rules for the selected bucket only. Click the Add Lifecycle Rule button from this Window. 

  • The Lifecycle Rule Window will be presented to you and asking for the name and other information to set up the policy. Make sure you enter the right information in the given fields.
  • Explore the given tabs wisely and set up things accordingly for the selected bucket.
  • The transitions tab will show you the previous version and the current version of objects that can also be customized as per the requirements.
  • The Expiration tab lets you customize and select the expiry dates for the stored objects.
  • The existing versions will be deleted from the storage after the set period.
  • If you have set the period to 90 days, on the 91st day, the prior versions will be deleted permanently.
  • Review everything well before you set up the lifecycle for the selected Bucket. In the same way, you can set up the lifecycle for each S3 Bucket and object.
  • Click the Next button to finalize the lifecycle.

Final Thoughts

It is important for the users/teams to set up lifecycle configuration for each object that is stored in S3 Buckets. If you don’t pay your attention to object storage & don’t set up the lifecycle policies, they will consume unnecessary data that will cost you extra money. Your monthly billing cycle will be affected and you will have to pay extra money for the services that you haven’t used.


Here are few awesome resources on AWS Services:
AWS S3 Bucket Details
AWS S3 LifeCycle Management
AWS S3 File Explorer
Create AWS S3 Access Keys

AWS S3 Bucket Costs
AWS S3 Custom Key Store

  • CloudySave is an all-round one stop-shop for your organization & teams to reduce your AWS Cloud Costs by more than 55%.
  • Cloudysave’s goal is to provide clear visibility about the spending and usage patterns to your Engineers and Ops teams.
  • Have a quick look at CloudySave’s Cost Caluculator to estimate real-time AWS costs.
  • Sign up Now and uncover instant savings opportunities.
Posted in S3
AWS S3 Set Access Key

AWS S3 Set Access Key

Access Keys in AWS Environment are essential to set up a connection between your WordPress and AWS S3 Buckets. The Access Keys are key elements to configure the extensions of a WordPress website. The following article will guide you on how you can create an S3 Bucket and get AWS S3 Set Access Key. 

Prerequisites: 

Before you create an S3 Bucket, make sure that you have the following things with you. 

A user account on AWS Services. If you do not have your AWS account, make sure you sign up for the new account by following the below-given link. 

https://aws.amazon.com

You will be charged $1 for the account creation on the AWS Platform. You will be asked to enter your personal details as well as credit card details to purchase different services in the near future. 

How to Create an S3 Bucket on AWS?

Step 1: 

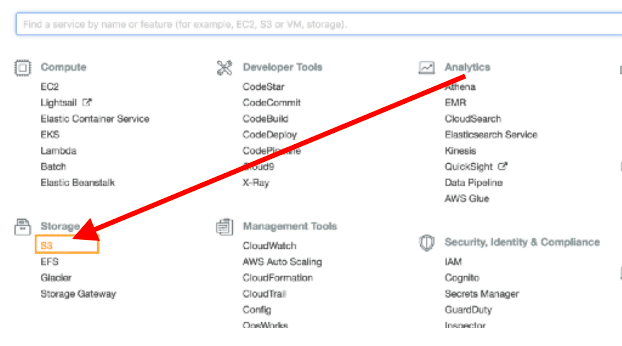
Login to your AWS Account and open the Console section. You would be presented with different services available on the platform. Select the S3 option given under the Storage section on the Services page. 

How to Create an S3 Bucket on AWS

How to Create an S3 Bucket on AWS

Step 2: 

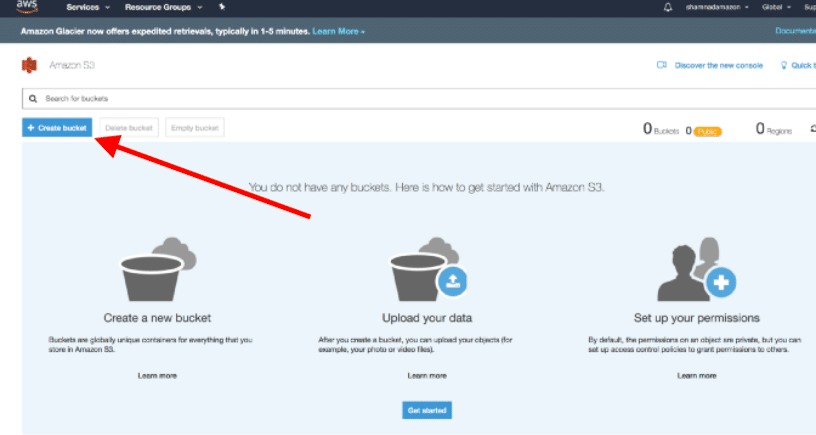
The official Amazon S3 page will be presented with different options. Kindly select the Create Bucket button from this page. 

How to Create an S3 Bucket on AWS 2

How to Create an S3 Bucket on AWS 2

Step 3: 

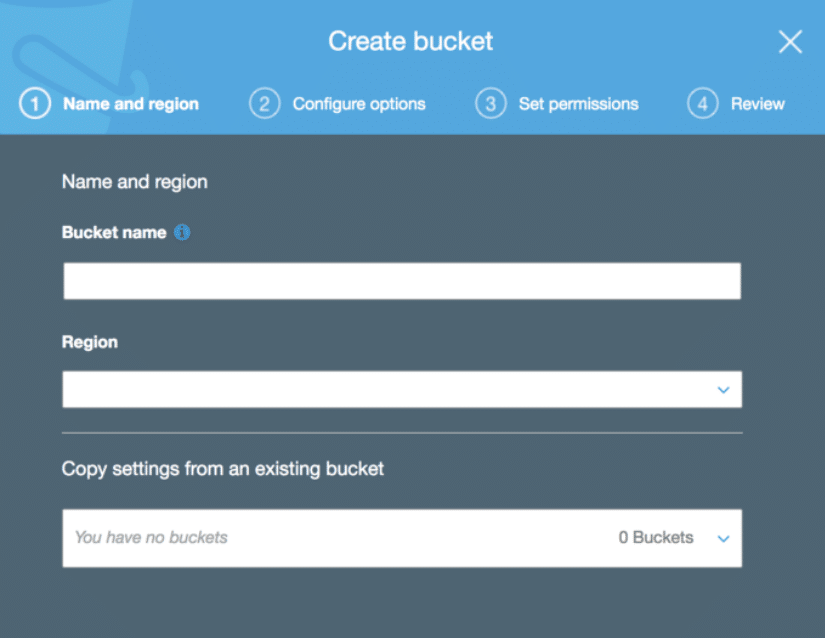
The Create Bucket page will ask you to fill in the details such as Bucket name, region, and other instructions that need to be followed by the user. 

How to Create an S3 Bucket on AWS 3

How to Create an S3 Bucket on AWS 3

Step 4: 

Upon successful creation of the new S3 Bucket, you would see the name of the newly created bucket there within the Amazon S3 page. 


AWS S3 Set Access Key

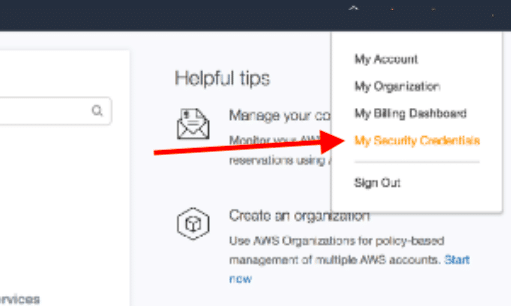
To access the newly created account, you need to have the access key for that account. You also need to have the Secure Access Key of your AWS Account. To get your Secure Access Key, just click the My Account option and then My Security Credentials to know more about the login and security credentials of your AWS Account. 

AWS S3 Set Access Key

AWS S3 Set Access Key

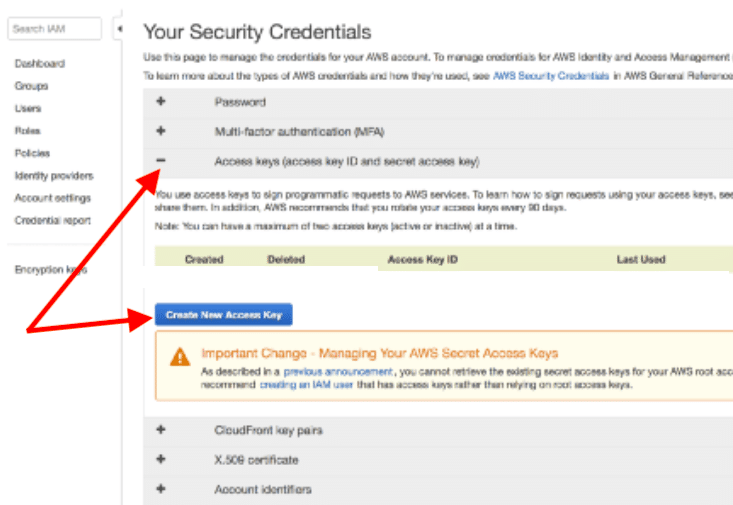
The page “Your Security Credentials” will show you a few additional options from where you need to select the Access Keys option i.e. the third option on the same page. 

AWS S3 Set Access Key - Create new

AWS S3 Set Access Key – Create new

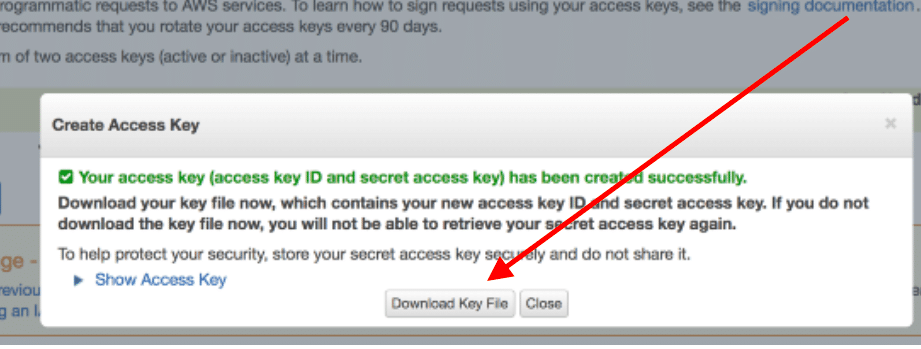
You are about to create a new access key for your AWS account. A pop-up message will be displayed along with the instructions. You can download the Access Key by clicking on to the Download Key File button. 

From here, you can click on the Show Access Key option. The page will show you the Access Key ID along with the Secret Access Key. 

AWS S3 Set Access Key - download

AWS S3 Set Access Key – download

Now, to access the newly created AWS S3 Bucket, you need to use this Access Key ID and Secret Access Key. 

Conclusion:

This is how the Access Key and the Security Access Key for the AWS Account can be created for accessing the AWS S3 Bucket. The Security Access Key and the Access Key for the S3 Bucket are essential to keep the data of the bucket safe and secured. 

You can follow the above steps to create a new S3 Bucket and have access to that bucket with the help of the Security Access Key. 

How to configure S3 bucket for web hosting