All you need to know about DevOps Toolchain

All You Need To Know About DevOps Toolchain

DevOps Toolchain

Revolutionary ideas have become actual products thanks to the boldness of the enterprises. DevOps has been the go-to solution for many developers to ensure a smooth and efficient software development process. DevOps is used by numerous big and small enterprises around the world and the DevOps Toolchain makes that task even easier.

In this article, you will learn everything essential there is to know about DevOps Toolchain, how DevOps Toolchain is useful today and the way to create your own Toolchain.

Why is DevOps Toolchain Used?

When a concept is to be transformed into a product, a well-laid-out plan of action is needed. The plan should have a comprehensive list of requirements from the client. The developer should be able to integrate the client requirements into product specifications, design a model, allot varying tasks to different development teams, choose the timeline for releasing the product and also create a feasible and efficient delivery, after-sales and maintenance plan.

Once the planning is completed, developers start creating the software or web app. This stage involves designing the software, creating its code and testing the code for functionality and bugs. The next stage in software development is testing, where the software is checked against specific parameters that follow client requirements. Once the testing is completed, the software is considered ready for launch in the market. Releasing the software requires providing and deploying apps that make the product available to consumers.

An ideal software producer remains with the consumer even after the delivery is done. There is a need to monitor the performance of the product in real-life situations to check for improvements and ensure optimal performance.

Many stages in the software development lifecycle do not require manual efforts owing to the availability of various automated software development tools, DevOps Toolchain being one of the most popular one’s today.

What is DevOps Toolchain?

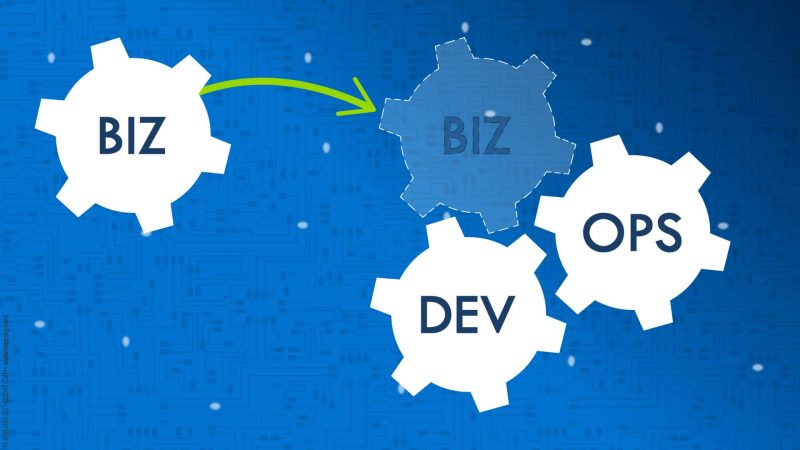
DevOps software development management system focuses on continuous integration, continuous delivery, collaboration and automation. As this is a practice, more than a technology, there is vast scope to use multiple tools to quicken the software development process.

DevOps Toolchain is a collection of DevOps tools that developers combine to create any software or web app. The Toolchain is excellent for faster development and efficient delivery of products. DevOps Toolchain is helpful in solving problems commonly faced in the design, development, testing, deployment and operational stage of software creation.

How does DevOps Toolchain help?

Let’s check out the different tools in the DevOps Toolchain that are useful at different stages of software development:

Collaboration

Collaboration is the greatest aspect of DevOps practice which helps promote communication between different teams participating in the software development process. This tool helps to enhance collaboration between multiple teams to automate and make the entire development process smoother.

Planning

Successful software is created when the different investors in the development process, such as clients, employees and stakeholders, share a common goal. The planning tool in DevOps Toolchain provides much-needed transparency.

Source Control

Central storage for data, codes, documents, files, etc is extremely important for smooth software development. The source control tool in the DevOps Toolchain helps to store all data into a well-categorized central repository with the different development teams having access to it, according to need.

Issue Tracking

Increased transparency in operations helps to make it easier to detect issues. There are a few issue tracking tools that help the team to detect and track problems in coding during the software development process.

Configuration Management

Configuration management tools in the DevOps Toolchain are designed to automatically configure and update your system. This tool is excellent to manage your infrastructure as code and avoid configuration drifts over different platforms.

Continuous Integration

An ideal software development lifecycle involves developing codes by different teams and integrating them continuously. These codes often show errors when running in collaboration. Continuous integration tool in the Toolchain helps detect errors and resolve them quickly.

Monitoring

Monitoring is a must in DevOps to ensure a smooth deployment. Monitoring tools in the Toolchain help to achieve maximum uptime and optimal performance.

Automated Testing

DevOps Toolchain also includes several automated testing tools that help to test the entire integrated code before it is deployed.

How to create DevOps Toolchain?

Here are the five main factors to consider when creating DevOps Toolchain:

  1. Acceptance – The first factor requires accepting and acknowledging mistakes and agreeing to the remedy. You may need to change your Toolchain if your developed software is not getting deployed quickly.
  2. Inspiration – Get inspired by reading the feedback, reviews and testimonials from the tens of thousands of developers who have used DevOps Toolchain successfully.
  3. Analysis – Analyzing the existing system helps to create an accurate software development process.
  4. Building – Once the areas of improvement are identified, it becomes easier to choose the right tools for DevOps Toolchain.
  5. Strategizing – It is essential to create, use and maintain your tools regularly and ensure a stronger software development strategy.

Conclusion

Using DevOps Toolchain, developers can now assign the mundane tasks of installing, upgrading, configuring and set-up to become automated while you focus on the core building aspects of the software development process.

See Also

Agile vs DevOps

Agile vs DevOps – Differences, Similarities and Uses

Agile vs DevOps – Differences, Similarities and Uses

What is the difference between Agile and DevOps

When it comes to software development there are several choices in the market. However, only a handful, like Agile and DevOps continue to dominate the software and web app development industry. Initially, software development management techniques were not specified.

Then “Waterfall” arrived and redefined the software development process according to the time it took to design and develop a web app. In the beginning, software development was a significantly time-consuming process due to the lack of a uniform software development management system. This often resulted in software being deployed with bugs and defects, which then took additional time to correct and made the development process even longer.

Thanks to the advances in management techniques, now we have extremely efficient systems, such as Agile and DevOps. Let’s take a look at the specific features of both these advanced software development management systems, as well as check their difference, their similarities and how they can be combined to achieve the end-product in the fastest and most efficient way possible.

What is Agile?

The agile method of software development management was first introduced in 2001, through the Agile Manifesto. It constitutes 4 values and 12 principals to develop an “agile” or quick software development environment.

The four core agile values are:

  1. Individual and Interactions have priority over Processes and Tools.
  2. Working software has priority over comprehensive documentation.
  3. Customer collaboration has priority over contract negotiation.
  4. Responding to change has priority over following a plan.

The twelve principles defined in the Agile Manifesto are:

  1. Customer satisfaction is the top priority
  2. Always adapt to changing requirements, even at the later stage of software development
  3. Deliver functional software frequently
  4. Development and business go hand-in-hand
  5. Motivated people should lead projects
  6. Inter-personal communication is the best method of distributing information
  7. Working software means successful development
  8. Sustainable development is possible with agile processes
  9. Keep a constant eye on good design and technical excellence
  10. Simple is better
  11. Self-organizing teams create the best architecture, designs and requirements
  12. Reflect on work regularly and adapt to improve

In simple words, the agile software development management method promotes adopting a leadership skill that boosts team-work, accountability and improves self-organization. In addition, the agile method aims to continuously align development based on customer needs and trends.

What is DevOps?

DevOps is a software development management system that helps IT operatives and software development teams to collaborate efficiently. This concept promotes an environment of collaboration between the two teams, which conventionally work isolated from the other. This collaboration is maintained from the initial stage to the last stage of software development.

Simply put, DevOps is focused on two main practices – lean and agile development. It is actually a commitment by the team or organization to provide continuous development, delivery and integration. The three distinct principles that can define DevOps in short are:

  1. Principles of flow
  2. Principles of feedback
  3. Principles of continuous learning

In its truest form, DevOps is a flexible practice with culture and mindset of sharing for software and IT development.

What are the similarities between Agile and DevOps?

Although some may argue that there is a vast difference between Agile and DevOps, there are three main distinct similarities between the two.

What are the similarities between Agile and DevOps

What are the similarities between Agile and DevOps

  1. Both are software development management methods
  2. Agile precedes DevOps
  3. Agile and DevOps promote faster software development

Agile and DevOps are both focused on providing a fast and effective way to design and develop software or web apps without compromising on client and consumer requirements.

What are the differences between Agile and DevOps?

Apart from the similarities, Agile and DevOps each have their own unique features. The differences between the two are mainly noticed in the post-development stage.

Here are the factors that distinguish the functions of Agile and DevOps:

Operations

DevOps and Agile are both useful for managing the development, testing and deployment stage in software creation.

However, DevOps provided an additional function that includes the operations stage too. This method focuses on monitoring and software development simultaneously.

Collaboration

Agile requires separate personnel to handle the designing, testing and deployment stages in software development.

In contrast, DevOps requires the DevOps engineer to supervise development, testing, deployment and operations.

Cost-cutting

Agile is more focused on reducing wastage of resources, using advanced concepts such as minimum viable product (MVP) and agile project accounting.

On the other hand, DevOps is designed to cut unwanted costs incurred during the designing, developing, testing, deploying and operating stages.

Conclusion

Although their common functions may lead people to believe that Agile and DevOps are one and the same, there are several distinct features that are unique to each of the two. Those who prioritize cost-cutting for their software development project may prefer DevOps. On the other hand, those seeking to reduce the wasting of resources during the software development process may choose Agile.

What is DevOps Lifecycle

DevOps Lifecycle

Everything You Need to Know About DevOps Lifecycle

DevOps Lifecycle

Software development has come a long way. Some of the most exciting new software has been launched in the past years. AI, machine learning and edge computing are the three top trends in software technology currently. According to Forbes, the top trends in software development technology for 2020 are:

  1. Low-code/No-code Platforms – This technology is focused on creating minimal to no coding software platforms, which are aimed at helping enterprises to transform digitally without having any technical resources.
  2. Machine Learning Ops – Also called MLOps, this technology involves advanced features, including automated concept-drift detection, real-time feedback on production KPIs, and built-in support for constant updating according to the success of production and integration with AutoML.
  3. UX Design – User experience design is integral to the success of any software. Every enterprise demands comprehensively engaging software models for its consumers. Hence, user-experience-focused designing software is definitely the need of the hour across the industrial spectrum.
  4. DevSecOps – DevSecOps is becoming increasingly essential when developers have comprehensive access to the client database and there are higher chances of internal and external threats of destruction of the database. Teams trained in DevSecOps helps amp up the security during software development and operation by monitoring activity and determining access permission strictly.
  5. Native Mobile Development Languages – Native mobile-development languages, such as Swift and Kotlin, are expected to make a comeback, as these are designed to enhance production speed, and memory security and provide parallelism, such as with Rust. The rising demand for speed, personalization and app quality from users are the major reasons for its return.

What is DevOps?

The complete process of software and web app development is extremely complicated. The software or app needs to be tested at every stage of development before being fine-tuned for production. Most often, the development process is time-consuming, thanks to its specific requirements. DevOps Lifecycle is the solution for software developers to develop and deliver software and web apps swiftly.

DevOps, short for Development-Operations, is the practice of using several task outlines for faster application development. It is essentially a combination of IT operations and software development.

How effective is DevOps?

DevOps forms a flexible relationship between IT operations and software development by enabling better communications within internal business departments. This helps to improve overall software production by using advanced techniques, such as:

  • Stable operating environment
  • Steady collaboration
  • Super swift delivery
  • On-going optimization
  • Optimizing time spent in the fix/maintain phase

What is DevOps Lifecycle?

DevOps practices are used mainly when developing e-commerce websites, cloud-native apps or similar large-spread platforms. The entire DevOps Lifecycle consists of seven stages:

1 – Continuous Development

The first stage of DevOps involves understanding the goal of the project and planning the software development based on it. The source code is one of the essential elements in this stage and DevOps practices require Source Code Management (SCM), which uses different tools, such as GIT, GitLab, TFS, Mercurial, Subversion, etc for distributed version control.

2 – Continuous Integration

The source code needs to be changed and altered on a regular basis. The next stage, code integration, is the main aspect of the DevOps Lifecycle. In this stage, the new codes that support the add-on functions are created and integrated into the source code. This stage helps to detect bugs and errors, brings additional functionality to the software/app, runs unit tests, prepares code reviews, tests integrity, and compiles and packages the code.

3 – Continuous Testing

This stage is interchangeable and can be before the second stage or after. In this stage, the developer tests the app for bugs using an ideal testing environment created by Docker containers. This automated testing system helps save developer resources, including precious time and resources.

4 – Continuous Feedback

In this stage, the testing and integrated stages are analyzed. Developers can measure the outcome of their code modifications by reviewing user feedback. This stage is often the turning point for most software and apps.

5 – Continuous Monitoring

Monitoring the performance of apps is extremely important for app developers. This stage is designed for developers to record data on app use and monitor its individual functions. This is the best way to ensure the availability of services in the app or software.

6 – Continuous Deployment

In this stage, the finalized software or app code is deployed in the production servers. SCM is an essential tool in this stage as it helps with the precise deployment of app code on servers. This is an excellent way to ensure consistent performance and functionality of the app.

7 – Continuous Operations

The last stage of the DevOps Lifecycle is the smallest and simplest. This stage requires automating the process of releasing the app and its updates later on.

Conclusion

DevOps Lifecycle has become an essential tool for software and app developers to ensure a swift, smooth and streamlined development process and helps save valuable resources for the client and developer alike.

See Also

DevOps Use Case

AWS Nitro Enclaves

What is AWS Nitro Enclaves – Perfect Solution for Processing Sensitive Data

Amazon Web Services has become the leading cloud service provider in the world, thanks to its focus on introducing increasingly advanced features.

Its immense service base of satisfied customers is clearly highlighted in the facts and figures published on ExpandedRamblings.com.

According to the report, there are well over 1 million active business customers for AWS around the world. AWS provides its ultra-efficient services with the help of over 8,000 partner network members and over 1,900 3rd party software and add-ons.

In addition, AWS operates through more than 18 infrastructure regions and over 52 availability zones placed in strategic locations worldwide.

This has allowed over 55,000 enterprise databases to be migrated to the AWS cloud. Each month, this immense global server network provides an impressive 70 million hours of run time to AWS customers.

This has boosted the AWS annual rate to over $30 billion. To ensure even smoother and safer services, Amazon introduced the AWS Nitro Enclaves.

What is AWS Nitro Enclave?

The AWS Nitro Enclave is a comprehensive system of server space that can be customized in several ways.

It gives the user to quickly devise and operate EC2 instances and provides increasingly advanced and versatile options for computing power, storage memory and networking solution.

What is AWS Nitro Enclave

What is AWS Nitro Enclave

In simple words, the AWS Nitro Enclave is a security extension especially designed for Amazon EC2 instances to process ultra-sensitive data in a secure and efficient manner.

It is an excellent option for enterprise customers to process private and confidential data in the safest way possible on cloud platforms.

There are several ways with which AWS customers can use various techniques to secure the data when in storage and while processing.

For instance, users can create custom keys to encrypt their data stored in Amazon S3 servers for more effective management.

Coincidentally, AWS already provides optimal security to data in its cloud servers, using conventional TLS and SSL encryption system.

Amazon also protects user data when it is being transferred between different services, such as between Amazon RDS and Amazon EC2.

How does AWS Nitro Enclave Protect Sensitive User Data?

Amazon Web Services are used by several industries that deal with sensitive data, such as life sciences, defense department, financial services as well as media and entertainment.

These industries regularly require storing and processing large volumes of confidential data on AWS cloud servers.

The security against breach of sensitive data, whether in storage or while processing, is of utmost priority to Amazon.

In addition, there are instances in which 3rd party vendors and partners default or there are disputes with customers and employees.

To remedy these problems, Amazon Web Services uses VPCs to make significantly detached processing systems that provide complete control to users and restricts access to only authorized users.

The AWS Nitro Enclave is the ideal solution for this. It is an excellent tool to configure isolated environments in EC2 instances that are supported by the AWS Nitro System.

The Nitro System has been around for a while and helps carve multiple isolated EC2 instances that run on the same hardware.

The AWS Nitro Enclaves is designed to isolate the EC2 instances even more.

This is done by compartmentalizing the CPU and storage of the common EC2 instance, which helps to protect ultra-confidential data and limits its access to other users or applications which share the instance.

What are the Advantages of Using AWS Nitro Enclaves?

The top-end security and flexibility of processing and storage of sensitive data are the two major advantages of using the AWS Nitro Enclaves.

AWS Nitro Enclaves provide a secure and flexible environment to process and store sensitive data. It is considered ideal to satisfy heavier production workloads as it gives the user complete control over allotment of storage memory and computing power for the isolated instance.

The flexibility of AWS Nitro Enclaves comes from the fact that each enclave operates an independent kernel with exclusive access to storage and computing resources.

Enclaves do not require external network connections, constant storage and can operate without the need for user access.

The isolated environment creates a local virtual socket (vsock) connection to provide a safe stream for data to flow in and out of enclaves. This connection ends at the EC2 instance.

Conclusion

In an increasingly competitive market, where data is the new gold, every major corporation is focused on providing a secure and efficient way to store and process sensitive data.

The AWS Nitro Enclaves is the perfect solution for such users as it provides completely isolated instances that have multiple security blankets and provides immense flexibility when it comes to assigning memory and CPU resources.

How to create an AWS Outpost ?

AWS Lambda Extensions

How AWS Lambda Extensions Work?

Amazon Web Services remains one of the largest computing and storage service providers in the world. It has introduced numerous add-ons and extensions to date. These have helped small and large businesses to streamline their business operations immensely. The AWS Lambda Extension is designed to provide an easy way to integrate Lambda with your choice of computer services.

In simple words, AWS Lambda Extensions are computing services that allow users to run codes without the need to provision or manage server space. Lambda from AWS executes your code only when the need arises. Thanks to its auto-scaling features AWS Lambda is also extremely flexible. It can run from a handful of requests to thousands of requests per second. This means that users are charged only for the computing time consumed and are not charged when there is no requirement to run codes.

Using AWS Lambda Extensions

AWS has made Lambda Extensions incredibly easy to use. Users with the basic knowledge of server computing can easily use the extension services.

This is the simple four-step procedure to explain how the AWS Lambda Extension works:

STEPS

  1. Users write code in Lambda’s code-editor or directly upload their code on AWS Lambda.
  2. Users set up codes for triggering from HTTP endpoints, in-app activity or other AWS services.
  3. AWS Lambda runs the code when it is triggered and uses only the required server resources.
  4. Users pay for the precise time-period it took to compute and run their codes
Using AWS Lambda Extensions

Using AWS Lambda Extensions

Features of AWS Lambda Extensions

These are the top features of AWS Lambda Extensions which have helped users to reduce their expenses and increase their efficiency to run codes:

1 – Custom Logic integrates other services with AWS

AWS Lambda supports custom logic with AWS resources, including Amazon DynamoDB tables and Amazon S3 buckets. This makes it easier to compute data as it is entered and transferred through the cloud servers.

2 – Customized on-demand back-end services

AWS Lambda allows users to create brand-new, customized back-end services for existing applications. These can be run on-demand with the Lambda API or custom API endpoints created on Amazon API Gateway. This feature helps to prevent variations in client platform, ensures easier updates and minimizes battery usage simultaneously.

3 – Create your own code

AWS Lambda is extremely easy to use. There is no need for users to learn a new language or tool as Lambda can be easily integrated with native and third-party libraries. It also allows users to write several codes, including SDKs, frameworks, libraries, etc, using Lambda Layer which helps to manage and share the codes easily across multiple platforms.

4 – Advantage of automated administration

The AWS Lambda Extension manages the entire IT infrastructure to run codes on freely available, error-resistant infrastructure. This lets users focus on creating effective back-end services. The extension does not need a special upgrade to release a patch, or resize server space, thanks to its incredible scalability.

5 – Amazing auto-scalability

The Lambda Extension from AWS is designed to use server space only when a request to run codes is made. It has incredible scalability and is made to handle varying loads of requests. This enabled it to configure the computing power accordingly.

Advantages of AWS Lambda Extensions

Check out the prime advantages of using AWS Lambda Extensions:

Server-Less Management

The extension runs your code automatically and does not require users to dictate the computing power for every request batch. Users can simply write the code and upload it to Lambda without the need to provision or manage server space.

Constant Scaling

Lambda Extensions are designed to automatically measure and adjust applications according to the response from individual triggers. The codes are run and compared with each trigger simultaneously which allows it to scale accurately, according to the request load.

Cost-Efficient Operations

AWS Lambda Extensions charge users for every 100 milliseconds of time that it took to run the code as well as according to the number of times the code is triggered. Thus, as users only have to pay for the computing time, this makes the extension an incredibly cost-efficient business tool.

Uniform Performance

Lambda from AWS allows users to optimize the code-execution process by choosing the correct memory space for each function. To get an even faster response, users can choose to activate Provisioned Concurrency and keep their functions tested and ready to run at a moment’s notice.

AWS Lambda has proven its excellence at cost-efficient computing and real-time code processing. Similar to other services from the company, the AWS Lambda Extension is another incredible efficiency-enhancing tool from Amazon.

Elastic Beanstalk vs Lambda

Create a model with SageMaker

Cloudflare AWS S3

Cloudflare AWS S3 

Amazon’s Simple Storage Service- S3 is a highly recommended service on the AWS platform. The service helps users to store content in the form of Buckets. Each bucket stores a variety of data for the users. The best thing about this service is you will be asked to pay for the storage space used by you. Reducing the data storage cost, it saves a lot of money in the monthly billing cycle. Sites that rely on AWS can be hosted on Cloudflare AWS S3. Let’s see how it is done!

Configuration of AWS S3 Buckets

A Bucket is a public cloud storage resource of the AWS S3 service. You can set up a separate Bucket for the main domain and for the subdomain. In this article, we will explain how you can set up AWS S3 Buckets on the subdomain and on the main domain.

Setting up an S3 Bucket for Subdomain and Root domain

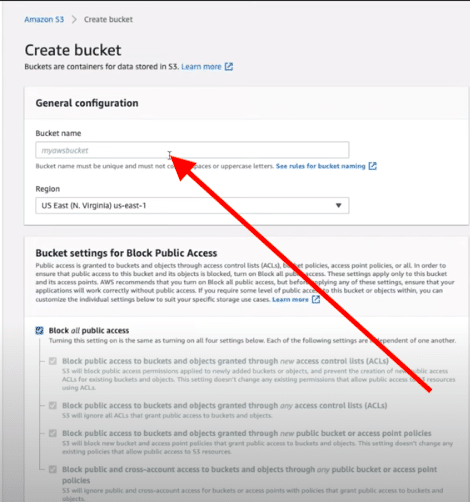
The first thing you need to do here is to create an S3 Bucket. You can create a new Bucket from the AWS Console page. Log into your AWS account and search for the S3 service. Select the Bucket option and then click the Create a new Bucket option.

Setting up an S3 Bucket for Subdomain and Root domain

Setting up an S3 Bucket for Subdomain and Root domain

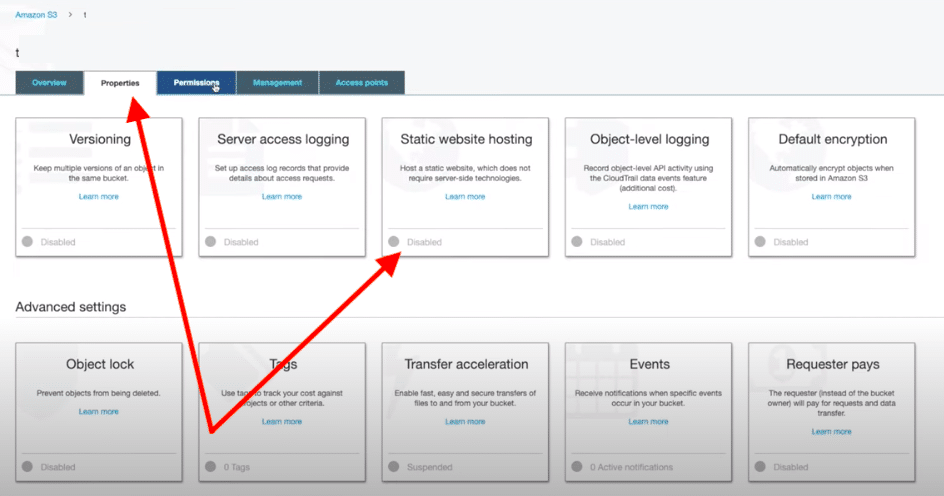
For better understanding, give a specific name to the newly created bucket. Once you create a bucket, you need to enable it for the static website. Go to the bucket and select the Properties option, select the Static Website Hosting option, and enable it.

Likewise, you need to follow the same steps for the main domain i.e. for the second bucket that you create for the main domain. You need to enable the Static Website Hosting option there as well. You need to be a little tech-savvy to do this, as it needs some additional changes while setting up a subdomain and domain with S3 Bucket for a new website.

Configuration of Cloudflare AWS S3

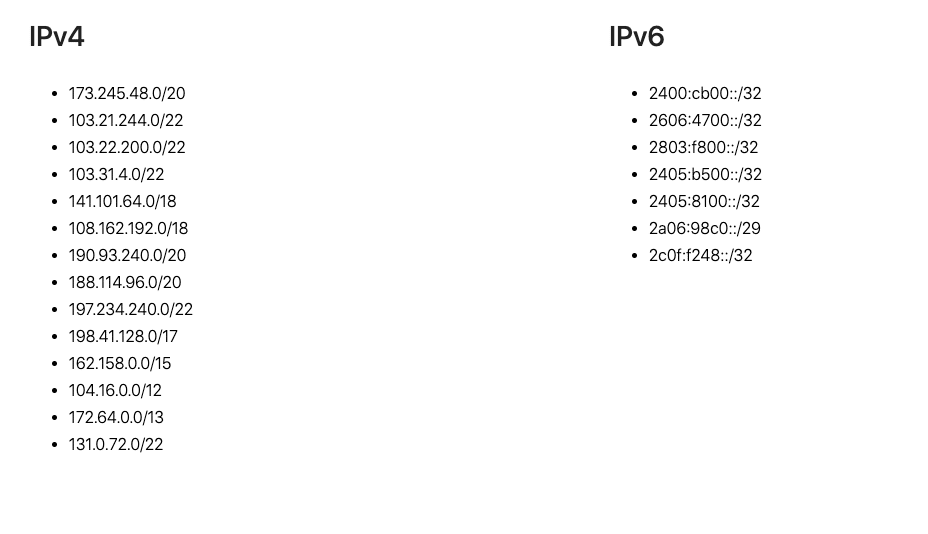
Until now, you have created your new Buckets using Amazon’s S3 service and also enabled hosting for them to behave as new websites. You need to setup Cloudflare Proxies so that the websites respond with Cloudflare’s IP addresses only. The list of working IP addresses of Cloudflare can be fetched from this link.

Configuration of Cloudflare AWS S3

Configuration of Cloudflare AWS S3

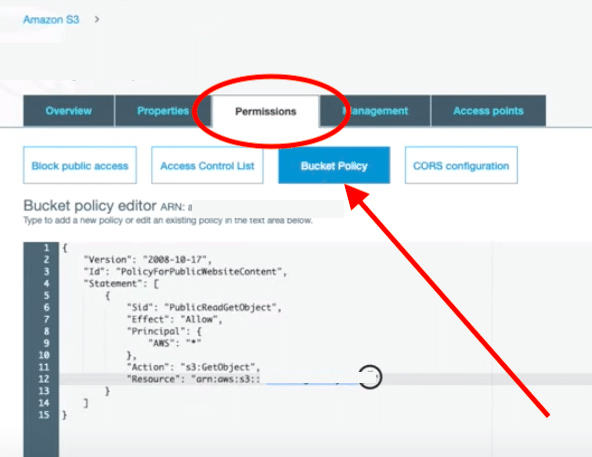
For the newly created Bucket, you need to add Bucket Policy. The following steps will give you more information about this.

Go to the AWS S3 service page and select the Bucket name created by you. From the Dashboard of the Buckets, click the Permissions tab, and then choose the Bucket Policy option.

Configuration of Cloudflare AWS S3 - 2

Configuration of Cloudflare AWS S3 – 2

Once you select the Bucket Policy Option, you will be presented with the editor window where you can enter the required code. Since we are setting up Cloudflare, you can copy and paste the below-given JSON code to the Bucket Policy Editor Window. If you know how to write JSON code, you can write up your own code in the editor window. For reference, you can use the below-given code.


{

  "Version": "2008-10-17",

  "Id": "PolicyForPublicWebsiteContent",

  "Statement": [

    {

      "Sid": "PublicReadGetObject",

      "Effect": "Allow",

      "Principal": {

        "AWS": "*"

      },

      "Action": "s3:GetObject",

      "Resource": "arn:aws:s3:::YOURBUCKETNAME/*”

    }

  ]

}

Setup new Website on Cloudflare with AWS S3

You need to locate the endpoint for each domain that you create to set up on Cloudflare. You can locate it from the Properties tab. Go to the AWS S3 page, select Bucket, and then choose Properties. From the Properties tab, select Static website hosting and then the Endpoint option.

Setup up new Website on Cloudflare with AWS S3

Setup up new Website on Cloudflare with AWS S3

Since you are going to set up a new website on Cloudflare, you must have an active account on Cloudflare. Go to the account by entering your username and password and then click the Add a domain to Cloudflare option.

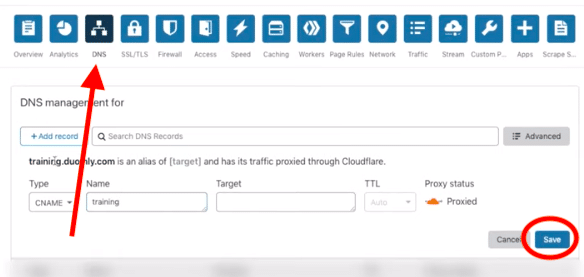
You need to create CNAME records for the main domain and the subdomain. From the Add a domain to Cloudflare page, select the DNS Query Results option. Here, you need to add CNAME records for each domain that you need to set up on Cloudflare.

Setup up new Website on Cloudflare with AWS S3 - 2

Setup up a new Website on Cloudflare with AWS S3 – 2

In the records tab, you will be asked to enter the name, value, and other important details for the domain and subdomain. Make sure to enter these details carefully as these details are directly associated with the domains.

Once you save the Records i.e. the name and value for the domain and root domain, you need to finish up the setup process by changing the nameservers to Cloudflare.

Uploading a Website to S3

You have successfully set up the S3 Buckets as web hosting. You have also set up the websites to work with Cloudflare. The last thing you need to do is upload a website to S3 to make it public.

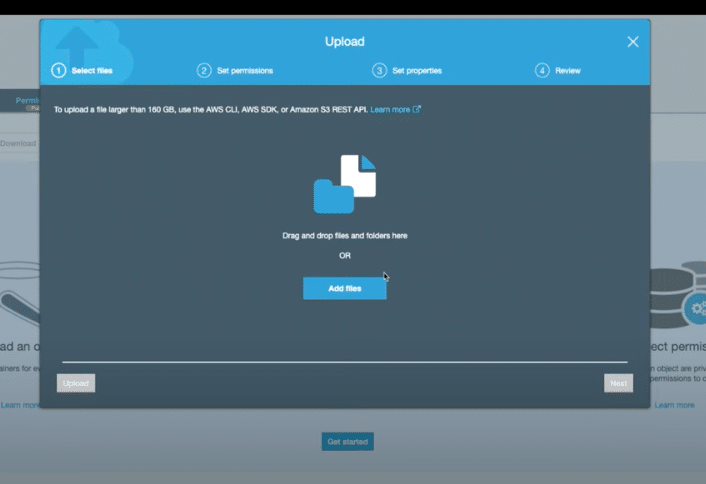
Go to the S3 Bucket option and select the View tab. From here, click the Upload option. From here, you can select files or drag and drop them from the Desk and then follow the on-screen instructions to save the data. You are allowed to set up permissions using the permissions window for each file that you create. Make sure you verify everything well before you hit the Save button.

Uploading a Website to S3

Uploading a Website to S3

Conclusion:

This is how you can create a new S3 Bucket and can set it up to act as a website with Cloudflare. The configuration process is a bit lengthy and it requires a focused person. Make sure you know how to set up a new website and configure a new domain on the platform. You can also follow video tutorials that will help you to set up Cloudflare AWS S3.

See Also

AWS S3 Bucket Cost

Configure Chime Webhooks on AWS