Configure S3 Bucket for Web Hosting

How to Configure S3 Bucket for Web Hosting

Amazon Web Service is the most secure and popular cloud services platform available for web users and developers. It’s a one-stop platform to get reliable cloud-based web services for a variety of purposes. Web-users and business owners can explore the different services offered by the platform at reasonable rates. In this article, we will show you to configure S3 Bucket for Web Hosting.

Before we jump on to the configuration process to host a new website with S3 Bucket, let’s collect some useful information about these terms first. 

What is Amazon S3?

Amazon S3 is one of the cloud-based services offered by AWS. The service is used to set up a storage mechanism for various objects used by the users. The use of Amazon’s S3 is necessary while hosting a new website as it can store all types of data such as documents, texts, images and more. To make use of this service, you need to create buckets i.e. S3 Buckets. 

Amazon S3 Buckets

A Bucket is nothing but a container for storing the objects of S3. Each object stored in a bucket. The buckets can have space for domains that are unique in their nature. The domain names will not be matched with any other domains as they are independent and unique. The domain name has a specific URL which can be accessible by the user. 

With the familiar nature of generating a domain name to registering it over the web, S3 Buckets need to be configured first. Once the web hosting with the S3 bucket is configured, we can upload the content to these buckets. We are here to learn about Configuring S3 Bucket for Web Hosting. The following step by step guidelines will help you out. 

How to Configure S3 Bucket for Web Hosting?

Step 1: 

You can’t have access to Amazon’s Web Services if you do not have your account registered. Make sure you first register your personal AWS Account by fill in all the details. You would be asked to add your personal details along with the credit card details to register a new AWS account. 

Step 2: 

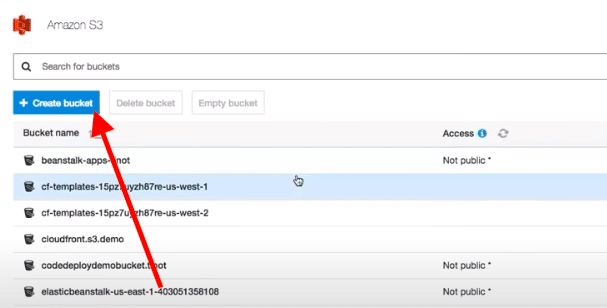
Once your account is registered, kindly log into your AWS account and click on the Services option. Select the S3 service from the given page. And then select the Create Bucket button. 

Step 3: 

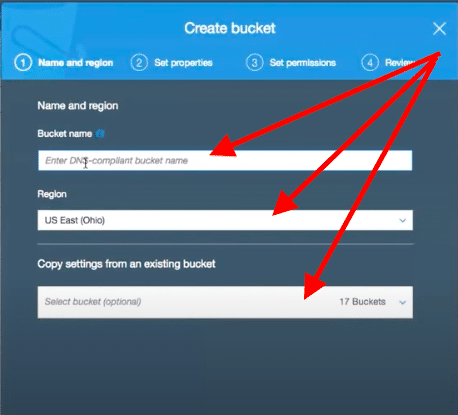
The Bucket Creation form will be presented to you on your screen. Enter a unique name for the bucket. You need to follow the on-screen instructions to create a new S3 Bucket. 

Configure S3 Bucket for Web Hosting - Step 3

Configure S3 Bucket for Web Hosting – Step 3


Step 4: 

Since we are going to host a new static website with this bucket, you need to keep the access of the website available for the public. The configure option tab lets you set this permission. 

Configure S3 Bucket for Web Hosting - Step 4

Configure S3 Bucket for Web Hosting – Step 4

Credit @blogs.perficient.com

Step 5: 

At last, click the Create Bucket button. The Bucket created by you can now be accessed by the public.

This is how you can create a new S3 Bucket for web hosting. Now, you have to configure this bucket manually. For that, you need to follow a few more steps. 

Step 6: 

Go to the S3 Bucket created by you from the Services tab. Click the Properties tab to configure the bucket for the static website. 

In this section, you will be asked whether to enable or disable the Static Website Hosting or not. Make sure you enable the static website hosting option from this page. 
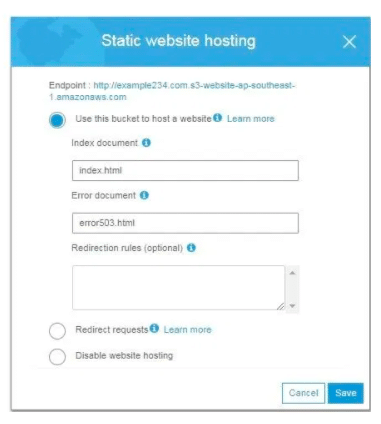
Configure S3 Bucket for Web Hosting - step 6

Configure S3 Bucket for Web Hosting – step 6

Step 7: 

The same page will have the Permissions tab of the Bucket created by you. From here, you can set up the permissions for the public access to your website or the domain created for the bucket. Make appropriate changes as per your requirements and then click the Save button. 
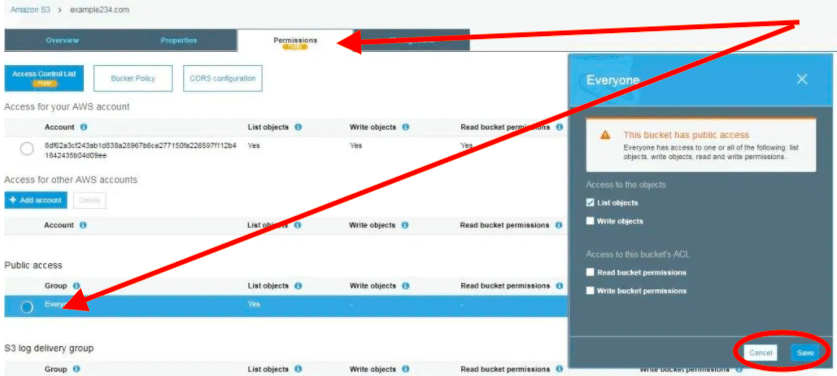
Configure S3 Bucket for Web Hosting - Step 7

Configure S3 Bucket for Web Hosting – Step 7

Credit @blogs.perficient.com

Step 8: 

Go back to the main page of the Bucket i.e. Amazon S3 Bucket and select the domain name created by you. 

Step 9: 

Click the Upload button to upload your website’s content. You can upload the website content in HTML or CSS. It also supports drag and drops functionality. If you have saved your Website’s Content on the desktop, you can simply drag the file to this section to get uploaded. 
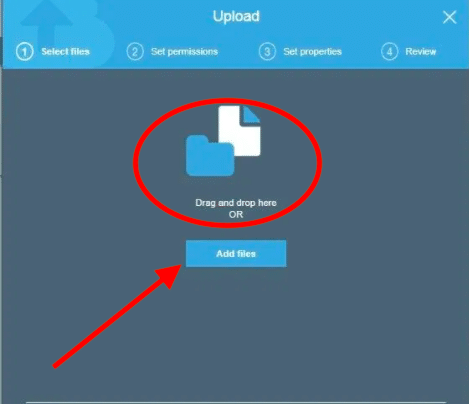
Configure S3 Bucket for Web Hosting - Step 9

Configure S3 Bucket for Web Hosting – Step 9

Step 10: 

Once everything is done, you can now have access to your newly created static website through S3 Bucket using the local server of AWS. You can also use the custom domain the same way and can use the Amazon S3 Buckets for storing the data. 

Conclusion:

This is how you can easily configure S3 Bucket for Web Hosting. Web designers and developers make use of the static website for testing purposes. They don’t need to buy a new domain every time just to test out things. The simple steps need to be followed to configure S3 Bucket for web hosting and to launch a new static website on the S3 Platform. 
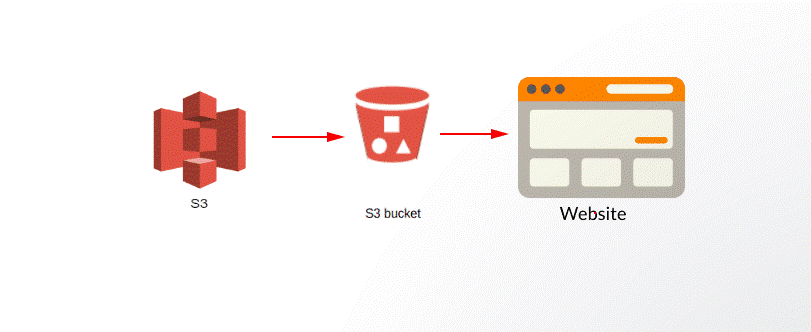
How to setup CloudFront for S3

AWS Storage Gateway Configuration

AWS Storage Gateway Configuration

Innovations in technology have changed the way enterprises used to deal with their daily operations. During the early days, enterprises were relying on a single physical platform. Gradually, they shifted to web platforms and now, most enterprises manage their data over the cloud platforms. Amazon Web Services offer a range of cloud-based services for enterprises and web users working in different fields. AWS Storage Gateway Configuration explained in this article.

What is AWS Storage Gateway?

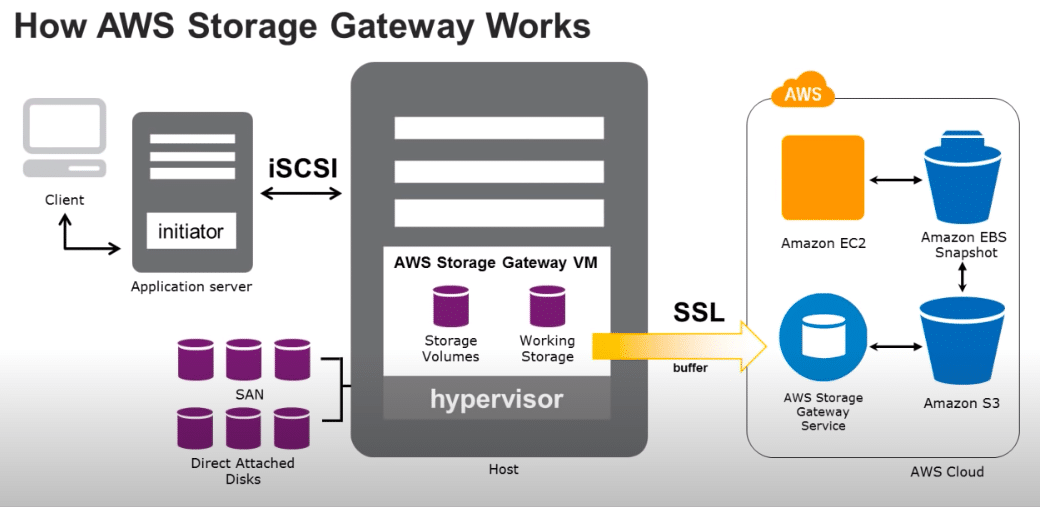
AWS Storage Gateway bridges the gap between the on-premises storage and cloud-storage service offered by AWS. AWS Cloud Services use AWS S3 and Amazon EBS for storing data of different sizes. The AWS Storage Gateway works with both types of data to simplify the process. All the data-related tasks can be done with this single service at the user’s end.

The AWS Storage Gateway stores data and files as native files of S3. It also stores EBS Snapshots with the help of the AWS EBS service. The S3 objects saved with Amazon Glacier within the same environment.

Before we jump on to the main configuration part, let’s get the details about the different types of Gateways offered by this service.

Three Types of AWS Storage Gateways

Type 1: File Gateway

This gateway behaves as a separate server for storing the data in S3 Objects. The file transfer process is done through SMB and NFS protocol access.

Type 2: Volume Gateway

This gateway can be deployed in two different ways, through cached volume and through dataset that resides locally. This type of gateway releases frequent snapshots. The snapshots store automatically in S3 objects for further use.

Type 3: Tape Gateway

This type of gateway uses local data that can be transmitted to Amazon S3 backups through S3 Objects, S3 Glaciers, and S3 Deep Archive.

How to Configure AWS Storage Gateway?

Make sure that you have an active AWS account registered with your username and password. If not, kindly create a new AWS account. Once the account is created, go to the AWS Management Console page and then go to the Storage services from which you need to select the Storage Gateway option.

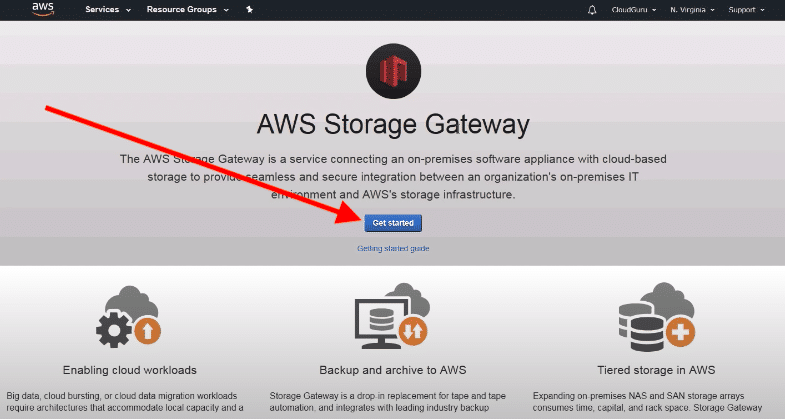
The AWS Storage Gateway’s front-page will be presented in front of you. You can read out all the information given about this service from here. Once done, click the blue-colored Get started button.

How to Configure AWS Storage Gateway

How to Configure AWS Storage Gateway


On the next page, the service will ask you to select the type of gateway for your next on-premises data storage. You will be presented with File Gateway, Volume Gateway and Tape Gateway options. Select the first option i.e. File Gateway from here.

Now, to host the selected Gateway, you will be presented with a list of available hosts. Depending on your current platform and requirements, you can select any of these hosts to get an image of the host. The downloaded file will be in ova file type. Eg. Here, we have selected the Amazon EC2 host platform.

The next page will be of adding storage. The Add Storage step will ask you how you would like to add new data. Click the Add New Volume button. After adding the file, click on to the Review and Launch button.

In the next step, you need to configure the final security group for the storage gateway. This must be enabled to keep the data of your storage safe and secured. You can configure the security group as per your requirements. Once done, click the Review and Launch button to launch the selected Instance of Amazon.

You will be taken to the main page of the Gateway where you would be asked to select the Amazon Instances option back. Since you have configured this gateway type, you don’t need to download the image file again. Select the Amazon EC2 option and then click the Next button.

In the next step, you need to set up the gateway to communicate with the AWS Services. Go back to the main page of the Amazon Storage Gateway service and select the “Select service endpoint” option from the left sidebar. Select the Public endpoint type and then click the Next button.

After this, you need to manually connect and activate this gateway with the help of the local host through the existing web browser app. Fetch the IP address of your system and enter the same on the main page of the Gateway service and click the Connect to Gateway button to establish a connection between the Gateway and the AWS Services.

You can configure and set up the other fields as per your knowledge and requirements from the same Gateway page. Select the appropriate option from the left sidebar and configure it by adding the Gateway number, IP address and other required details.

Conclusion:

The Amazon Storage Gateway is a very important service for web developers and designers to test out the live applications. Since users can use hybrid storage options, the implementation process of new data for the websites will become easier. The same service can be integrated easily with the existing storage services. Set up a new file gateway, establish a connection and start accessing the AWS Services!

AWS Billing

Posted in AWS

Setup Cloudfront for S3

AWS S3 is Amazon Simple Storage Service which is an object storage service that provides great scalability and faster performance. The best thing about this service is it can be used by all types of users to store and protect their critical data. Amazon’s Cloudfront works well with S3 to reduce the website’s loading time. By reducing the load on the main servers, the setup improves the site loading speed and keeps the data protected. Let’s see how can we Setup Cloudfront for S3. 

Key Benefits of Amazon Simple Storage Service i.e. S3

Top-notch Security

The storage buckets created with Amazon S3 can only be used by the persons’ who created them. During the creation, they have to create a personal identity to use them in the future. To make use of these buckets, you need to seek permission from the ones who created them. All the information will be given to the creator through notifications and detailed reports. It is very secured and provided top-tier security. 

Available for all

Amazon S3 is available for all types of users and not only for specific ones. It provides the same scalability, reliability and faster performance to each user whenever they use it for data storage and buckets creation. It comes with a standard availability of 99.99% resources. 

Quick Migration 

The data migration with S3 is pretty easy. It is compatible with different services when it comes to migrating the stored data over the cloud. The best part about this service is a user can easily transfer or receive a large amount of data from Amazon S3. 

Budget-friendly

What makes Amazon’s S3 more reliable storage service is it is very affordable. You won’t be charged extra for any services. You will be charged only for the data that you have used. The storage option is very cheaper and you can even use the built-in migration option to transfer the stored data to different servers. 

Easy Management

Amazon S3 serves a user-friendly interface with top-tier security to keep the data of the users protected. You can easily configure or set up this service with existing systems and can start backing up its data. All the cloud services can be accessed through Amazon S3 as it is compatible with all the standards. 

Now, to make your website run faster and to reduce the traffic load on the existing server, Cloudfront can be used with the S3. Let’s see how one can set up Cloudfront for S3. Here, we have created a step by step tutorial to understand the setup procedure of Cloudfront for S3. 

How to Setup Cloudfront for S3?

Step 1: Bucket Creation

The first, thing you need to do here is creating an S3 Bucket. To do so, you need to go to the AWS Console first and then create an S3 Bucket. 

Setup Cloudfront for S3 - Bucket Creation

Setup Cloudfront for S3 – Bucket Creation

Setup Cloudfront for S3 - Create Bucket

Setup Cloudfront for S3 – Create Bucket

Go to: AWS Services>> Search for S3>> Amazon S3 Management Page>> Click + Create bucket 

Step 2: Uploading the Bucket

Once you create a bucket, the next thing you need to do here is uploading it to the Cloudfront. You need to create a demo file to upload the bucket. Since you are creating it for the first time, it will take a while to complete the process. 

Setup Cloudfront for S3 - Uploading the bucket

Setup Cloudfront for S3 – Uploading the bucket

Go to: Amazon S3>> Open the Cloudfront.Demo>> Click Upload button 

Note: You can also click on the Create Folder option to create a new folder of files that you want to upload to the Cloudfront. 

Step 3: Open Cloudfront

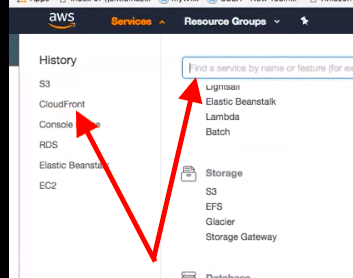
Click on to the Services tab from the top-front and select Cloudfront from the left sidebar. 

Setup Cloudfront for S3 - Open Cloudfront

Setup Cloudfront for S3 – Open Cloudfront

Step 4: Search for Networking

From here, click the Search bar and search for Networking and Networking Incontinent Delivery option. 

Step 5: Cloudfront Distribution

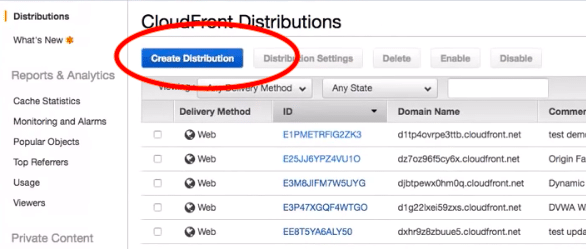
You need to click on to the Create Distribution button from this page.  

Setup Cloudfront for S3 - Cloudfront distribution

Setup Cloudfront for S3 – Cloudfront distribution

Step 6: On-page Instructions

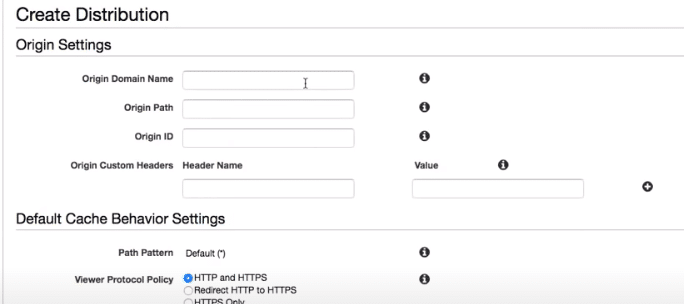
Now, follow the on-page instructions by filling in the given form. Make sure you add the right information there such as the domain name, origin path, origin id and other information must be correct. 

Setup Cloudfront for S3 - On page instruction

Setup Cloudfront for S3 – On page instruction

Step 7:

Once the Cloudfront Distribution is created, it would show up on the main screen of Cloudfront’s services. You can check it by clicking on to its name. 

Step 8: Create Custom Error Response

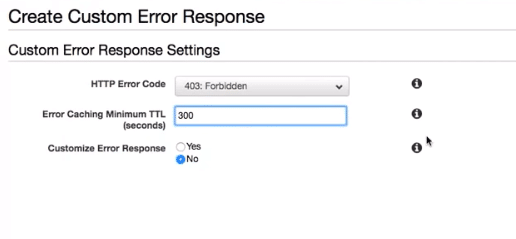
Now, you must create an error response for the website by selecting the error code. Click the Create Custom Error Response option, select the error code and enter the custom message on your own. 

Setup Cloudfront for S3 - Create custom Error response

Setup Cloudfront for S3 – Create custom Error response

You can also manage the Geo Restriction and many other functions of your website right from this page. You can use the additional plug-in to work with the S3 Buckets easily. 

Conclusion:

That’s all about the Setup of Cloudfront for S3. Thankfully, there are many readily available templates there for the users. These templates can be used by anyone simply by selecting them from the given page. What you can do here is just follow the given steps and start creating an S3 bucket for Cloudfront to make your website run smoother. 

Locking an S3 Object

Amazon Elastic container Service for Kubernetes

Amazon Elastic Container Service for Kubernetes

Amazon Elastic Container Service for Kubernetes – Overview

Being an open-source container tool, Kubernetes helps developers to design applications based on containers. Amazon Elastic Container Service for Kubernetes is more reliable than any other service provider. If you are searching for a new container service provider for Kubernetes Application development, then Amazon’s Elastic Container Service should be the right option for you.

Amazon Web Services is the world’s largest cloud platform for web developers and designers. The hub offers over 175 managed cloud services from trusted providers to the clients working in different industries. The demand for Containerized applications designed with Kubernetes is increasing rapidly.

Many popular companies such as Intel, GoDaddy, Autodesk, Snap, etc. do use their applications based on Kubernetes. The applications designed with Kubernetes provide high security with better scalability and reliability. Before we jump into the list of benefits of Amazon’s ECS, let’s find out the actual meaning of this term.

What is Elastic Container Service?

Elastic Container Service i.e. ECS is a popular container management platform. It is highly scalable and is known for its world-class performance working with different containers. It supports the Dockers containers that make it easier for the developers to run and test different applications based on Amazon’s EC2 Instances.

What is Elastic Container Service

What is Elastic Container Service

With the help of this service, you do not need to search for any other tools or platforms. You don’t need to scale or manage the infrastructure as everything will be managed by this service automatically.

You can use Amazon’s ECS for a variety of purposes throughout your project. To learn more about this service, let’s check out some of the benefits that you will get from using it.

Benefits of Using Amazon Elastic Container Service for Kubernetes

Simplified Work Process

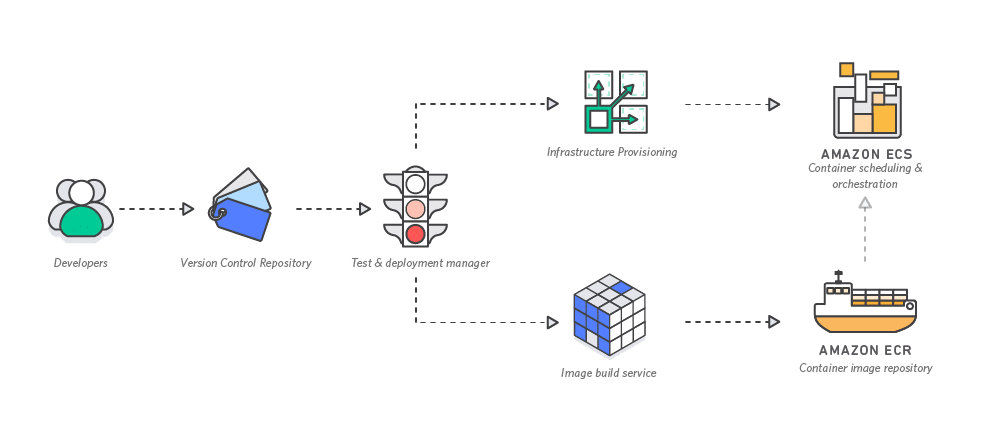
Amazon ECS works as an automated platform with which a developer or a programmer can use the containers as building blocks during the development process of applications. It eliminates the need for additional work such as the installation of the blocks, scaling of the project and constant monitoring. The service uses dock containers to manage everything automatically.

Simplified Work Process

Simplified Work Process

Easy Deployment of Containers

The service works with the Dock Containers that make it easier for the developers to deploy the containers in the application development process. The same platform helps developers to install and manage other microservices together so that they don’t have to interrupt the on-going process.

Simple API

Amazon ECS lets you easily integrate its service with the current infrastructure. It maintains the availability of applications that decides the basic requirements of resources. Anyone can easily integrate Amazon’s ECS with the existing software to manage and schedule the application development process on Kubernetes.

Easy Management

The Amazon ECS works with a range of tools and applications. The built-in scheduler helps developers manage long-running applications easily. The services associated with all the long-running applications can also be managed well with this service. It should be more familiar for the developers, rather than using any other fresh platform for Kubernetes Application Development.

Benefits of Using Amazon Elastic Container Service for Kubernetes - Easy Management

Benefits of Using Amazon Elastic Container Service for Kubernetes – Easy Management

Managed Containers

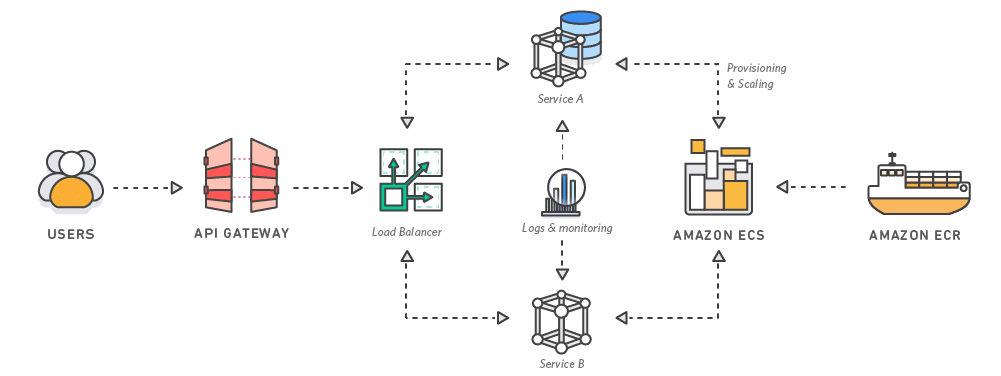
The service works with automated tools that distribute a load of containers to different blocks resulting in a smooth process. It uses Elastic Load Balancing to distribute loads between the containers and blocks. The service itself registers the load balancer and de-register it when not in use. It also consumes fewer resources than other services which makes it cost-effective.

Benefits of Using Amazon Elastic Container Service for Kubernetes - Managed Containers

Benefits of Using Amazon Elastic Container Service for Kubernetes – Managed Containers

Recovery Process

What makes Amazon’s ECS more reliable to new users is it recovers the containers automatically. Some containers can have issues that can be figured out using the ELB health check program. The ECS helps such containers in recovery without additional tools or help from external resources. You can have the option to stop such unhealthy containers from consuming the data and other resources.

Improved Scalability

The best thing about Amazon’s ECS is its scaling process. The service can easily scale up the containers. You are allowed to select the containers on which you are going to run the application and then scape them up with this service to figure out the end-process. With this, you can add a built-in scheduler to help the process fetch the required containers to accomplish the development process.

Conclusion:

Amazon’s Elastic Container Service for Kubernetes is the most advanced service designed for Kubernetes application development. It supports hybrid deployment with the help of the latest Machine Learning technology. It comes with a range of built-in tools and an easy API for quick integration with the existing system software. It’s worth using a service if you are working with the Kubernetes.

See Also

AWS Cost Explorer

Why is AWS Migration Calculator so Important

Why is AWS Migration Calculator so Important?

Cloud computing is probably one of the most significant technological advances since the invention of the internet. The technology has drastically improved the process of data storage and processing worldwide. Millions of small and large companies and organizations across the world have moved their enterprise database and applications from conventional servers to cloud servers. One of the most prominent reasons for companies to shift to a cloud platform is the incredible ease of access to data that the technology provides. If you are on the verge of choosing to shift your enterprise data and applications to the cloud platform, we suggest you try the online AWS Migration Calculator and get a more accurate estimate of the total cost of migration. 

It is estimated that companies allocate around 30% of their It budget for cloud-based services. According to a report, the worldwide public cloud computing market is set to reach US$ 330 billion by the end of 2020. Another report by 451 shows that around 90% of companies already use some form of cloud service and as much as 83% of the workload is handled by cloud technology today. The industrial leader is Amazon Web Services (AWS), with a 32% market share of the global public cloud computing market. 

AWS has become the top favorite of enterprises and organizations for cloud technology because the company offers over 140 services to its clients worldwide. 

Why should you migrate to AWS Cloud Services?

Amazon Web Services, since its launch in 2006, has helped numerous small and large enterprises to make their business operations more efficient with a smooth and seamless transition from on-site servers to the cloud platform. Some of the major brands that have already moved to AWS cloud are Coca-Cola Company, General Electrical (GE), Samsung, British Petroleum (BP), Enel, Twenty-First Century Fox, NewsCorp and others. By choosing to shift to cloud technology, all these companies reported significant savings in IT costs as well as improvement in business operations, such as enhanced productivity, agility in business and resilient operations. 

Cloud migration to AWS involves moving any workload from an on-site server base or hosting facility and even another public cloud platform. Thousands of small and large enterprises have migrated their websites, applications, storage, database, virtual and physical servers and even entire data centers onto to AWS cloud platform. 

On one hand, AWS cloud services offer incredible scalability, security and ease-of-data-access while on the other hand, the migration process itself is quite complicated. Business IT experts advise considering several points before deciding to move your database and applications from on-site servers to AWS cloud platform. 

Cost is one of the most common factors when deciding to shift enterprise applications and data from conventional servers to cloud technology. As compared to conventional IT infrastructure costs, the price of operating and maintaining a cloud-based IT environment is significantly less. Still, it helps to prove the feasibility of the migration when you can get an accurate estimate of the cloud migration costs for your business applications. 

This is where AWS Migration Calculator comes handy.

How does AWS Migration Calculator help?

Amazon Web Service’s Cloud Migration Calculator is an excellent way to figure out the cost estimate which suits your particular business requirements when it comes to the AWS cloud platform. 

The AWS Migration Calculator is an online tool that helps business owners to get an accurate estimate of the cost of cloud migration process according to their current and potential requirements for IT resources. 

Once you access the online AWS Cloud Cost Calculator, there are three simple steps you need to follow to get a precise cost estimate of AWS cloud services for your enterprise.

STEPS

  • Access AWS Migration Calculator – You can perform a simple Google search for “AWS Migration Calculator” or directly visit the official Amazon Web Services website. This is an excellent tool to estimate the cost of AWS products and services. 
  • Choose Services – Find and add cloud computing and storage services that you will require for your enterprise IT infrastructure. You can perform an internal IT audit and find the cost and requirements for IT resources by your business and enter the relevant configuration. 
  • Configure Services – After selecting every service, you will be presented with a slew of options with finer configuration details. Choose a precise configuration according to your existing and potential needs.


Bottom Line

Once you submit your choices, the AWS Migration Calculator will promptly display an estimate of the costs of individual services, service groups and the total cost of migrating to, operating and maintaining a cloud-based IT infrastructure. 

Cloud Migration Cost Calculation

Cloud Computing Cost

Cloud Cost Benefit Analysis

4 Financial Benefits of Moving to Cloud

Cloud computing offers immense agility, scalability and cost-efficiency for running and storing enterprise databases and applications. Our comprehensive cloud cost benefit analysis will prove it too. Millions of small and large companies have already adopted one or more cloud-based services into their operations. The majority of leading brands in the retail and entertainment industries have shifted their business database and applications completely to the cloud platform. 

Here are some quick stats to show just how immense and beneficial cloud technology is for those seeking efficiency and scalability as well as cost-savings in their business operations. 

How is Cloud Computing Beneficial?

According to a report by 451, around 90% of companies globally used one or more cloud-based services with an estimated 60% workload being handled by cloud technology. By 2021, Cisco estimates that cloud data centers will be processing 94% of the workload of business applications. According to Statista, the revenue from the global cloud computing market reached US$ 258 billion in 2019 and is expected to grow exponentially to an astonishing US$ 623.3 billion by 2023. In this, the largest public cloud market is the US which spent around US$ 124.6 billion in 2019, according to IDC

These cloud cost benefit analysis figures prove that cloud technology is the future of the web. Hence, increasing numbers of businesses are choosing to shift their business applications and database to cloud servers from conventional on-premise servers. Although there are numerous benefits of moving to cloud technology, one of the most prominent one is its cost-efficiency. Every enterprise owner knows the importance of capital, especially when investing in a decision that calls for a dynamic shift from in-house servers to the cloud platform. 

How is Cloud Computing Cost-Efficient?

Operating an on-premise IT infrastructure involves frequent server crashes, software bugs, coding errors, employing an in-house IT team and expensive upgrades to maintain your enterprise IT architecture. Some of the aspect of in-house IT infrastructure which frequently incurs charges are:

  • Network 
  • Software 
  • Hardware 
  • Security 
  • Disaster recovery

As your business grows, your IT resource needs will also grow in proportion. This makes the operation and maintenance of on-site server banks expensive and time-consuming. 

However, with cloud technology, there are hosts of advantages and financial benefits to be had. Our cloud cost benefit analysis report shows the major financial benefits of adopting and using cloud technology for enterprise applications and databases.

1 – Make full use of hardware

Cloud computing supports virtual services and brings a natural economy of scale with it. There is no need to purchase new hardware and equipment when you make the move to cloud platforms. The cloud servers provide you with sufficient hardware to suit your requirements. 

Apart from avoiding the charges of buying new hardware equipment, the cloud platform also makes long-term operations more cost-efficient with the “pay-as-you-go” payment model which charges users only for the IT resources that were used. Conventional server databanks are made to handle storage data at maximum workload limits, which eventually racks up significant charges when the complete hardware resources are not in use. 

2 – Lower utility bills and carbon footprint

Conventional server banks require immense power for operating round-the-clock. As the business grows, the number of servers is increased to get more processing power. This leads to higher energy bills. However, moving your enterprise applications to the cloud platform helps to drastically cut down the carbon footprint of your business and reduce your electricity bills noticeably. 

3 – Decrease operational cost of business

Every business has a unique perspective on getting the best ROI from cloud technology. Mostly the Operations Expenses (OpEx) and Capital Expenses (CapEx) are considered to estimate cloud ROI. However, according to a report by Forrester, more than 50% of the total cost of cloud migration consists of labor and not infrastructure expenses and platform service charges. 

However, when you chose to hire professional cloud migration service providers, you can cut down on operational costs significantly. In addition, the cloud platform is likely to cut down your IT staff as it is a completely managed service. 

4 – Lower cost of capital and investment

Conventional on-site servers require investing significant capital. On the other hand, cloud services provide higher utilization and scalability, which requires noticeably low capital investment. There is numerous small and large expense associated with maintaining and operating on-premise data banks. 

However, with cloud technology, companies can save significantly on capital expenses and use these savings by investing it in the core aspects of the business. 

Bottom Line

These are the four major points from our comprehensive cloud cost benefit analysis study. If you are considering shifting your enterprise applications to cloud servers, make sure to hire experienced migration consultants to ensure a smooth and seamless migration process.

cloud computing cost analysis

cloud migration cost