AWS Load Balancer Pricing - 3 types of Load Balancer

AWS Load Balancer Pricing

AWS Load Balancer Pricing

AWS Load Balancer Pricing - How Load Balancing Works

AWS Load Balancer Pricing – How Load Balancing Works

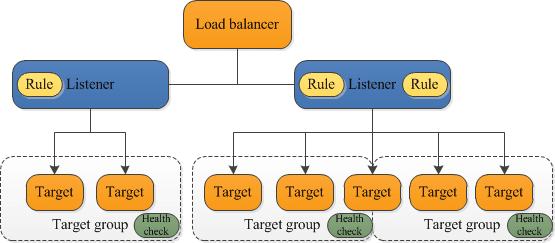
The advantages of using a load balancer will dominate whatever amount of AWS Load Balancer pricing you get charged with. With load balancers, you will get your incoming application traffic sent with elastic load balancing over various EC2 instances. The benefits are amazingly as follows:

– This will inevitably reduce your traffic.

– It offers you the necessary load balancing capacity required for distributing traffic.

– It will identify any unhealthy instances and directly start rerouting traffic to healthy ones, till the time that the unhealthy instances get restored.

– It will allow you to reach the best level of fault tolerance.

Elastic Load Balancing may be used within single or multiple AZs to ensure better app performance. It may as well be utilized in a VPC for distributing traffic between app tiers in a pre-defined virtual network.

  1. AWS Load Balancer Pricing: Classic Load Balancer

    AWS Load Balancer Pricing - Elastic Load Balancer

    AWS Load Balancer Pricing – Elastic Load Balancer

Elastic Load Balancing charges you according to your usage. It bills you for every hour or partial hour of a running elastic Load Balancer. It also charges you for every GB of data that you transfer using the elastic load balancer. When every month comes to an end, you are going to be billed for your actual usage of Elastic Load Balancing resources.

Partial hours will be charged for as regular full hours. There will be regular EC2 service fees that are separately billed.

Region Price per elastic load balancer-hour or partial hour Price per GB of data processed
China (Ningxia) Region ¥ 0.156 ¥ 0.072
China (Beijing) Region ¥ 0.156 ¥ 0.072


  1. AWS Load Balancer Pricing: Application Load Balancer

    AWS Load Balancer Pricing - Application Load Balancer

    AWS Load Balancer Pricing – Application Load Balancer

Application Load Balancers charge you according to your usage. It bills you for every hour or partial hour of a running Application Load Balancer. It also charges you for the amount of used Load Balancer Capacity Units.

Region Price per application load balancer-hour or partial hour Price per LCU-hour or partial hour
China (Ningxia) Region ¥ 0.156 ¥ 0.072
China (Beijing) Region ¥ 0.156 ¥ 0.072


Partial hours will be charged for as regular full hours. There will be regular EC2 service fees that are separately billed.


  1. AWS Load Balancer Pricing: Network Load Balancer

    AWS Load Balancer Pricing - Network Load Balancer

    AWS Load Balancer Pricing – Network Load Balancer

Network Load Balancers charge you according to your usage. It bills you for every hour or partial hour of a running Network Load Balancer. It also charges you for the amount of used Load Balancer Capacity Units.

Partial hours will be charged for as regular full hours. There will be regular EC2 service fees that are separately billed.

Region Price per network load balancer-hour or partial hour Price per LCU-hour or partial hour
China (Ningxia) Region ¥ 0.156 ¥ 0.072
China (Beijing) Region ¥ 0.156 ¥ 0.072


Which type of Load Balancer offers the least expensive AWS Load Balancer Pricing?

AWS Load Balancer Pricing - Classic Vs Application Load Balancer

AWS Load Balancer Pricing – Classic Vs Application Load Balancer

You should first know that the Application Load Balancer is similar to the classic elastic load balancer that everyone is familiar with and admire. However, it has been boosted with a strong portion of Micro Service cordial steroids making it filled with loads of exquisite features like the ones below:

– Request Tracing

– Containerized App Support

– Content-Based Routing

The component that is quite striking is the content-based routing. With application load balancers, you will have the simplicity and accommodation of Elastic Load Balancing while also obtaining an outstanding path-based routing solution. It’s the ideal arrangement that will make every user’s life easier.

Application load balancers are the best choice to go with. There is no need for you to keep managing extra servers and constantly worrying about whether its recovery or HA. Content routing is offered to you by AWS.

Classic Load Balancers= $0.028 / hour.

Application Load Balancers= $0.0252 / hour.

AWS Load Balancer Pricing - How Application Load Balancer Saves Money

AWS Load Balancer Pricing – How Application Load Balancer Saves Money

This might not seem as such a hard thing to think about. However, the billing method of Application load balancers have been changed by AWS where a new unit, called the LCU Load Balancer Capacity Units, has been added. This LCU unit takes the highest values of the below mentioned metrics:

– Bandwidth in Mbps

– Active connections per minute

– New connections per second

Hence, as you work with load balancing, you’ll notice that the calculation will start turning somewhat complex. For example, to calculate your pricing, check the below example:

Application Load Balancer = $0.0252/h * 24 hours * 5 ALBs = $3.02 per day

Classic Load Balancer = $0.028 p/h * 24 hours * 50 ELBs = $33.60 per day


Clearly, after this calculation, you can notice that it would be much cheaper and more convenient for you to work with application load balancers.

You can go to the AWS Lightsail console to start working with load balancers and creating an AWS Lightsail Load Balancer.

AWS Lightsail – Create a Disk


AWS SDK Metrics - SDK Metrics in Coding

AWS SDK Metrics

AWS SDK Metrics


The AWS SDK for Java can generate AWS SDK Metrics are generated for the sake of gaining better visualization. It also allows you to perform monitoring using CloudWatch for measuring:

  • App performance when accessing AWS
  • JVMs performance when used with AWS
  • Details for runtime environment. For example: number of threads, opened file descriptors and heap memory.

Keep in mind

You can also use the SDK Metrics for Enterprise Support in order to get your application’s metrics. SDK Metrics is a service offered by AWS for publishing data to CloudWatch. It permits you to get metric data shared with Support for a more efficient and simplified troubleshooting process.

Enabling AWS SDK Metric Generation:

AWS SDK metrics will be disabled by default. For the sake of enabling it for your environment, you need to add a system property which show where your security credential file is upon the JVM startup. Just like the below example:

-Dcom.amazonaws.sdk.enableDefaultMetrics=credentialFile=/path/aws.properties

Declare your credential file’s path in order to get the found datapoints uploaded to CloudWatch to analyze them.

Keep in mind

In case you want to access AWS using an EC2 instance from EC2 instance metadata service, it’s not required of you to set a credential file. For this, you will merely have to set the following:

-Dcom.amazonaws.sdk.enableDefaultMetrics

Every captured metric using the SDK will be found below namespace AWSSDK/Java, then they get uploaded to the default region for CloudWatch, which is us-east-1. For the sake of altering regions, you can set them with the cloudwatchRegion attribute. Utilize the below statement for setting your CloudWatch region to us-west-2:

-Dcom.amazonaws.sdk.enableDefaultMetrics=credentialFile=/path/aws.properties,cloudwatchRegion=us-west-2

Upon enabling the feature, metric data points are going to be generated whenever there occurs a service request to AWS from the SDK. Also they get queued for statistical summary, as well as uploaded in an asynchronous manner to CloudWatch each minute. Upon uploading those metrics, they can be visualized through AWS Management Console. You can also get alarms set on possible errors like leakage of file descriptor or memory. To know more about Cloudwatch alarms you can check the EC2 Instances: Status Check Alarms guidline.


How to get AWS SDK Metrics from CloudWatch?

AWS SDK Metrics - AWS SDK Metrics from CloudWatch

AWS SDK Metrics – AWS SDK Metrics from CloudWatch

Ways for listing AWS SDK Metrics:

For the sake of listing CloudWatch metrics, you will need to get a ListMetricsRequest created. After that, the AmazonCloudWatchClient’s listMetrics method should be called. The ListMetricsRequest may be used for the sake of filtering returned metrics based on metric names, dimensions or namespace.

Keep in mind

A list of available dimensions and AWS SDK metrics can be found posted by services.

The Imports needed

import com.amazonaws.services.cloudwatch.AmazonCloudWatch;import com.amazonaws.services.cloudwatch.AmazonCloudWatchClientBuilder;import com.amazonaws.services.cloudwatch.model.ListMetricsRequest;import com.amazonaws.services.cloudwatch.model.ListMetricsResult;import com.amazonaws.services.cloudwatch.model.Metric;

The Coding

final AmazonCloudWatch cw =    AmazonCloudWatchClientBuilder.defaultClient(); ListMetricsRequest request = new ListMetricsRequest()        .withMetricName(name)        .withNamespace(namespace); boolean done = false; while(!done) {    ListMetricsResult response = cw.listMetrics(request);     for(Metric metric : response.getMetrics()) {        System.out.printf(            “Retrieved metric %s”, metric.getMetricName());    }     request.setNextToken(response.getNextToken());     if(response.getNextToken() == null) {        done = true;    }}

When the getMetrics method is called, you will get the metrics returned in a ListMetricsResult.

Results can get paged.

In order to get the following batch of results, the setNextToken needs to get called on the original request object. It’s return value should be the ListMetricsResult object’s getNextToken method. The modified request object should be passed to a different call to listMetrics.


Available AWS SDK Metrics Types:

There is a default set of AWS SDK metrics separated into 3 main types.

What are Request AWS SDK Metrics?

AWS SDK Metrics - Request AWS SDK Metrics

AWS SDK Metrics – Request AWS SDK Metrics

They are the metrics capable of covering areas like:

– The number of requests

– The retries

– The latency of the HTTP request and response

– The exceptions

What are Service AWS SDK Metrics?

AWS SDK Metrics - Service AWS SDK Metrics

AWS SDK Metrics – Service AWS SDK Metrics

They are the metrics that include service-specific data. For example, the byte count and the throughput of S3 downloads and uploads.

What are Machine AWS SDK Metrics?

AWS SDK Metrics - Machine AWS SDK Metrics

AWS SDK Metrics – Machine AWS SDK Metrics

They are the metrics capable of covering the runtime environment. As well as heap memory, the open file descriptions, and the amount of threads.

For not including Machine Metrics, you can add the parameter of excludeMachineMetrics to your system property as follows:

-Dcom.amazonaws.sdk.enableDefaultMetrics=credentialFile=/path/aws.properties,excludeMachineMetrics

AWS java application

AWS Java Application - SDK for Java Application

AWS Java Application

AWS Java Application

In the following article, you will learn the steps for building and running a local AWS Java Application for AWS resources. You will be working with the AWS Toolkit for Eclipse.


Keep in mind

The samples directory in the SDK download gives you the SDK for Java Samples. The SDK for Java Samples may be seen on GitHub as well.


How to Build and Run the Simple Queue Service Sample for your AWS Java Application?

For the sake of building and running the Simple Queue Service sample for your AWS Java Application, go through the below steps:

1. Select from the Eclipse toolbar the AWS icon, then choose the option New AWS Java Project.

2. Enter a unique name in the box of Project name box then select the option Amazon Simple Queue Service Sample.

AWS Java Application - Create an AWS Java Project

AWS Java Application – Create an AWS Java Project


3. Select Finish.

4. Project Explorer will show you the sample application. Start expanding this project’s tree view.

5. Click two times on the SimpleQueueService.java source file, under src node. Once you access it from editor pane, search for the below code line:

System.out.println(“Receiving messages from MyQueue.\n”);

6. Use the right-click mouse button to press on editor pane’s left margin, then choose Toggle Breakpoint.

7. Now right-click in Project Explorer on the project node. Choose the Debug As > Java Application.

8. For the box of Select Java Application, pick the SQS application then choose the OK action.

9. As soon as this application reaches the breakpoint and stops, you will be asked if you’d like to go to Debug perspective. When this happens, select the option No.

10. Open AWS Explorer then get the node for Amazon SQS expanded.

11. Click two times on MyQueue then check the queue’s created contents.

AWS Java Application - AWS Explorer MyQueue

AWS Java Application – AWS Explorer MyQueue


12. Click on the F8 keyboard command. You will see as the Java client application keeps on running then naturally get terminated.

13. When you’re in AWS Explorer click refresh. Now, you can find that MyQueue queue has disappeared; The queue gets deleted by the application prior to its exiting.

Keep in mind

There should be a minimum of 60 seconds wait between the deletion of a queue and the creation of a new one holding its name.


Naming of AWS Resources for your AWS Java Application:

When creating products, you can simplify things by making sure that your resources are being kept separate. The ones that are for development should be separate from those that are for production purposes. A particular way to do so was mentioned in the article of Setting AWS Credentials, which talked about utilizing separate accounts, ones for development and ones for production resources. This can be very helpful when working with AWS Explorer, since your resources will be shown according to your account credentials. Here we will talk about a different method that can be used in terms of coding as well.

The whole purpose is to uniquely identify resources, like S3 buckets or SimpleDB domains, with a designated string value to each resource name.

This means that you should name your Amazon SimpleDB domain as “customers-dev” instead of giving it a general name like “customers”. Hence, you name your domain as “customers-dev” when it is meant for development purposes, and “customer-prod” when it is intended for production purposes.

AWS Java Application - Project Explorer

AWS Java Application – Project Explorer

The below method gets exposed by StageUtils:


public static String getResourceSuffixForCurrentStage()


The method of getResourceSuffixForCurrentStage gets back a string corresponding to the “stage” of a specific resource which could be for example “prod” or “beta” or “dev”. This means that the getResourceSuffixForCurrentStage may be used for setting resource names.


private String getTopicName (Entry entry) {

return "entry" + StageUtils.getResourceSuffixForCurrentStage() + "-" + entry.getId();

}

The Java system property gets you the value which is an output of getResourceSuffixForCurrentStage, “application.stage”. This value may be declared when you set the system property in the Elastic Beanstalk container configuration.


How to access the Container/JVM Options panel?

  1. Open AWS Explorer, click the node for AWS Elastic Beanstalk and then the node of your application.
  2. Under your application node, click two times on your Elastic Beanstalk environment.
  3. Scroll to the end of the Overview pane, and go to the tab labeled Configuration.
  4. Inside Container, start configuring the options of the container.
  5. For Additional Tomcat JVM command line options, add a -D command line option for entering a value for the application.stage system property. The below syntax specifies the need of the string value to be set as “-beta”.

-Dapplication.stage=beta

getResourceSuffixForCurrentStage will prepend a hyphen to a chosen string value.

AWS Java Application - Container JVM Options

AWS Java Application – Container JVM Options

6. Upon adding the value for the system property, open File menu, then select Save. Your new configuration will be saved, and your application restarts. To see the event for the deployment of the configuration to the environment, head to the bottom Eclipse editor at Events tab.

7. When the application finishes restarting, select to open the node for Amazon SimpleDB under the AWS Explorer. The new domains which you set shall be displayed now having the same string value you entered.

AWS Java Application - Amazon SimpleDB under AWS Explorer

AWS Java Application – Amazon SimpleDB under AWS Explorer

To access your AWS Elastic Beanstalk console and create an environment, go to this link https://us-east-2.console.aws.amazon.com/elasticbeanstalk/home?region=us-east-2#/welcome.

Spring framework on AWS

AWS Serverless Project - AWS Toolkit for Eclipse to Create Serverless Project

AWS Serverless Project

AWS Serverless Project

There is a project creation wizard in Toolkit for Eclipse where you get to swiftly start creating and configuring your AWS Serverless Project. Such a project can be deployed on CloudFormation, and it will start running Lambda functions. The functions come as responses to RESTful web requests. To learn more about Lambda Functions, take a look at the AWS Lambda How to Create A Function tutorial.

How to Create an AWS Serverless Project?

To create an AWS Serverless Project, go over the below steps:

  1. Click on the AWS icon found in the toolbar. Select the option New AWS serverless project.

    AWS Serverless Project - Project Name, Namespace and Blueprint

    AWS Serverless Project – Project Name, Namespace and Blueprint

2. Fill in a particular Project name.

3. Fill in the project’s Package namespace. It is the prefix for your project’s source namespaces.

4. Make a choice between Select a blueprint or Select a serverless template file:

Select a Blueprint

Pick a pre-defined project blueprint.

Select a Serverless Template File

Pick a file of JSON-formatted SAM .template to get a completely customized project.

5. Click on Finish for creating the project.

AWS Serverless Project - Create a New Serverless Java Project

AWS Serverless Project – Create a New Serverless Java Project

What does the AWS Serverless Project Wizard Include?

AWS Serverless Project Blueprints:

Below you can check the available project Blueprints.

– article

It can create an S3 Bucket to store your article’s content. It also creates a DynamoDB Table for its metadata. Inside of it, you will find 2 Lambda functions: one for finding an article, named GetArticle and another one to store the article, called PutArticle. API Gateway events will trigger those Lambda Functions.

– hello-world

It is simply used for creating a Lambda function taking one string as value. The output of this function is:

Hello, value

The value parameter represents the entered string. The default value is “World” when there is no entered string.


What is the Structure of an AWS Serverless Project?

When you use the AWS Serverless Project wizard, you will get a newly created Eclipse project. It is made up of the below parts:

  • There are 2 sub-directories in the main src directory. Every one of those sub-directories, has a prefix made up of the selected Package namespace:

mynamespace.function

Here you can find class files defined by the serverless template for Lambda functions.

mynamespace.model

Here you can find generic classes of ServerlessInput and ServerlessOutput. Those classes are capable of declaring your function’s models of input and output.

Keep in mind

Your project’s lambda functions and resources are declared in the serverless.template file. It’s a resource which represents the type “AWS::Serverless:Function”.


How to deploy an AWS Serverless Project?

Follow the below steps for deploying your AWS Serverless Project:

  1. From the window for Eclipse’s Project Explorer, pick the project you created then go to the context menu.
    AWS Serverless Project - Project Explorer

    AWS Serverless Project – Project Explorer


  2. Select Amazon Web Services ‣ Deploy Serverless Project. Now you will get the dialog called Deploy Serverless to AWS CloudFormation.
  3. Pick which AWS Regions you’d like. This is for setting where the deployed CloudFormation stack will be.
  4. Pick an S3 Bucket for storing your Lambda function code. You can even create a new one by clicking the Create button.
  5. Enter your CloudFormation stack name.
  6. Choose Finish for uploading Lambda functions to S3. This will also start deploying the selected project template to CloudFormation.

    AWS Serverless Project - Deploy Serverless to AWS Cloudformation

    AWS Serverless Project – Deploy Serverless to AWS Cloudformation

The deployment dialog:

After deployment of your project, you will find the deployment’s status and info on a CloudFormation stack detail window. The first deployment status is going to be CREATE_IN_PROGRESS to show that the process of creation is taking place. Activated deployment of the selected project takes place when CREATE_COMPLETE is set as its status.

To head to the same window again, you need to go to the AWS Explorer. From there, choose the node of AWS CloudFormation. After that, choose the stack you set.

AWS Serverless Project - AWS Cloudformation

AWS Serverless Project – AWS Cloudformation

Keep in Mind

Stack might get rolled back in case of any deployment error.

You can access the AWS CloudFormation console to check your available stacks or to create a new one.

AWS cloud computing

Setting AWS Credentials - AWS Credentials

Setting AWS Credentials

Setting AWS Credentials

You must start by setting AWS Credentials for your account before anything else. Using Amazon Web Services with the Toolkit for Eclipse, requires configuration. The Toolkit for Eclipse should be first configured with your account credentials.


Setting AWS Credentials for getting AWS access keys:

What makes up your access keys are the secret access key and the access key ID. You refer to them when signing for programmatic AWS requests. For creating your access keys, you need to go to the AWS Management Console to start the process. IAM access keys are more efficient than AWS root account access keys. With IAM you will be able to safely take control over the access to resources and services in your account.

Keep in Mind

Permissions for performing necessary IAM actions are needed for creating access keys. To learn how to set policies for certain permissions, go over the AWS IAM Console: Create A Policy tutorial.

For receiving your access key ID as well as your secret access key, follow the below steps in setting AWS Credentials:

  1. Head to the IAM console.
    Setting AWS Credentials - IAM Users

    Setting AWS Credentials – IAM Users


  2. From navigation pane, select Users.
  3. Click on your personal IAM user name.
    Setting AWS Credentials - Select Personal IAM User Name

    Setting AWS Credentials – Select Personal IAM User Name


  4. From Security credentials tab, click on the option Create access key.
    Setting AWS Credentials - Security Credentials Tab

    Setting AWS Credentials – Security Credentials Tab


  5. For viewing you new access key, click on Show. You will get credentials similar to the ones below:

    Setting AWS Credentials - Create Access Key

    Setting AWS Credentials – Create Access Key

– Example Access key ID: KITOIOSFODSS7EXAMPLE

– Example Secret access key: wLalrXUtmFELI/K7RDEBG/bPxFirSTEXAMPLEKEY

6. For downloading your key pair, click on Download .csv file. You must keep the keys stored in a safe place.

Keep in Mind

Make sure your keys are confidential for keeping your AWS account secure. Remember not to ever send them by email. Keep them strictly within your organization, regardless of any inquiries that seem from Amazon.com or AWS. Amazon never sends anyone to question you for your secret key.


Setting AWS Credentials and adding access keys to the Toolkit for Eclipse:

Keep in Mind

Your credential file’s location may get changed when needed.

In case your credentials were set through AWS CLI, then they will be directly found and used by the AWS Toolkit for Eclipse.

For setting AWS Credentials and adding access keys to the Toolkit for Eclipse, follow the below steps:

  1. Head to Eclipse’s Preferences dialog box, then from the sidebar choose AWS Toolkit.
  2. Paste or fill in access key ID into the box for Access Key ID.
  3. Paste or fill in secret access key into the box for Secret Access Key.
  4. Select the action Apply or OK for storing your access key data.

Below you can check how a configured set of default credentials would look like:

Setting AWS Credentials - Configured Set of Default Credentials

Setting AWS Credentials – Configured Set of Default Credentials

Multiple accounts with Toolkit for Eclipse:

With the dialog box of Preferences you can add info for multiple accounts. This could be useful for offering administrators and developers differing resources for their work in development and publication or release.

Profiles are the sets of credentials stored in the shared credentials file. Profiles that get configured will be shown in the top drop-down box of the Toolkit Preferences Global Configuration page, named Default Profile.

How to add new access keys for Setting AWS Credentials?

  1. From the screen of AWS Toolkit Preferences in Eclipse’s dialog box for Preferences, select the option Add profile.
  2. Enter account details to the section named Profile Details.

Enter a unique Profile Name, then type in access key info into the boxes named Access Key ID and Secret Access Key.

  1. Choose the action of Apply or OK for storing access key info.

For adding even more account info, keep repeating the previous steps.

At the point when you have entered the entirety of your AWS account data, select the default account by picking a specific account from the drop-down menu for Default Profile. AWS Explorer shows resources related to the default account. Whenever another app is created with the Toolkit for Eclipse, the app utilizes credentials for the default account which was configured.

Setting AWS Credentials - Default Profile drop-down

Setting AWS Credentials – Default Profile drop-down

How to change credentials file location?

The location for storing and loading credentials can be altered with the screen of Toolkit for Eclipse Preferences.

Setting AWS Credentials file location:

Setting AWS Credentials - Setting Credentials file location

Setting AWS Credentials – Setting Credentials file location

For the dialog of Toolkit Preferences, head to the section named Credentials file location. Type in or paste the destination file’s pathname for storing the credentials.

Keep in Mind

Always avoid storing any of your AWS credential data in an insecure environment which may put your data at risk.

role creation for SAML 3.0 federation

AWS Neptune Parameter Group - Amazon Neptune Console

AWS Neptune Parameter Group

AWS Neptune Parameter Group


How to create an AWS Neptune Parameter Group or a DB Cluster Parameter Group?


  1. Login to the Management Console, then go to the Neptune console using this link https://console.aws.amazon.com/neptune/home.
    AWS Neptune Parameter Group - Parameter Groups on Neptune Console

    AWS Neptune Parameter Group – Parameter Groups on Neptune Console


  2. Select Parameter groups from the navigation pane.
  3. Select Create DB parameter group.

    AWS Neptune Parameter Group - Create Parameter Group

    AWS Neptune Parameter Group – Create Parameter Group

You will now see the page for creating an AWS Neptune Parameter Group, Create DB parameter group.

  1. From the list of Type, select DB Parameter Group or DB Cluster Parameter Group.
    AWS Neptune Parameter Group - Enter Parameter Group Type

    AWS Neptune Parameter Group – Enter Parameter Group Type


  2. For the box of Group name, fill in a specific name for your DB parameter group.
  3. In the Description box, fill in a distinctive description for your DB parameter group.

    AWS Neptune Parameter Group - Enter Parameter Group Name and Description

    AWS Neptune Parameter Group – Enter Parameter Group Name and Description

  4. Click on Create.


How to edit a DB Cluster Parameter Group or an AWS Neptune Parameter Group?

  1. Login to the Management Console, then go to the Neptune console using this link https://console.aws.amazon.com/neptune/home.
  2. Select from the left navigation pane, Parameter groups.
  3. Select the needed DB Parameter group’s Name link to start editing.

You can optionally select Create parameter group for creating a cluster parameter group. After that, select the new parameter group’s Name.

Keep in Mind

The optional step above will become required to be done you are using the default DB cluster parameter group. This is because you’re not capable of modifying the default DB cluster parameter group.

  1. Click on Edit parameters.
  2. Specify the value for the parameters which need to be altered.
  3. Select Save changes.
  4. Now, you must reboot all Neptune DB instances.


Parameters Used for Configuring Amazon Neptune:

AWS Neptune Parameter Group Parameters


  • neptune_enable_audit_log: Enable or disable audit logging.

Default Value: 0

Values: 0 for disabled and 1 for enabled.


  • neptune_enforce_ssl:   Where HTTP connections are allowed, every connection to your DB cluster will use HTTPS when this parameter is set as 1.

Default Value: 1

Values: 0 for disabled and 1 for enabled.


  • neptune_lab_mode:   For adding experimental features.

Default: None are enabled.

Values: (feature name)=enabled or (feature name)=disabled

Commas can be used to add more than one feature, such as:

(feature #1 name)=enabled, (feature #2 name)=enabled


  • neptune_query_timeout: Specifies a specific timeout duration for graph queries, in milliseconds.

Default value: 120,000 (2 minutes).

Values: 10 to 2,147,483,647 (231 – 1).


  • neptune_streams: Toggling Neptune Streams.

Default: 0

Values: 0 for disabled and 1 for enabled.


create-db-parameter-group: Create a New AWS Neptune Parameter Group


What is the Synopsis?

create-db-parameter-group–db-parameter-group-name <value>

–db-parameter-group-family <value>

–description <value>[–tags <value>][–cli-input-json <value>][–generate-cli-skeleton <value>]


What are the Options?


–db-parameter-group-name: It is a string

Names the DB parameter group.

What are the Constraints for name?

  • 1 to 255 characters.
  • A letter should be the 1st
  • No hyphen at the end and no two hyphens after another.


–db-parameter-group-family: It is a string

Name of the DB parameter group family.


–description: It is a string

Describes the DB parameter group.


–tags: It is a list

Given to the new DB parameter group.

Represents a structure of metadata given to a specific Neptune resource which has a key-value pair.

– Key: It is a string

Represent the tag name of the tag.

– Value: It is also a string

Represents the optional tag value.

The Syntax:

Key=string,Value=string …

The JSON Syntax:

[  {    “Key”: “string”,    “Value”: “string”  }  …]

To learn more about tags, you can check the AWS Tagging guidelines.

–cli-input-json: a string which will perform service operation according to which JSON string is given.

–generate-cli-skeleton: a string which will print a JSON skeleton as an output with no API request.


What is the Output?


DBParameterGroup: It is a structure

Shows details about a specific Neptune DB parameter group.

It is a response to the action called DescribeDBParameterGroups.


DBParameterGroupName: It is a string

DB parameter group’s Name.


DBParameterGroupFamily: It is a string

Name of the DB parameter group family to which the chosen DB parameter group gets compatible with.


Description: It is a string

The description which is given by the customer for this DB parameter group.


DBParameterGroupArn: It is a string

The DB parameter group’s ARN.

Creating a notebook with AWS Neptune