Create an SNS Topic - Featured Image

3 Best Ways to Create an SNS Topic

Create an SNS Topic

What is an Amazon SNS topic?

It is a logical access point. It works as a form of communication channel. It allows you to group various endpoints. For example, SQS, Lambda, an email address or HTTP/S.

When do you Create an SNS Topic ?

The very first step to do in Amazon SNS is to get a topic created.

In this tutorial you will learn how to use the Management Console, the SDK for Java, and the SDK for .NET for creating a topic.


If you want to Create an SNS Topic with the Management Console, go through the below steps::

  1. Login to the Amazon SNS console.
  2. Do one of the following:
    • In the case that not any of the topics have ever been created under your AWS account before, read the description of Amazon SNS on the home page.
    • In the case that some of the topics were previously created using your AWS account, from navigation panel, click on the option Topics.
      Create an SNS Topic - Topics

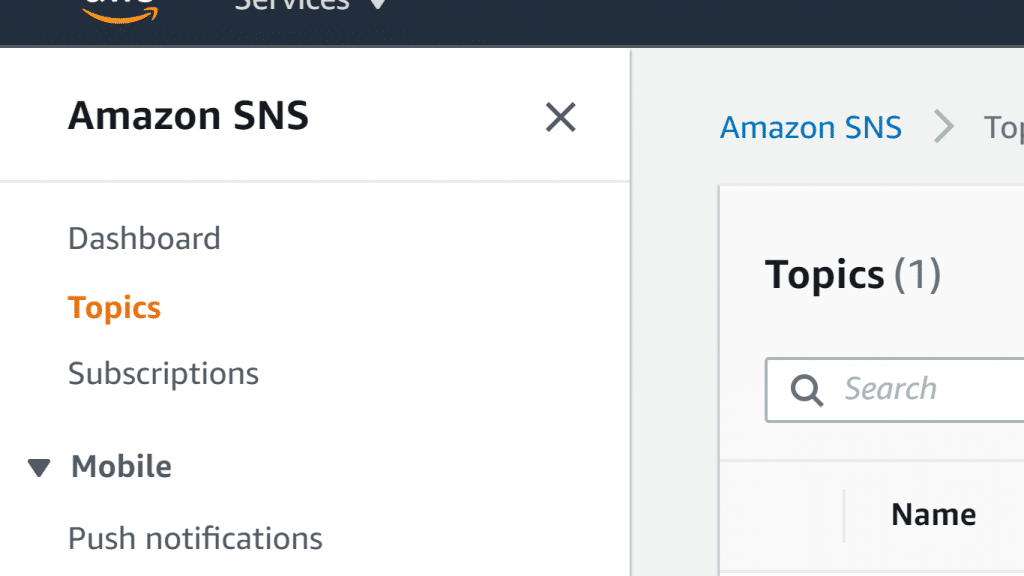
      Create an SNS Topic – Topics


  3. For the section named Create topic, fill in a Topic name, such as MyFirstTopic.
    Create an SNS Topic - Topic Name

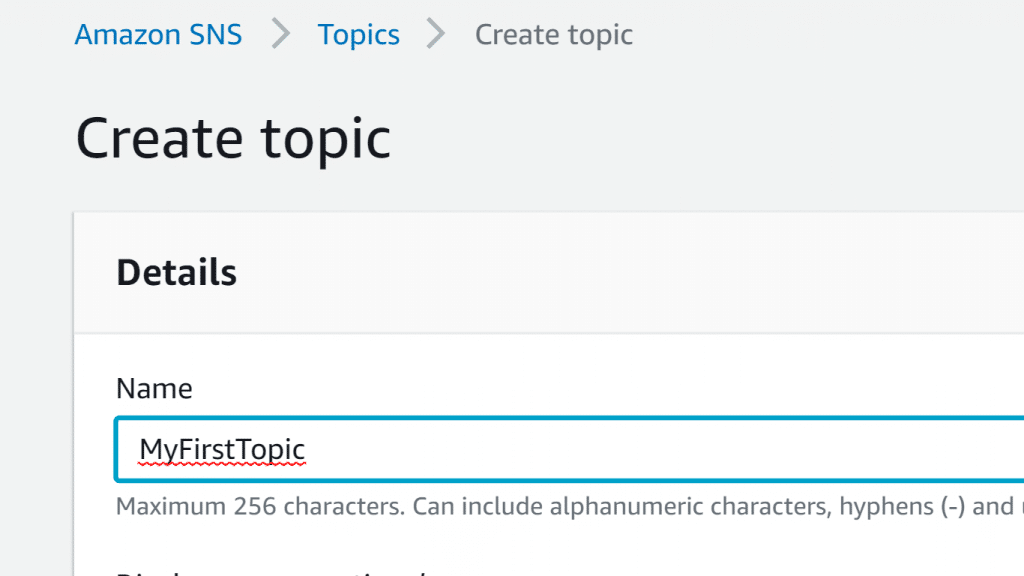
    Create an SNS Topic – Topic Name


  4. You can optionally open the Encryption section and go over the below steps.

    Create an SNS Topic - Encryption

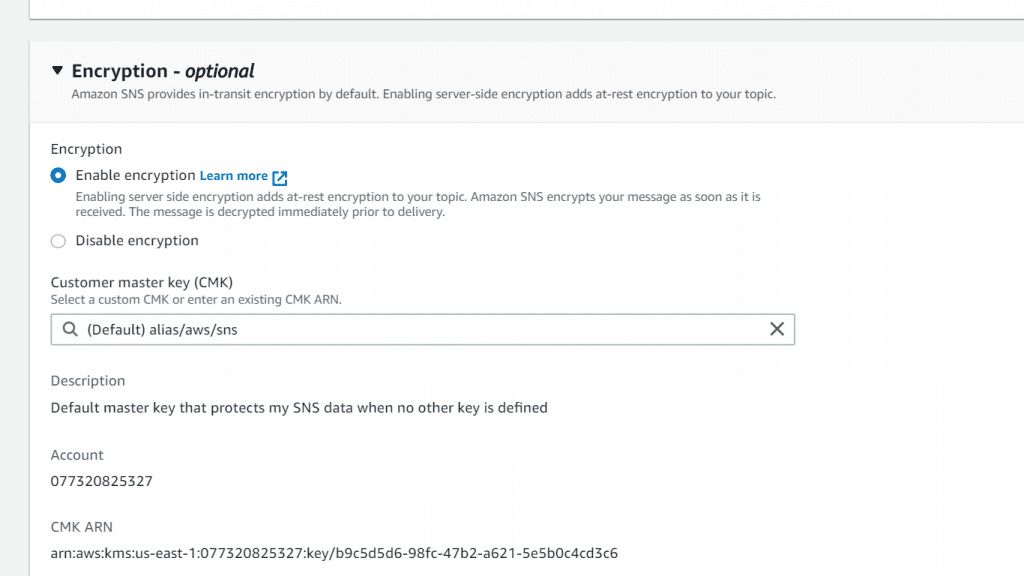
    Create an SNS Topic – Encryption

  • Click on the option Enable encryption.
  • Set the CMK, which is short for customer master key.

For each CMK type, the DescriptionAccount, and CMK ARN are displayed.

Important

In the case that you were not the CMK owner, or in the case that you’re logging in with an account with no kms:ListAliases and kms:DescribeKey permissions, you won’t be able to view information about the CMK on the Amazon SNS console.

You should tell the owner of the CMK to give you the required permissions.

      • By default, the AWS managed CMK will be set for SNS as (Default) alias/aws/sns.

Keep in mind

Remember the below:

– When you use the Publish action on a topic with SSE enabled for the very first time, KMS will create the managed CMK for SNS.

– When you utilize the Management Console for setting the managed CMK for SNS for a specific topic, KMS will create the managed CMK for SNS.


– For utilizing a custom CMK using your own AWS account, click on the option showing the field of Customer master key (CMK). Then, select the custom CMK out of the listed ones.


Keep in mind

You can check the needed instructions on how to create Asymmetric CMKs and Symmetric CMKs.

      • For the sake of utilizing a custom CMK ARN using your own AWS account or using a different one, type it down in the field of Customer master key (CMK).

5. The topic owner is the one who is set by default to subscribe to or publish the topic. You can optionally configure more access permissions, by simply expanding the section for Access policy.

Create an SNS Topic - Access Policy

Create an SNS Topic – Access Policy

Keep in mind

Upon creating a topic through the console, you will find that the default policy utilizes the condition key of aws:SourceOwner. It is like the aws:SourceAccount.

6. You can optionally configure the way SNS tends to retry any failed attempts of message delivery. To do so, simply expand the section called Delivery retry policy (HTTP/S).

7. You can optionally configure the way SNS will start logging the delivery of messages to CloudWatch. To do so, simply expand the section named Delivery status logging.

Create an SNS Topic - Delivery Status Logging

Create an SNS Topic – Delivery Status Logging

8. You can optionally start adding metadata tags to the topic by expanding the section called Tags. There you can go ahead and fill in a Key and a Value, then click on the option Add tag.

Create an SNS Topic - Add tags and Create

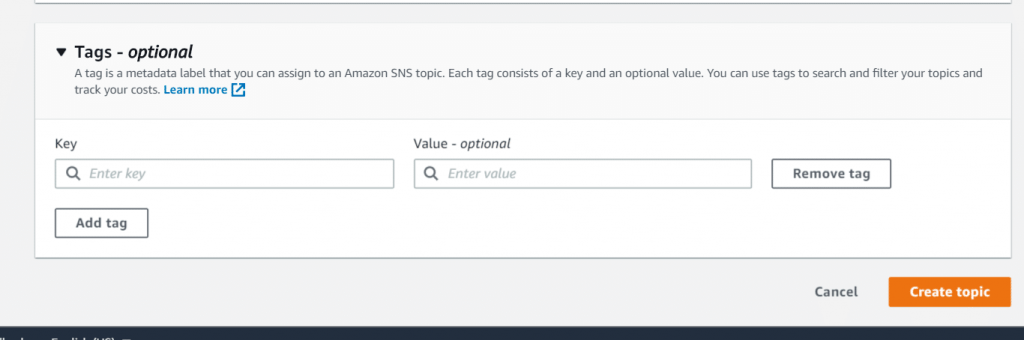
Create an SNS Topic – Add tags and Create

9. Click on the option Create topic.

The topic will get created and the page called MyFirstTopic will be displayed.

In the section called Details, you will find the topic’s Name, the ARN, its Display name, and the Topic owner‘s AWS account ID.

10. Finally, you will have to copy the topic ARN to the clipboard, which will look as follows:

arn:aws:sns:us-east-2:123456789012:MyFirstTopic


If you want to Create an SNS Topic through the AWS SDK for Java, go through the below steps::

  1. Setting your credentials.
  2. Typing your code.

Below you will find a code excerpt which is going to create the topic MyFirstTopic. After that it will print the topic ARN as well as the CreateTopicRequest request ID for a request which has been executed earlier and turned out to be successful.

// Here we are creating an SNS topic.

final CreateTopicRequest createTopicRequest = new CreateTopicRequest("MyFirstTopic");

final CreateTopicResponse createTopicResponse = snsClient.createTopic(createTopicRequest);


// Here we are printing the topic ARN.

System.out.println("TopicArn:" + createTopicResponse.getTopicArn());


// Here we are printing the request ID for the action of CreateTopicRequest.

System.out.println("CreateTopicRequest: " + snsClient.getCachedResponseMetadata(createTopicRequest));

3. Now, start compiling and running the code.

The topic will get created. Also, the topic ARN as well as the CreateTopicRequest request ID will get printed, such as follows:

TopicArn: arn:aws:sns:us-east-2:123456789012:MyFirstTopic

CreateTopicRequest: {AWS_REQUEST_ID=1234a567-bc89-012d-3e45-6fg7h890123i}

4. The topic ARN may be assigned to a String variable for utilizing it in extra operations, such as follows:

final String topicArn = "arn:aws:sns:us-east-2:123456789012:MyFirstTopic";


If you’d like to Create an SNS Topic with the AWS SDK for .NET, go through the below steps:

  1. Setting your AWS credentials.
  2. Typing in your code.

Below is a code excerpt which is going to Create an SNS Topic MyFirstTopic and later on print the topic ARN as well as the CreateTopicRequest request ID.

// Here we are going to Create an SNS Topic.

CreateTopicRequest createTopicRequest = new CreateTopicRequest("MyFirstTopic");

CreateTopicResponse createTopicResponse = snsClient.CreateTopic(createTopicRequest);


// Here we are printing the topic ARN.

Console.WriteLine("TopicArn: " + createTopicResponse.TopicArn);


// Here we are printing the request ID for the action of CreateTopicRequest.

Console.WriteLine("CreateTopicRequest: " + createTopicResponse.ResponseMetadata.RequestId);

3. Now, it’s time to get your code compiled and running.

The topic will become created and you will find that the topic ARN and CreateTopicRequest request ID will get printed, such as follows:

TopicArn: arn:aws:sns:us-east-2:123456789012:MyFirstTopic

CreateTopicRequest: 1234a567-bc89-012d-3e45-6fg7h890123i

4. It’s possible to get the topic ARN assigned to a String variable for utilizing it in more operations, such as:


String topicArn = createTopicResponse.TopicArn;

AWS SNS Topic

Purchasing Savings Plans - Savings Plans Featured Image

Choosing Between the 2 Types of Purchasing Savings Plans

Purchasing Savings Plans


How to evaluate recommended Savings Plans using the Recommendations page?

Given recommendations would be calculated specifically to simplify your choice when purchasing savings plans that are the most ideal and efficient and can save you better than the rest of the plans.

Purchasing Savings Plans:  Recommendations page

  1. Login to the AWS Management Console. Then head straight to the AWS Cost Management console at https://console.aws.amazon.com/cost-management/home.
    Purchasing Savings Plans - AWS Cost Management Console

    Purchasing Savings Plans – AWS Cost Management Console


  2. From navigation pane, from below Savings Plans, select the option Recommendations.
    Purchasing Savings Plans - Recommendations

    Purchasing Savings Plans – Recommendations


  3. For Recommendation options, select the most suitable Savings Plans typePayment option, Savings Plans term and lookback period.
    Purchasing Savings Plans - Recommendation Options

    Purchasing Savings Plans – Recommendation Options


  4. From the table for Recommended Savings Plan, click on the check boxes for your favored Savings Plans which you choose to purchase.

Keep in Mind

The best commitment which is recommended when purchasing savings plans at all times is not the On-Demand spend, but rather the Savings Plans rate.

5. Select the option Add Selected Savings Plan(s) to cart.

Keep in Mind

Member account recommendations let merely the owner of the member account to add Savings Plans recommendations to the cart and carry on with purchasing them.

6. You can optionally queue the recommended purchase to use it in the future.

7. To carry on with the purchase, select the option Cart located on the left pane.

8. From the page named Cart, go over your chosen order, then select the option Submit order.


How to purchase a custom commitment Savings Plan using the Purchase Savings Plans page?

You can go with EC2 Instance Savings Plans or Compute Savings Plans when purchasing savings plans.

Purchasing Savings Plans: EC2 Instance

  1. Go to the AWS Cost Management console using the following link https://console.aws.amazon.com/cost-management/home.
  2. From navigation pane, below the section Savings Plans, select the option Purchase Savings Plans.
    Purchasing Savings Plans - Purchase Savings Plans

    Purchasing Savings Plans – Purchase Savings Plans


  3. For Savings Plans type, select the option EC2 Instance.
  4. First select the Term, then the Region, and the Instance Family.
  5. For the section Hourly commitment, fill in a specific amount.

Keep in Mind

The Hourly commitment when purchasing savings plans is not the On-Demand spend, but rather the Savings Plans rate.

6. Select the option Payment option.

7. In case of previously selecting Partial Upfront payment, fill in the Partial Upfront payment amount.

8. You can optionally queue the Savings Plan to start later on a future date by setting a Start date.

9. Select the option Add to cart.

10. From the page named Cart, go over the selection of your order, then click on the option Submit order.


Purchasing Saving Plans: Compute

  1. Head to the AWS Cost Management console using the following link https://console.aws.amazon.com/cost-management/home.
  2. From navigation pane, below the section Savings Plans, select the option Purchase Savings Plans.
  3. Below the section Savings Plan type, select the option Compute.
  4. Select the option Term.
  5. For Hourly commitment, type in a specific amount.

Keep in Mind

The Hourly commitment when purchasing savings plans is not the On-Demand spend, but rather the Savings Plans rate.

6. Select the option Payment option.

7. In case of previously selecting Partial Upfront payment, fill in the Partial Upfront payment amount.

8. You can optionally queue the Savings Plan to start on a future date by simply setting a needed Start date.

9. Select the option Add to cart.

10. From the page named Cart, go over the selection of your order, and click on Submit order.


How to Queue a Savings Plan purchase using the Cart page after purchasing savings plans?

For purchasing Saving Plans and queuing those future purchases

  1. Head to the AWS Cost Management console using the following link https://console.aws.amazon.com/cost-management/home.
  2. Add your Savings Plans from the Purchase Savings Plans page or the Recommendations page.
  3. From navigation pane, from below Savings Plans, select the option Cart.
  4. Click on your Savings Plans.
  5. Select the option Set start date.
  6. Set a specific Date and Time.
  7. Select the option Confirm.
  8. You can optionally clear the Start date, by selecting Set start date and clicking on Remove start date.
  9. Select the option Submit order.


How to go over and finalize your purchases using the Cart page?

For reviewing and finalizing purchases from the Cart page

  1. Head to the AWS Cost Management console using the following link https://console.aws.amazon.com/cost-management/home.
  2. From navigation pane, below the section Savings Plans, select the option Cart.
  3. Go over the selection of your order as required.
  4. For the Summary section you will need to go over the below contents:
    • Total Commitment
    • Total upfront payment due now
  5. You can optionally remove the Savings Plans that you don’t need from your cart by choosing every single item and clicking on Remove from cart.
  6. You can optionally start over by simply removing every single item through clicking on Clear cart.
  7. You can optionally start adding new commitments through selecting Add another Savings Plan.
    Purchasing Savings Plans - Add or Submit

    Purchasing Savings Plans – Add or Submit


  8. Select the option Submit order.

In case you get a specific error message or a failed attempt while finalizing your purchase for purchasing savings plans, you will need to directly contact AWS Support about this.

AWS cost explorer

AWS SNS Topic - Featured Image

AWS SNS Topic Best Subscription in 2 Ways

How to Subscribe to an AWS SNS Topic?

For the sake of receiving messages that were published to a topic, you will need to first subscribe to an AWS SNS Topic. Upon subscribing an endpoint to a topic then confirming the subscription, the endpoint will start getting the messages which get published to its related topic.

AWS Management Console: Subscribing an endpoint to an AWS SNS Topic

  1. Login to the Amazon SNS console.
    AWS SNS Topic - SNS Dashboard

    AWS SNS Topic – SNS Dashboard


  2. From the navigation panel, click on the option Subscriptions.
    AWS SNS Topic - Subscriptions

    AWS SNS Topic – Subscriptions


  3. From the page of Subscriptions, click on the option Create subscription.
    AWS SNS Topic - Create Subscription

    AWS SNS Topic – Create Subscription


  4. From the opened page of Create subscription, go over the below steps:
    1. Fill in the Topic ARN of your previously created AWS SNS Topic, which should be similar to the following example:

arn:aws:sns:us-east-2:123456789012:MyFirstTopic

AWS SNS Topic - Topic

AWS SNS Topic – Topic


Keep in mind

For viewing the available topics in the AWS account you are currently in, click on the field named Topic ARN.

AWS SNS Topic - Protocol and Endpoint

AWS SNS Topic – Protocol and Endpoint

    1. In the section of Protocol, select a specific endpoint type, such as Email.
    2. In the section of Endpoint, fill in an email address for getting all the notifications, such as the below example:

myname@example.com

Keep in mind

Upon creating the subscription, you will have to now confirm it. Confirmation is just needed for email addresses, HTTP/S endpoints, and different account AWS resources. However, Lambda functions and SQS queues which are located in the exact AWS account and mobile endpoints, will not need any confirmation.

    1. Click on the option Create subscription.

      AWS SNS Topic - Policy

      AWS SNS Topic – Policy

Now you will get a subscription created and the page for this Subscription which is: 1234a567-bc89-012d-3e45-6fg7h890123i will get shown.

You will see that the ARNEndpointTopicStatus (Pending confirmation) for this subscription, as well as the Protocol will be shown in the section called Details.

  1. From the email client, review the set email address then click on the option Confirm subscription which is found in the email from SNS.
  2. You will find a subscription confirmation on your web browser having your subscription ID.


AWS SDK for Java: Subscribing an endpoint to an AWS SNS topic

For the sake of subscribing an endpoint to an AWS SNS Topic through the SDK for Java, you will need to do the below:

  1. Set your needed credentials.
  2. Type your code.

Below is a code excerpt which will create a subscription for an email endpoint. After that, it will print the request ID of SubscribeRequest.

// Subscribing an email endpoint to an AWS SNS topic.

final SubscribeRequest subscribeRequest = new SubscribeRequest(topicArn, "email", "myname@example.com");

snsClient.subscribe(subscribeRequest);


// Printing the request ID for SubscribeRequest action.

System.out.println("SubscribeRequest: " + snsClient.getCachedResponseMetadata(subscribeRequest));

System.out.println("If you’d like to confirm your subscription, you will have to review your specified email.");
  1. Compile your code then run it.

You will find that the subscription has been created and the SubscribeRequest request ID gets printed, such as follows:

SubscribeRequest: {AWS_REQUEST_ID=1234a567-bc89-012d-3e45-6fg7h890123i}

If you’d like to confirm your subscription, you will have to review your specified email.

For subscribing an endpoint to an SNS topic through the SDK for .NET, go over the below steps:

  1. Set your credentials.
  2. Start writing your code.

Below you will find a code excerpt which is going to create a subscription for an email endpoint. Then it will print the SubscribeRequest request ID.

// Subscribing an email endpoint to an AWS SNS topic.


SubscribeRequest subscribeRequest = new SubscribeRequest(topicArn, "email", "myname@example.com");
SubscribeResponse subscribeResponse = snsClient.Subscribe(subscribeRequest);


// Printing the request ID for the SubscribeRequest action.


Console.WriteLine("SubscribeRequest: " + subscribeResponse.ResponseMetadata.RequestId);

Console.WriteLine("If you’d like to confirm your subscription, you will have to review your specified email.");
  1. Now, you should compile then run your code.

Finally, the subscription will be created and the SubscribeRequest request ID will get printed, as such:


SubscribeRequest: 1234a567-bc89-012d-3e45-6fg7h890123i

If you’d like to confirm your subscription, you will have to review your specified email.

How to Manage AWS Budget

Manage AWS Budgets - Featured Image

8 Step Process to Manage AWS Budgets

Manage AWS Budgets


Manage AWS Budgets: View budgets

  1. Login to the AWS Management Console. Then, go to the Billing and Cost Management console using the following link https://console.aws.amazon.com/billing/.
  2. From navigation pane, click on Budgets.
    Manage AWS Budgets - Budgets

    Manage AWS Budgets – Budgets


  3. For viewing the filters and cost variances of your available budgets, click on the needed budget’s name from your listed budgets.
    Manage AWS Budgets - Budget name

    Manage AWS Budgets – Budget name


Manage AWS Budgets: Read budgets

Upon selecting your budget name, you will be taken to your budget details page. There, you will find the below listed information:

Manage AWS Budgets

Manage AWS Budgets Read Budgets

  • Budget History
  • Current vs budgeted
  • Alerts
  • Forecasted vs budgeted

In case changing your budgeted amount for a budget period, you will find that the budgeted amount listed in the shown table will only be the second added budgeted amount.

As an example: in case of having a monthly budget of 200 for April and decide to increase this budget to 400 for the month of May, the may line listed in the table will merely display the 400.

  • Budgeted amount
  • Budget details

The above mentioned data can be utilized for the sake of checking how well your budget was matching your past costs and usage.

It is also possible to begin downloading every single data used in Budgets for creating the table. Simply follow the below procedure.

Manage AWS Budgets: Download budgets CSV

  1. Login to the AWS Management Console. Then, go to the Billing and Cost Management console using the following link https://console.aws.amazon.com/billing/.
  2. From navigation pane, click on Budgets.
  3. For viewing the filters and cost variances of your available budgets, click on the budget’s name in your list of budgets.
  4. In the section of Budget History, click on Download as CSV.
    Manage AWS Budgets - Download CSV

    Manage AWS Budgets – Download CSV


  5. Go over the listed instructions on the screen.


Manage AWS Budgets: Edit budgets

  1. Login to the AWS Management Console. Then, go to the Billing and Cost Management console using the following link https://console.aws.amazon.com/billing/.
  2. From navigation pane, click on Budgets.
  3. From the page of Budgets, click on the budget for editing.
  4. Click on Edit budget.
  5. Make changes to the necessary parameters. It’s not possible to make changes to the name of your budget.
  6. Select the option Configure alerts.
  7. Click on Confirm budget.
  8. Click on Done.


Manage AWS Budgets: Download budgets

  1. Login to the AWS Management Console. Then, go to the Billing and Cost Management console using the following link https://console.aws.amazon.com/billing/.
  2. From navigation pane, click on Budgets.
  3. Click on Download CSV.
  4. You can either choose to open or to save the file.


Manage AWS Budgets: Copy budgets

  1. Login to the AWS Management Console. Then, go to the Billing and Cost Management console using the following link https://console.aws.amazon.com/billing/.
  2. From navigation pane, click on Budgets.
  3. Out of the listed budgets, click on the name of the budget for copying.
  4. From the upper page, select the option “…” and click on Copy.
    Manage AWS Budgets - Copy Budget

    Manage AWS Budgets – Copy Budget


  5. Make changes to the required parameters. You will have to make changes to the name of your budget.
  6. Click on the option Configure alerts.
  7. Click on Confirm budget.
  8. Click on the button Create.


Manage AWS Budgets: Delete budgets

For the sake of deleting any unwanted budgets, go over the below steps.

  1. Login to the AWS Management Console. Then, go to the Billing and Cost Management console using the following link https://console.aws.amazon.com/billing/.
  2. From navigation pane, click on Budgets.
  3. From the page of Budgets, click on the name of your needed budget.
  4. From the box of budget page, from below “…”, click on Delete.


Manage AWS Budgets: Receive budget alerts in Amazon Chime and slack

If you’d like to start getting alerts for your budgets in slack and Amazon Chime, simply go over the below steps.

  1. Go over how we edited a budget in this section and choose Configure alerts.
  2. Get an SNS topic added as an alert recipient for a particular alert or set of alerts.
  3. Choose Confirm Budget.
  4. Click on Done.
  5. Go to the AWS Chatbot console.
  6. Choose your chat client.
  7. Click on Configure.
  8. Click on Slack workspace.
  9. Select a specific channel type.
    • Public: For all the users in your workspace to join or view the channel
    • Private: For merely the users that are invited to view the channel
  10. Choose one of the existing IAM roles for the Chatbot for either assigning or creating an IAM role.
  11. Click on a role name.
  12. Choose the Amazon SNS Region.
  13. Choose the SNS topic.
  14. Click on Configure.

After going through all of the previously mentioned steps, you will have ensured a well managed budgeting of your AWS account. You’re all set to go with no worries whatsoever of any unexpected above the budget expenses. You can even go ahead and check your AWS Account Information to go over alternate billing contacts who will be informed of your future AWS Billing preferences.

AWS Storage Gateway Configuration

AWS Budgets - AWS Budgets Featured Image

AWS Budgets: How to Easily Monitor AWS Account?

AWS Budgets


How to create AWS Budgets?

Go over the below process for creating AWS Budgets that are cost-based.

  1. Login to the AWS Management Console. Then, go to the Billing and Cost Management console using the following link https://console.aws.amazon.com/billing/.
  2. From navigation pane, click on Budgets.
    AWS Budgets - Budgets

    AWS Budgets – Budgets


  3. From the upper section of the page, click on Create budget.
    AWS Budgets - Create Budget

    AWS Budgets – Create Budget


  4. In the section Select budget type, click on Cost budget.
    AWS Budgets - Select Budget Type

    AWS Budgets – Select Budget Type


  5. Click on Set up your budget.
    AWS Budgets - Set Your Budget Button

    AWS Budgets – Set Your Budget Button


  6. In the section Name, type in a specific name for your new budget. It should be special inside your account. It could have a-z, A-Z, spaces, and the mentioned characters:

_.:/=+-%@

AWS Budgets - Set Your Budget

AWS Budgets – Set Your Budget

  1. In the section of Period, select the rate at which you’d like the budget to reset its forecasted and its actual spend. Click on Monthly if you want it to be done each month, Quarterly each 3 months, or Annually each year.
  2. In the section of Budgeted Amount, type in the total amount to be spent for the selected budget period.
  3. You can optionally for Budget effective dates, click on Recurring Budget to get a budget which is capable of resetting whenever the budget period ends. Otherwise, click on Expiring Budget to get a 1-time budget which will not be resetting itself when the AWS Budget period ends.

In the section of Start Month, click on the needed month for starting your AWS Budgets.

When choosing an Expiring Budget, for its End Month section, select which month you’d like to end your AWS Budgets. (AWS Budget time: UTC).

  1. You can optionally refer to the section under Budget parameters (optional), in Filtering, and click on what you want of the available filters. The displayed filters are based on the AWS Budget type that you have chosen.

    AWS Budgets - Budget Parameters

    AWS Budgets – Budget Parameters

  2. You can optionally refer to the section under Budget parameters (optional), in Advanced options, and click on what you want of the below filters. In case you’ve logged in from a member account in an organization and not a master account, it is possible that you do not get every single advanced option.

Refunds

Credits

Upfront reservation fees

Recurring reservation charges

Taxes

Support charges

Other subscription costs

Use blended costs

Use amortized costs

  1. Click on Configure alerts.
  2. For the section Configure alerts, in Alert 1, click on Actual for creating a notification related to actual spend. Otherwise, click on Forecast for creating a notification related to forecasted spend.
  3. For the section Alert threshold, fill in the amount for being notified at. It may be a percentage or an absolute value.

Beside the amount, click on Absolute amount for getting notified whenever the threshold amount gets exceeded. Also, you can click on % of budgeted amount for getting notified whenever the budget’s threshold percentage gets exceeded.

  1. You can optionally fill in for Email contacts, the required email addresses which will get the notifications. After that, click on Add email contact. Divide the number of email addresses using commas. Each notification is capable of getting a maximum of ten email addresses.

For the sake of getting a notification, you need to first set a specific email address. It is possible to set a specific Amazon SNS topic as well.

  1. You can optionally refer to the section of SNS topic ARN, and fill in the needed ARN for your Amazon SNS topic. Then, click on Verify.

AWS tends to verify that your AWS Budgets got permission for sending notifications to your SNS topic through sending a test email to it. In case the SNS topic ARN turns out to be valid yet the Verify step turns unsuccessful, review the SNS topic policy to ensure that it gives permission to your budget for publishing to that topic.

Just a single Amazon SNS topic can get a notification subscribed to it.

For the sake of getting a notification, you need to first set a specific email address. It is possible to set a specific Amazon SNS topic as well.

  1. Click on Confirm budget.
  2. Go over the settings for your budget, then click on Create.

Keep in Mind when Creating AWS Budgets:

Upon completing the creation of your AWS Budgets using Amazon SNS notifications, SNS will send you a confirmation email to your specified email addresses. It will have a subject line of “AWS Notification – Subscription Confirmation”. The recipient will need to click on Confirm subscription from the confirmation email for him to start getting notifications.

AWS storage gateway configuration

AWS Account Information - Featured Image

Step-by-Step Tutorial for AWS Account Information

AWS Account Information


Edit AWS Account Information: Name, root user password, and root user email address

To edit your AWS Account Information name, root user password, or root user email address, follow the below steps:

  1. Login to the AWS Management Console. Then, head straight to the Billing and Cost Management console using the following link https://console.aws.amazon.com/billing/.
    AWS Account Information - Billing and Cost Management Console

    AWS Account Information – Billing and Cost Management Console


  2. From navigation bar, click on your account name. Then, click on My Account.
    AWS Account Information - My Account

    AWS Account Information – My Account


  3. From Account Settings page, click on Edit.
    AWS Account Information - Account Settings

    AWS Account Information – Account Settings


  4. Beside the required field for updating, click on Edit.
  5. Upon filling in all required changes, click on Save changes.
  6. When you finish, click on Done.


Edit AWS Account Information: Contact information

You can change the contact information associated with your AWS Account Information, including your mailing address, telephone number, and website address.

To edit your contact information

  1. Login to the AWS Management Console. Then, head straight to the Billing and Cost Management console using the following link https://console.aws.amazon.com/billing/.
  2. From navigation bar, click on your account name. Then, click on My Account.
  3. Below the section Contact Information, click on Edit.

    AWS Account Information - Contact Information

    AWS Account Information – Contact Information

  4. For the required fields for you to start changing, fill in your new information. Then, click on Update.


Change AWS Account Information: Currency for paying bill

To change the local currency of your account, go over the below steps.

  1. Login to the AWS Management Console. Then, go to the Billing and Cost Management console using the following link https://console.aws.amazon.com/billing/.
  2. From navigation bar, click on your account name. Then, click on My Account.
  3. Go down till you reach the Payment Currency Preference Beside the section Payment Currency Preference, click on Edit.
  4. In Select Payment Currency, pick which currency you want to pay your bill in. Then, click on Update.

To learn more about billing reports, you can check the article about how AWS Billing Reports are Unpredictable.

Edit AWS Account Information: Adding, changing, or removing alternate contacts

For adding, updating, or removing alternate contacts, follow the below steps.

  1. Login to the AWS Management Console. Then, head straight to the Billing and Cost Management console using the following link https://console.aws.amazon.com/billing/.
  2. From navigation bar, click on your account name. Then, click on My Account.
  3. Head down till you reach the Alternate Contacts section, then click on Edit.

    AWS Account Information - Alternate Contacts

    AWS Account Information – Alternate Contacts

  4. Fill in your updated information into the fields you want to change, then click on Update.


Edit AWS Account Information: Enable and Disable regions

You must keep in mind the below information regarding the subject of enabling and disabling Regions:

– IAM permissions may be utilized to control access to Regions

– It’s free to enable a Region

– When a Region is disabled, access to its resources is also disabled

– Charges won’t stop upon disabling a Region

– The disabling of Region won’t directly be visible at times

– By default, existing Regions will be enabled

– A Region needs a couple of minutes to get enabled for some of the accounts


To enable a Region, go over the below steps.

  1. Login to the AWS Management Console. Then, go to the Billing and Cost Management console using the following link https://console.aws.amazon.com/billing/.
  2. From navigation bar, click on your account name. Then, click on My Account.
  3. For AWS Regions, look beside the Region for enabling and click on Enable.

By default, the Older Regions will be enabled.

  1. Inside the dialog box, click on Enable region.


For disabling a Region, go over the below steps.

It is possible to disable a couple of Regions from your My Account page.

  1. Login to the AWS Management Console. Then, go to the Billing and Cost Management console using the following link https://console.aws.amazon.com/billing/.
  2. From the navigation bar, click on your account name. Then, click on My Account.
  3. Below AWS Regions, look beside the Region for disabling then click on Disable.

Only a number of Regions are capable of being disabled and not all of them.

  1. Inside the dialog box, for the section “To confirm disabling in this region”, type in “disable”. Then, click on Disable region.


Edit AWS Account Information: Updating and deleting tax registration numbers

For updating tax registration numbers, follow the below sections.

  1. Login to the AWS Management Console. Then, head straight to the Billing and Cost Management console using the following link https://console.aws.amazon.com/billing/.
  2. From the navigation pane, click on Tax Settings.
  3. Below Manage Tax Registration Numbers, pick which numbers you need for editing.
  4. In the section Manage Tax Registration, click on Edit.
  5. Make the necessary changes for the required fields, then click on Update.


To delete tax registration numbers, follow the below steps.

It is possible to get one or a number of tax registration numbers removed.

  1. Login to the AWS Management Console. Then, head straight to the Billing and Cost Management console using the following link https://console.aws.amazon.com/billing/.
  2. In the navigation pane, click on Tax Settings.
  3. Below Manage Tax Registration Numbers, pick which tax registration numbers you want to delete.
  4. In the section Manage Tax Registration, click on Delete.
  5. Inside the Delete tax registration dialog box, click on Delete.


Enabling tax setting inheritance

It is possible to utilize your tax registration info with your linked accounts through simply getting your Tax Settings Inheritance enabled.

For enabling tax setting inheritance, follow the below steps.

  1. Login to the AWS Management Console. Then, head straight to the Billing and Cost Management console using the following link https://console.aws.amazon.com/billing/.
  2. In the navigation pane, click on Tax Settings.
  3. Below Manage Tax Registration Numbers, choose Enable Tax Settings Inheritance.
  4. Click on Continue.

AWS Billing

Posted in AWS