AWS Lambda - AWS Lambda Console

What is AWS Lambda?

This article provides a general overview about AWS Lambda, also highlights few of key features of AWS Lambda.


What is an AWS Lambda and What is it Used For?

  • Lambda is one of the responsive cloud service and completely manages its infra.
  • It checks activity within the application and responds by distributing codes, as in functions, defined by the user.
  • For Lambda, AWS spreads the compute resources across multiple availability zones and it automatically scales them upon triggering of new actions. There is no need of user intervention.
  • Lambda supports diverse programming languages like Node.js, Python and Java etc. The service can also run processes in languages that work with Amazon Linux such as Bash, Go & Ruby.


Things to know while using AWS Lambda:
  • The Lambda function code should be written in a stateless style.
  • No function variable should be declared outside of the reach of the handler.
  • Sets of +rx permissions should be found on files of uploaded ZIP in order to make sure that Lambda will be able to execute this code for you.
  • Old Lambda functions should be surely erased when they are not needed any more.

AWS Lambda Features:
Offer different resources some custom logic

Users can add custom logic to use Lambda with other services (S3 Buckets, SNS, EC2…).


Customizable back-end services

Get some newly created back-end services for selected apps which will be triggered on-demand through Lambda or custom API endpoints for API Gateway.

Add the code of your choice

Using AWS Lambda, user don’t need to use any new tools, frameworks etc. Lambda support embedding which-ever third party libraries using Lambda Layers.

Total automation for administration

AWS Lambda takes care of backend infrastructure for running code with high availability and fault-tolerance so that users get the chance to concentrate on developing unique back-end services.

Fault tolerant

Fault tolerance comes as default for AWS Lambda. AWS takes care about that in the background

Automated scaling

AWS Lambda will only invoke your code whenever required & AWS takes care of scaling for supporting incoming requests.

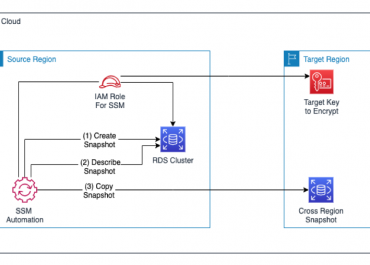
Connection with relational databases

RDS Proxy may be utilized for benefiting from completely managed connection pools for your selected relational databases.

Handle performance

With provisioned concurrency users can attain better manageability over serverless app’s performance.

Capability of connecting with shared file systems

AWS Lambda’s Elastic File System allows users to securely write, persist & read great volumes of data while maintaining low latency.

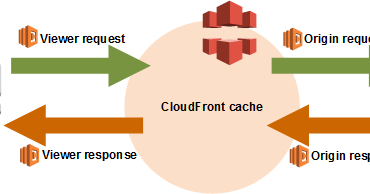
Running code with CloudFront requests

With Lambda@Edge, AWS Lambda is capable of running code over global Regions as a response to CloudFront events.

Having multiple functions

Multiple Lambda functions can be run for some hard and constantly-running tasks through workflows with Step Functions.
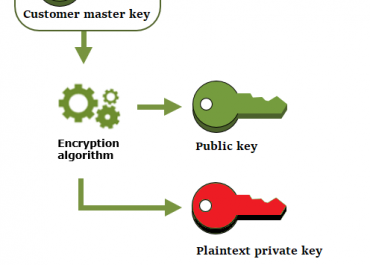
Top security model

AWS Lambda allows coding to get access to different services using it’s SDK and integrates with IAM while securely to execute code in a VPC.

Pay as you go

with AWS Lambda you will only need to pay as you go for the amount of execution you use.

A resource model with flexibility

You are capable of selecting how much memory you want to work with.


How is AWS Lambda Configured?

First: Go and sign into your AWS account.
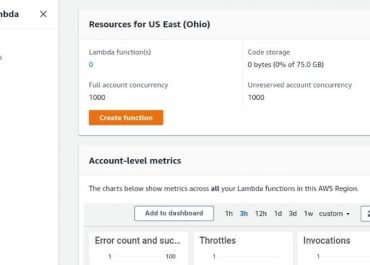
Second: Head to AWS Services section and choose Lambda under “Compute”.

AWS Lambda - AWS Lambda from Compute Services

AWS Lambda – AWS Lambda from Compute Services

Third: Click on Create Function on top right. A new form will open.
Fourth: Before proceeding click on the Blueprint box in the center. Type the word “Hello” in the search box, and press Enter. Select the Blueprint with the name “hello-world-python” and click Configure.

AWS Lambda - AWS Lambda Use a Blueprint

AWS Lambda – AWS Lambda Use a Blueprint

Fifth: Fill in the required information in order to create a Lambda function. Choose a unique name for your function, put the Execution role as “existing role”, and select the basic execution role for the Existing role box.

AWS Lambda - AWS Lambda Use an existing role

AWS Lambda – AWS Lambda Use an existing role

Sixth: Click on the Create Function button, and you’ve got yourself a new function.


AWS Lambda Limits
Limited Throttle

The maximum amount of throttle allowed is execution of 100 concurrent Lambda Functions for each AWS account. It includes the total concurrent executions of all functions found within the same region.

Formula for calculating number of concurrent executions per function:
(Average Duration of the Function Execution) X (Number of Requests or Events Processed by AWS Lambda).
Upon reaching throttle limit, an error will be returned having the code 429. When the duration of fifteen to thirty minutes passes, work can be resumed. You can increase throttle limit by contacting AWS support center.


Limited Resources

The below figure explains for you the resources limits for a Lambda function:

Resource Default Limit
Ephemeral disk capacity (“/tmp” space) 512 MB
Number of file descriptors 1,024
Total number of processes and threads 1,024
Maximum execution duration per request 300 seconds
Invoke request body payload size 6 MB
Invoke response body payload size 6 MB

Limited Service

The figure below helps you know about the services limits for deploying a Lambda function:

Item Default Limit
Lambda function deployment package size (.zip/.jar file) 50 MB
Size of code/dependencies that you can zip into a deployment package (uncompressed zip/jar size) 250 MB
Total size of all the deployment packages that can be uploaded per region 1.5 GB
Number of unique event sources of the Scheduled Event source type per account 50
Number of unique Lambda functions you can connect to each Scheduled Event 5

Here are few awesome resources on AWS Lambda:

  • CloudySave is an all-round one stop-shop for your organization & teams to reduce your AWS Cloud Costs by more than 55%.
  • Cloudysave’s goal is to provide clear visibility about the spending and usage patterns to your Engineers and Ops teams.
  • Have a quick look at CloudySave’s Cost Caluculator to estimate real-time AWS costs.
  • Sign up Now and uncover instant savings opportunities.
AWS Lambda Trigger - CloudFront Triggers

AWS Lambda Triggers

AWS Lambda Triggers


CloudFront Events for Triggering a Lambda Function

For every single cache behavior found in a CloudFront distribution, it’s possible to add up to 4 triggers for a Lambda function to start executing upon the occurrence of specific CloudFront events. CloudFront triggers may be based upon 1 of 4 CloudFront events, just like what is displayed in the below diagram.

AWS Lambda Trigger - CloudFront Triggers

AWS Lambda Trigger – CloudFront Triggers

CloudFront events for triggering Lambda@Edge functions are listed below:

– Viewer Request

Function will be executed as soon as CloudFront receives a request from any viewer, prior to checking if the requested object is found in the CloudFront cache or not.

– Origin Request

Function will be executed merely as soon as CloudFront forwards a request to your origin. Upon having the requested object found in the CloudFront cache, its function shall not be executed.

– Origin Response

Function will be executed when CloudFront gets a response from the origin and prior to caching the object in the response. Function will still execute when an error returns from the origin.

Function may not be executed in the below cases:

  • Requested file is found in the CloudFront cache + not expired.
  • Response gets generated from a function triggered by an origin request event.

– Viewer Response

Function will be executed prior to getting back the requested file to its viewer. Function will execute even if the file is already found in the CloudFront cache.

Function will not be executed in the below cases:

  • Origin returns an HTTP status code being 400 or greater.
  • Custom error page gets returned.
  • Response gets generated from a function triggered using a viewer request event.
  • CloudFront automatically redirects HTTP request to HTTPS

How to Add Triggers Through the Lambda Console?

  1. Start by signing in to the Management Console and opening the Lambda console using the following link https://console.aws.amazon.com/lambda/.
  2. From the available Region list at the top right of your page, select US East (N. Virginia).
AWS Lambda Trigger - Select Region

AWS Lambda Trigger – Select Region

  1. From the Functions page, select a name of which function you’d like to add triggers for.
AWS Lambda Trigger - Select Function for Adding Triggers

AWS Lambda Trigger – Select Function for Adding Triggers

  1. Click on Qualifiers, then select the Versions Tab.
AWS Lambda Trigger - Select Version for adding triggers

AWS Lambda Trigger – Select Version for adding triggers

  1. Select which version you’d like to add triggers to.

Upon choosing a version, the button’s name will be changed to Version: $LATEST – Version: the version number.

  1. Click on the Triggers
  2. Select Add triggers.
AWS Lambda Trigger - Add Trigger Button

AWS Lambda Trigger – Add Trigger Button

  1. For the Add trigger dialog box, select the dotted box, then click on CloudFront.
AWS Lambda Trigger - Select CloudFront as Trigger Configuration

AWS Lambda Trigger – Select CloudFront as Trigger Configuration

Keep Note

In case of previously creating 1 or more triggers, CloudFront is going to be the default service.

  1. Set the following values in order to indicate at the time of Lambda function execution.

Distribution ID

Select the ID of which distribution you’d like to add the trigger to.

Cache behavior

Select which cache behavior specifying the objects you’d like the function to be executed on.


Take Note

Specifying * for the cache behavior enables the Lambda function to deploy to default cache behavior.

CloudFront event

Select which CloudFront event will be causing your function to get executed.

Include body

Choose this check box for accessing the request body in the chosen function.

Enable trigger and replicate

Choose this check box to allow Lambda to replicate your function to other Regions globally.

  1. Click on Submit.


How to Add Triggers Through the CloudFront Console?

  1. Find the ARN of which Lambda function you’d like triggers to be added triggers for:

– Start by signing in to the Management Console and then opening the Lambda console through this link https://console.aws.amazon.com/lambda/.

– From the list of available Regions at the top right of your page, select US East (N. Virginia).

– From under the list of functions, select the name of which function you’d like to get triggers added to.

– Click on Qualifiers, select the Versions tab, and click on which numbered version you’d like triggers to be added to.

Important Note

Triggers may be added to a numbered version and not $LATEST.

– Go ahead and copy the ARN which shows at the very top of your page, as an example:

arn:aws:lambda:us-east-1:123456789012:function:TestFunction:2

The last number stated at the end (2 in the mentioned example) refers to the version number of your chosen function.

  1. Go to the CloudFront console through this link https://console.aws.amazon.com/cloudfront/.
  2. From under the list of distributions, select the ID of a specific distribution for which you’d like to add triggers.
  3. Select the Behaviors
  4. Choose the check box to the cache behavior for adding triggers to, and later select Edit.
  5. For Lambda Function Associations, from the Event Type list, select the time you’d like the function to get executed: for viewer requests, responses, origin requests or responses.
  6. Paste the ARN of the Lambda function you’ like to get executed as soon as the selected event takes place. It will be the value which you have previously copied in step 1.
  7. Choose Include Body for accessing the request body in the function.

In case you simply need to replace the request body, you don’t need to select this option is not necessary for being selected.

  1. For executing the exact function for additional event types, select +and keep repeating steps 6 + 7.
  2. Select Yes, Edit.
  3. For adding triggers to additional cache behaviors for this distribution, you will need to go ahead and repeat steps 5 till 9.

aws lambda rds

Asymmetric CMK - Asymmetric CMK Algorithm

Asymmetric CMKs

Asymmetric CMKs

Create your Asymmetric CMKs:

How to Create asymmetric CMKs using the console?

Asymmetric CMK - CMK Key Type Asymmetric

Asymmetric CMK – CMK Key Type Asymmetric


  1. Log into the Management Console then head directly to the KMS console using the following link https://console.aws.amazon.com/kms.
  2. For the sake of changing your current Region, you must refer to the Region selector from the top right.
  3. From navigation pane, select Customer managed keys.
  4. Click on Create key.
  5. For creating an asymmetric CMK, select the option Asymmetric from section Key type.
  6. For the sake of creating an asymmetric CMK for your process of public key encryption, you will need to select Encrypt and decrypt for the section of Key usage. Otherwise, for creating an asymmetric CMK to get the possibility to sign messages and then verify the signature, you will need to select the option Sign and verify from Key usage.
  7. Choose a particular specification which refers to Key spec to give to the asymmetric CMK.
  8. Click on Next.
  9. Enter a specific alias for the asymmetric CMK, which is not capable of staring with the prefix aws/.
  10. You can enter an optional description for the asymmetric CMK.

Type in a description which can describe what kind of data you’re planning to protect or which application you are planning to utilize using the asymmetric CMK. Avoid using the description format of AWS managed CMKs.

Asymmetric CMK - Asymmetric CMK Application Utilization

Asymmetric CMK – Asymmetric CMK Application Utilization

You are capable of either entering a description currently or you could just get it updated whenever you want, but make sure that the key state is not at Pending Deletion. For the sake of changing, adding or simply deleting the description of a customer managed CMK, you must start by editing the CMK using the Management Console or through utilizing UpdateKeyDescription operation.

  1. You can optionally enter a tag key and a tag value, and for adding even extra tags to your asymmetric CMK you will need to click on Add tag.

Upon adding tags to resources, AWS will generate a cost allocation report which includes usage and prices aggregated through tags.

  1. Click on Next.
  2. Choose which IAM users and roles are capable of administrating the asymmetric CMK.

Keep in Mind

IAM policies are capable of granting different IAM users and roles the permission to start managing the CMK.

  1. It is optional for you to choose to prevent the chosen IAM users and roles from having the ability to delete this asymmetric CMK, by going to the Key deletionsection located below the page and then clearing out the check box for Allow key administrators to delete this key.
  2. Click on Next.
  3. Choose which IAM users and roles are to be given the ability to utilize the asymmetric CMK for cryptographic operations.

Keep in mind

The root user will be given by default total permissions. Consequently, whichever IAM policies capable of granting users and roles permission will need to utilize the asymmetric CMK for the sake of performing cryptographic operations.

  1. You may also optionally provide access for different AWS accounts to be able to work with this asymmetric CMK for their cryptographic operations. For this to happen, you will need to head to the Other AWS accounts section located below of the page, select the option Add another AWS account and type in the required AWS account identification number of the needed external account. For adding even more external accounts, you must go over this same step.

Keep in Mind

For the sake of granting the possibility for principals in external accounts to work with the asymmetric CMK, the Administrators of external account will need to get IAM policies created which will grant them the required permissions.

  1. Select Next.
  2. Go over the key policy document which includes your choices of creation, and edit it if you’d like.
  3. Click on Finish in order to get the new asymmetric CMK created.


How to Create asymmetric CMKs using the AWS KMS API?

The CreateKey operation may be utilized for the creation of an asymmetric CMK.

The below examples have the AWS CLI, however it is possible to utilize a different language of supported programming.

Asymmetric CMK - Asymmetric CMK Decryption Algorithm

Asymmetric CMK – Asymmetric CMK Decryption Algorithm

Upon creating an asymmetric CMK, you will have to set the CustomerMasterKeySpec parameter that will specify which keys are to be created. You will additionally need to set a KeyUsage value of either ENCRYPT_DECRYPT or SIGN_VERIFY, and those properties can no longer get changed upon the creation of your asymmetric CMK.

Asymmetric CMK - Asymmetric CMK Encryption Algorithm

Asymmetric CMK – Asymmetric CMK Encryption Algorithm

The below is an example which utilizes the CreateKey operation for the sake of creating an asymmetric CMK having 4096-bit RSA keys made specifically for public key encryption.


$ aws kms create-key --customer-master-key-spec RSA_4096 --key-usage ENCRYPT_DECRYPT

{

"KeyMetadata": {

"KeyState": "Enabled",

"KeyId": "1234abcd-12ab-34cd-56ef-1234567890ab",

"CustomerMasterKeySpec": "RSA_4096",

"KeyManager": "CUSTOMER",

"Description": "",

"KeyUsage": "ENCRYPT_DECRYPT",

"Arn": "arn:aws:kms:us-west-2:111122223333:key/1234abcd-12ab-34cd-56ef-1234567890ab",

"CreationDate": 1569973196.214,

"EncryptionAlgorithms": [

"RSAES_OAEP_SHA_1",

"RSAES_OAEP_SHA_256"

],

"AWSAccountId": "111122223333",

"Origin": "AWS_KMS",

"Enabled": true

}

}

The below is an example command which tend to create an asymmetric CMK representing a pair of ECDSA keys that are utilized for the sign in and verification needs. An elliptic curve key pair may not be created for purposes of encryption and decryption.


$ aws kms create-key --customer-master-key-spec ECC_NIST_P521 --key-usage SIGN_VERIFY

{

"KeyMetadata": {

"KeyState": "Enabled",

"KeyId": "0987dcba-09fe-87dc-65ba-ab0987654321",

"CreationDate": 1570824817.837,

"Origin": "AWS_KMS",

"SigningAlgorithms": [

"ECDSA_SHA_512"

],

"Arn": "arn:aws:kms:us-west-2:111122223333:key/0987dcba-09fe-87dc-65ba-ab0987654321",

"AWSAccountId": "111122223333",

"CustomerMasterKeySpec": "ECC_NIST_P521",

"KeyManager": "CUSTOMER",

"Description": "",

"Enabled": true,

"KeyUsage": "SIGN_VERIFY"

}

}


Identity Access Management

Create Policy Using Visual Editor- Visual Editor Tab

Create Policy Using Visual Editor

Create Policy Using Visual Editor


Create Policy Using Visual Editor- Visual Editor Tab

Create Policy Using Visual Editor- Visual Editor Tab

How to Create Policies using the Visual Editor?

You can use the visual editor from the IAM console to learn how to go through the creation of a policy with no need for writing in JSON syntax.

Using the visual editor for creating a policy

  1.  Login to the Management Console then go straight to the IAM console using the following link https://console.aws.amazon.com/iam/.
  2.  From left navigation pane, select the option Policies.
Create Policy Using Visual Editor- Create Policy button

Create Policy Using Visual Editor- Create Policy button

  1.  Select Create policy.
  2.  From Visual editor tab, click on Choose a service. After that, select a specific service for adding it to your policy. It’s also possible to utilize the top search box for limiting the results from the listed services. Merely 1 service may be selected in a visual editor permission block. For the sake of granting access to multiple services, you can add various permission blocks through selecting the option Add additional permissions.
  1.  Click on Select actions then select which actions you’d like to start adding to this policy. Your visual editor will display actions which are actually available in the previously chosen service.
Create Policy Using Visual Editor- Actions section

Create Policy Using Visual Editor- Actions section

Actions may be chosen in the below ways:

    • Utilize check boxes for choosing every single action for the service or every action in 1 of the already defined Access level groups.
    • Click on add actions for entering a particular action or utilize the feature of wildcards which is designated by “*” for the sake of setting more than 1 action.
    • Open every one of the Access level groups for the sake of selecting individual actions.

The policy being created grants the chosen actions. For not allowing the chosen actions, you will need to select the option of Switch to deny permissions.

6.  In case the chosen service and the previously selected actions do not support the selection of certain resources, All resources will be chosen for you with no possibility to get this section edited.

In case of selecting actions which support resource-level permissions, they will be listed using the visual editor, and the option Resources can be chosen for the sake of setting resources for the policy.

Resources may be selected using the below ways:

    • Select Add ARN for the sake of setting resources according to their ARN. It’s possible to add a wildcard using the “*” symbol, in whichever needed field of the ARN.
    • Select Any from the right side of the resource section for the sake of giving permissions to whatever resources having a similar selected type.
    • Select Add ARN for the sake of setting specific details regarding the resource. Other than typing a value, it’s possible for you to select Any for the sake of providing permissions for whichever value of your choice for the setting which you have entered. This means that in case you choose the EC2 Read access level group, your policy’s actions are going to support the instance resource type.

It is necessary to set Account, InstanceId and Region values for this resource. In the case that you choose to give your account ID yet select Any for the values of instance ID and Region, this will allow the policy to give the permissions to whichever instance found in your set account.

    • Select the option of All resources for the sake of selecting every single resource for that specific service.

7.  You can optionally select Specify request conditions (optional) for adding conditions to the newly being created policy. Having conditions will limit the effect of a JSON policy statement, which means that you are capable of defining the ability of a user in performing an action on the resources whenever the request of the user takes place at a certain range in time. It is even possible to rely on common conditions for the sake of limiting if there should be authentication required with an MFA device. Otherwise, it’s possible to set this request to be originating from a specific set of IP addresses.

Create Policy Using Visual Editor- Conditions section

Create Policy Using Visual Editor- Conditions section

Conditions may be selected in the below ways:

    • You are capable of utilizing check boxes for choosing common conditions.
    • Select the Add condition for specifying different conditions. Select the Qualifier, Operator and Condition Key then set for each one a Value. For adding multiple values, select the option of Add new value, and you are capable of considering them connected by a logical “OR” operator. Upon finishing, click on Add.

For the sake of adding multiple conditions, click on the Add condition once more. Follow the same steps as necessary. Every single condition will be applied merely to the current visual editor permission block at hand. The entire conditions need to be true in order to take the permission block as a match. Which means that you should try connecting the conditions by a logical “AND” operator.

8. For the sake of adding multiple permission blocks, select the option Add additional permissions. Then, for every single block, go over the steps from number two till number five.

9. Upon finishing, select the option of Review policy.

Keep in Mind

You are capable of switching from the Visual editor to the JSON tab or vice versa whenever you want. Although remember that in case you choose to make alterations or select the option of Review policy found in Visual editor tab, your policy may then get restructured for the sake of making it optimized for visual editor.

Create Policy Using Visual Editor- Review Policy Page

Create Policy Using Visual Editor- Review Policy Page

10. From Review policy page, enter a specific Name and a particular optional Description for your newly being created policy. Go over the policy summary in order to ensure that you have given the needed permissions, then select the option of Create policy for saving the newly created policy.

Upon creating a policy, it will possible to get it attached to users, roles or groups.

create a database with Amazon Neptune 

RDS Snapshot Pricing - Using RDS Snapshot

RDS Snapshot Pricing

RDS Snapshot Pricing

This article provides a general overview about RDS Snapshot Pricing, also highlights few of the use-cases in general. Check out our Video to get more understanding


What is an RDS Snapshot?

An RDS Snapshot is a storage volume snapshot of a DB instance that is created by Amazon RDS, for backing up the whole DB instance  & not merely individual databases.

If the DB snapshot is created on a Single-Availability Zone, the DB instance will cause an I/O suspension for a few seconds to a few minutes. The I/O suspension depends on the size & class associated with DB instance.

I/O activity will not be suspended primary database on the following engines during backup for Multi-AZ deployments since this backup comes from the standby for the following:

  • MySQL
  • PostgreSQL
  • Oracle
  • MariaDB

I/O activity will get suspended for SQL Server for a brief period while backup takes place for Multi-Availability Zone deployments of the following:

Upon creating a DB snapshot, specify the DB instance that was intended to be backed up. Provide the name for your DB snapshot for restoring from the snapshot afterward.

The snapshot creation time depends on the size of the DB as well as the size of the file system (including temporary files) as snapshots include the whole storage volume.


How does the RDS Snapshot Pricing Vary?

RDS pricing is based on the following services:

Pricing for RDS Snapshot Export
RDS Snapshot Pricing - RDS Snapshot Export

RDS Snapshot Pricing – RDS Snapshot Export

Snapshot Export offers its users an automated procedure to export their data to RDS snapshot (or) Aurora snapshot to S3 using the Parquet format. This format is almost twice as fast in unloading & it can consume 60% less storage in S3, in comparison to text formats.

The Exported data can be analyzed with the following AWS services:

  • Amazon SageMaker.
  • Amazon EMR
  • Amazon Athena

All the cost information provided below is considered US-East-2(Ohio) Region.

Type of Charge Price
Charge per GB of snapshot size: $0.010

Let’s consider an example:

  • We have 100 GB snapshot
  • We utilize filtering for choosing a 10 GB table from the snapshot in order to get it exported to S3.

For exporting this selected data, you will be charged as follows:

  • 100 GB * $0.010 for every GB of snapshot size.
  • Subsequent exports of data with the same snapshot will not add up.
  • Extra charges will be applied for choosing AWS-KMS for encryption & decryption.

More charges will apply as well for the following actions:

  • Storing your exported data in S3
  • Making PUT requests against S3 bucket

Pricing for RDS Snapshot Backup Storage
RDS Snapshot Pricing - RDS Snapshot Backup Storage

RDS Snapshot Pricing – RDS Snapshot Backup Storage

Resource Type Warm Storage Cold Storage
Amazon EFS File System Backup $0.05 per GB-Month $0.01 per GB-Month
Amazon EBS Volume Snapshot $0.05 per GB-Month n/a†
Amazon RDS Database Snapshot $0.095 per GB-Month n/a†
Amazon Aurora Cluster Snapshot $0.021 per GB-Month n/a†
Amazon DynamoDB Table Backup $0.10 per GB-Month n/a†
AWS Storage Gateway Volume Backup $0.05 per GB-Month n/a†


Pricing for RDS Snapshot Restore


RDS Snapshot Pricing - RDS Snapshot Restore

RDS Snapshot Pricing – RDS Snapshot Restore


Resource Type Warm Storage Cold Storage Item-level Restore
Amazon EFS File System Backup $0.02 per GB $0.03 per GB $0.50 per GB-Month
Amazon EBS Volume Snapshot Free n/a† n/a**
Amazon RDS Database Snapshot Free n/a† n/a**
Amazon Aurora Cluster Snapshot Free n/a† n/a**
Amazon DynamoDB Table Backup $0.15 per GB n/a† n/a**
AWS Storage Gateway Volume Backup Free n/a† n/a**


Additional Information

  • Cold storage: Supported merely for backups of EFS file systems.
  • EFS: Not available in the US East (Ohio) Region.
  • Item-level restore: Not available.
  • Backups transitioned to Cold Storage: Minimum 90 days of storage.
  • Backups deleted before 90 days: A pro-rated cost is charged similar to the cost of storage for the leftover days.

Pricing for RDS Snapshot Cross-region Data Transfer


RDS Snapshot Pricing - RDS Snapshot Cross-Region Data Transfer

RDS Snapshot Pricing – RDS Snapshot Cross-Region Data Transfer

DynamoDB has no support for any cross-region backup as of now.

Data Transfer OUT from Amazon EFS Backup To Warm Storage Cold Storage
Any destination region $0.04 per GB N/A
Data Transfer OUT From Amazon EBS, SGW,
Aurora and RDS Backup To
Pricing
Asia Pacific (Mumbai) $0.02 per GB
Asia Pacific (Seoul) $0.02 per GB
Asia Pacific (Singapore) $0.02 per GB
Asia Pacific (Sydney) $0.02 per GB
Asia Pacific (Tokyo) $0.02 per GB
Canada (Central) $0.02 per GB
Europe (Frankfurt) $0.02 per GB
Europe (Ireland) $0.02 per GB
Europe (London) $0.02 per GB
Europe (Paris) $0.02 per GB
Europe (Stockholm) $0.02 per GB
South America (Sao Paulo) $0.02 per GB
US East (N. Virginia) $0.01 per GB
US West (N. California) $0.02 per GB
US West (Oregon) $0.02 per GB

RDS Pricing Techniques

  • Storage amount is charged on a monthly basis and depends on the average storage space which is utilized over the month.
  • Storage usage will be measured in GBs per Month, which will be summed up on the last day of the month for generating monthly charges.
  • The restore amount is charged on a monthly basis and is calculated by the amount of data that gets restored this whole month.
  • Data restored monthly will be measured in GBs which reflects the total amount of data from every single restore made within that month.

Here are few awesome resources on AWS RDS:

RDS Maria DB Basics

RDS Cost Optimization Techniques

Manage AWS RDS DB Instance

AWS RDS Instance Types

Aurora Serverless Pricing Calculator


  • CloudySave is an all-round one stop-shop for your organization & teams to reduce your AWS Cloud Costs by more than 55%.
  • Cloudysave’s goal is to provide clear visibility about the spending and usage patterns to your Engineers and Ops teams.
  • Have a quick look at CloudySave’s Cost calculator to estimate real-time AWS costs.
Symmetric CMKs - Create Symmetric CMK

Symmetric CMKs

Symmetric CMKs

Create your Symmetric CMKs:

Symmetric CMKs may either be created using the Management Console or through the use of AWS KMS API.

Symmetric key encryption: It is a process which utilizes one same key for the sake of encrypting data and decrypting it.

How to create symmetric CMKs using the console?

It is possible to utilize the Management Console in order to get CMKs created.

  1. Login to the Management Console then head straight to the KMS console using the following link https://console.aws.amazon.com/kms.
  2. For the sake of changing the currently selected Region, you will need to utilize the Region selector from the top right.
  3. From navigation pane, select the option Customer managed keys.
  4. Click on Create key.
  5. For the sake of creating a symmetric CMK, you will need to select the option Symmetric from Key type.
  6. Click on Next.
  7. Enter a particular alias for CMK, but keep in mind that the name of the alias should not start with the prefix aws/ which is originally reserved by AWS for the sake of representing AWS managed CMKs in your account.

What is an alias?

Symmetric CMKs - Symmetric CMK Alias

Symmetric CMKs – Symmetric CMK Alias

An alias represents a display name which may be utilized for the sake of specifying the CMK. It is recommended for you to select an alias which specifies which kind of data is to be protected or which app is to be used with CMK.

An alias is necessary upon creating a CMK using the Management Console, and they will be an optional upon utilizing the operation of CreateKey.

  1. You can optionally type a specific description for your CMK, which describes which kind of data is to be protected or which app you will be utilizing with this CMK. Be careful not to utilize the description format which was originally intended to be utilized for managed CMKs.

You are capable of either entering a description currently or you could just get it updated whenever you want, but make sure that the key state is not at Pending Deletion. For the sake of changing, adding or simply deleting the description of a customer managed CMK, you must start by editing the CMK using the Management Console or through utilizing UpdateKeyDescription operation.

  1. Click on Next.
  2. You can optionally enter a tag key and optionally type a tag value. For the sake of adding multiple tags to your CMK, select the option Add tag.

Upon adding tags to resources, a cost allocation report will be generated having the sections of usage and costs that are being aggregated through tags.

  1. Click on Next.
  2. Choose which IAM users and which roles you’d like to grant permission to administer the CMK.

Keep in Mind

IAM policies are capable of granting different IAM users and different roles the permission needed for managing the CMK.

  1. It is optional for you to choose to prevent the chosen IAM users and roles from having the ability to delete this CMK, by going to the Key deletionsection located below the page and then clearing out the check box for Allow key administrators to delete this key.
  2. Click on Next.
  3. Choose which IAM users and roles are to be given the ability to utilize the CMK for cryptographic operations.


Keep in mind

Symmetric CMKs - Symmetric CMK Cryptographic Configuration

Symmetric CMKs – Symmetric CMK Cryptographic Configuration

The root user will be given by default total permissions. Consequently, whichever IAM policies capable of granting users and roles permission will need to utilize the CMK for the sake of performing cryptographic operations.

  1. You may also optionally provide access for different AWS accounts to be able to work with this CMK for their cryptographic operations. For this to happen, you will need to head to the Other AWS accountssection located below of the page, select the option Add another AWS account and type in the required AWS account identification number of the needed external account. For adding even more external accounts, you must go over this same step.

Keep in Mind

For the sake of granting the possibility for principals in external accounts to work with the CMK, the Administrators of external account will need to get IAM policies created which will grant them the required permissions.

  1. Click on Next.
  2. Go over the key policy document which got created using your own choices, and it’s possible to get it edited as well.
  3. Click on the option Finishfor creating your CMK.


How to Create symmetric CMKs using the AWS KMS API?

Symmetric CMKs - Create Symmetric CMK using KMS

Symmetric CMKs – Create Symmetric CMK using KMS

The CreateKey operation may be utilized for the creation of a symmetric CMK.

The below examples have the AWS CLI, however it is possible to utilize a different language of supported programming.

Performing such an operation does not need any specific parameters. Yet you may desire the utilization of Policy parameter for the sake of setting a key policy. It’s possible to alter key policy which is referred to by PutKeyPolicy then get some optional elements added like tags or a description whenever you want.

In addition, in case of getting a CMK created for imported key material or one in a custom key store you will need to use the Origin parameter.

Below you will find a call for the CreateKey operation while having no parameters whatsoever. It uses every single default value, and gets a symmetric CMK created for the sake of encryption and decryption using key material which was generated through the KMS.

$ aws kms create-key

{

“KeyMetadata”: {

“Origin”: “AWS_KMS”,

“KeyId”: “1234abcd-12ab-34cd-56ef-1234567890ab”,

“Description”: “”,

“KeyManager”: “CUSTOMER”,

“Enabled”: true,

“CustomerMasterKeySpec”: “SYMMETRIC_DEFAULT”,

“KeyUsage”: “ENCRYPT_DECRYPT”,

“KeyState”: “Enabled”,

“CreationDate”: 1502910355.475,

“Arn”: “arn:aws:kms:us-west-2:111122223333:key/1234abcd-12ab-34cd-56ef-1234567890ab”,

“AWSAccountId”: “111122223333”

“EncryptionAlgorithms”: [

“SYMMETRIC_DEFAULT”

]

}

}

In case there was no key policy set for the newly created CMK, you will find that the default key policy applied by CreateKey is not the same as that of the default key policy which is applied by the console when utilized for creating a new CMK.

Take the example of this call which is made to GetKeyPolicy operation. It is going to return the key policy applied by CreateKey, and grant the account the permission to be able to access CMK as well as give it the ability to get AWS IAM policies created for this CMK.

$ aws kms get-key-policy –key-id 1234abcd-12ab-34cd-56ef-1234567890ab –policy-name default –output text

{

“Version” : “2012-10-17”,

“Id” : “key-default-1”,

“Statement” : [ {

“Sid” : “Enable IAM User Permissions”,

“Effect” : “Allow”,

“Principal” : {

“AWS” : “arn:aws:iam::111122223333:root”

},

“Action” : “kms:*”,

“Resource” : “*”

} ]

}


Posted in KMS