Elastic Beanstalk Vs CloudFormation - Use Cases of Elastic Beanstalk Vs CloudFormation

Elastic Beanstalk vs CloudFormation: Which one is Better?

This article provides a detailed overview of Elastic-Beanstalk Vs Ec2, also highlights few of the use-cases in general.


Elastic Beanstalk vs CloudFormation: Which one is Better?

AWS users will often ask themselves about the difference between Elastic Beanstalk & CloudFormation. This is because AWS offers its users with multiple options for provisioning IT infrastructure, app-deployment & management. AWS provides them with totally convenient & easy ways to setup along with lower levels of granular control.


Ways of Deployment and Management of Elastic Beanstalk vs CloudFormation:
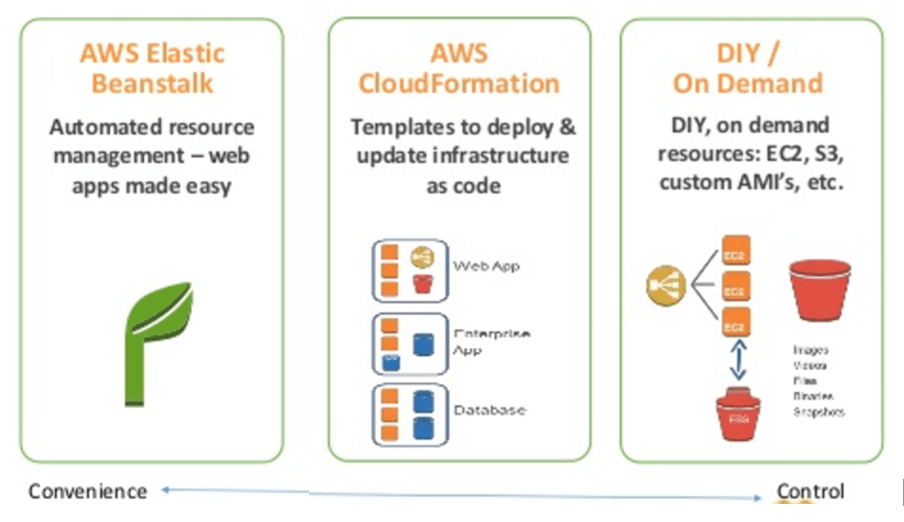
Elastic Beanstalk vs CloudFormation - Deployment and Management differences

Elastic Beanstalk vs CloudFormation – Deployment and Management differences

As it can be seen from above illustration, users who search for convenience find AWS Elastic Beanstalk as the perfect choice to go with. On the other hand, those who find both convenience & control equally important to them, will better go with using AWS CloudFormation instead.


What is AWS Elastic Beanstalk?
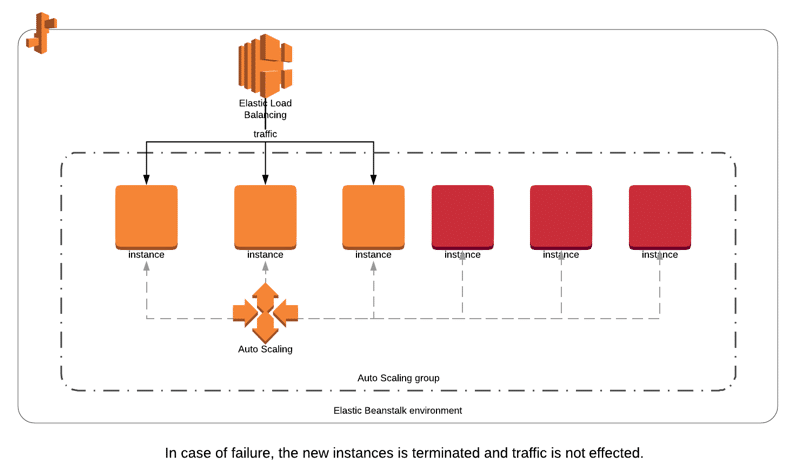
Elastic Beanstalk vs CloudFormation - How AWS Elastic Beanstalk Works

Elastic Beanstalk vs CloudFormation – How AWS Elastic Beanstalk Works

AWS Elastic Beanstalk is a fully-managed service to deploy, run and scale web applications and services developed in Java, .NET, PHP, Node.js, Python and Ruby and using a selective of servers such as Apache, Nginx and IIS.

Elastic Beanstalk handles the deployment, capacity provisioning, load balancing, scaling and application health monitoring. This allows developers to focus on developing the application withour considering infrastructure. Elastic Beanstalk enables Continuous Integration, Continuous Deployment with multiple deployment strategies such as blue/green deployments, rolling updates, and canary deployments.

  • It can aid in the deployment, handling & monitoring of the scalability of your apps.
  • Easy Integration with developer tools.
  • Higher-level service with fast deployment & low management effort for a worker-based (or) web environment.
  • Offers an environment for simple deployment and running of apps within AWS.
  • Quick and easy for starting an app and then running it on the cloud.
  • One-stop experience for app lifecycle management.
  • Needs the least possible configuration changes.
  • It does not require a lot of manual effort other than writing the app code & defining just a bit of configuration.
  • The best choice for developers looking for deploying code without worrying about underlying infrastructure.

Head to Elastic Beanstalk console here.


What is AWS CloudFormation?
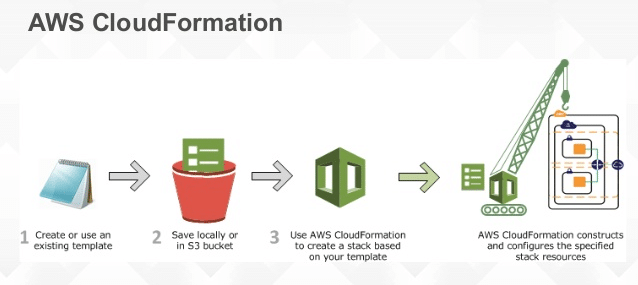
Elastic Beanstalk vs CloudFormation - How AWS CloudFormation Works

Elastic Beanstalk vs CloudFormation – How AWS CloudFormation Works

Amazon Web Services (AWS) CloudFormation is a Infrastructure as a Code service tool to manage and provision AWS resources as if writing code. CloudFormation allows you to create, update, and delete a collection of related AWS resources in a single and orchestrated operation. By having provisioning as a code, you can get rid of manual configuration as well as use versioning for any changes you made. Comparing with previous versions, reverting deployments and redo/replicate the operations will become very easy.

CloudFormation uses templates files, which are JSON or YAML formatted text files that constructs blueprints for AWS infrastructure and can be stored in S3 buckets or locally on your computer. With CloudFormation, a wide range of AWS resources like EC2 instances, elastic load balancers, and more can be defined easily. All of these resources in the template files are called the stack. All of the resources in the stack are created and managed as a single unit. This is essential to manage complex infrastructure deployments and to guarantee that all the resources are created and configured correctly.

If you need to modify existing AWS resources, you can update the template file and then CloudFormation can update the stack. So that you do not have to manually modify each individual resource.
Also CloudFormation provides a consistent way to manage your AWS resources across multiple accounts and regions. You can also easily move or replicate the stacks to another region or create different environments such as development, staging and production in your infrastructure without having to manually configure each environment.

  • AWS Cloudformation provides provisioning, version-controlling & modeling of variety of AWS resources.
  • Cloudformation also complements OpsWorks & Elastic Beanstalk as well.
  • Low-level service provides perfect control over managing & provisioning your stacks of resources based on template.
  • Templates allow for version control of your code’s infrastructure.
  • Cloudformation simplifies the deployment of environments by using one template and updating variables.
  • Cloudformation is capable of provisioning various types of AWS resources.
  • Cloudformation also supports and can spin-up infrastructure requirements of diverse apps deployed on top of AWS.

Head to CloudFormation Console here.


Using CloudFormation along with Elastic Beanstalk:       
  • Elastic Beanstalk application environments may be supported by CloudFormation while considering it a resource type.
  • Hence you can get an Elastic Beanstalk–hosted app created & managed plus making an RDS database for the sake of storing the app data.
  • Different supported resources may as well be used just like the RDS database.

What are the key differences b/w AWS Elastic Beanstalk & AWS CloudFormation?
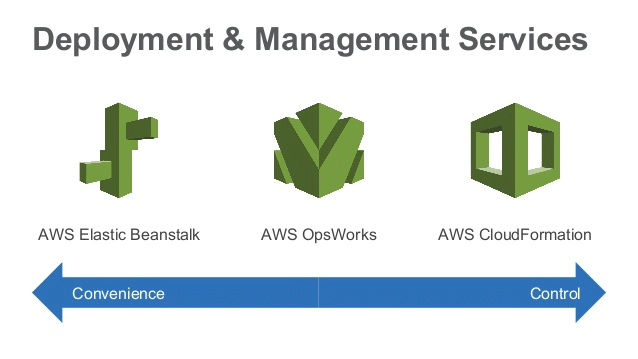
Elastic Beanstalk vs CloudFormation - Elastic Beanstalk vs CloudFormation In Control and Convenience

Elastic Beanstalk vs CloudFormation – Elastic Beanstalk vs CloudFormation In Control and Convenience

Elastic Beanstalk: For swiftly being able to get your apps deployed and managed. Higher-Level services and more convenience.

CloudFormation: For creating and managing a variety of close resources. You do things yourself while having more control.


Elastic Beanstalk Vs CloudFormation in Category:

AWS Elastic Beanstalk goes under Platform as a Serviceof tech stack, while AWS CloudFormation goes under the section of Infrastructure Build Tools.


Some of AWS Elastic Beanstalk’s most important features:
  • Merely pay for the resources you require
  • Created with known software stacks
  • Fast and easy deployment method

Features provided by AWS CloudFormation:
  • AWS CloudFormation comes with already created and complete sample templates
  • Everything is out there in the field with no hidden discoveries, where templates come in easy to understand JSON text files.
  • There is no need to make up something new or come up with a brilliant new idea because templates may always get utilized one time after the other for the sake of getting similar copies created of one particular stack. It is also possible to work with as a foundation for getting a new stack started right away.

Comparison of Elastic Beanstalk & CloudFormation:
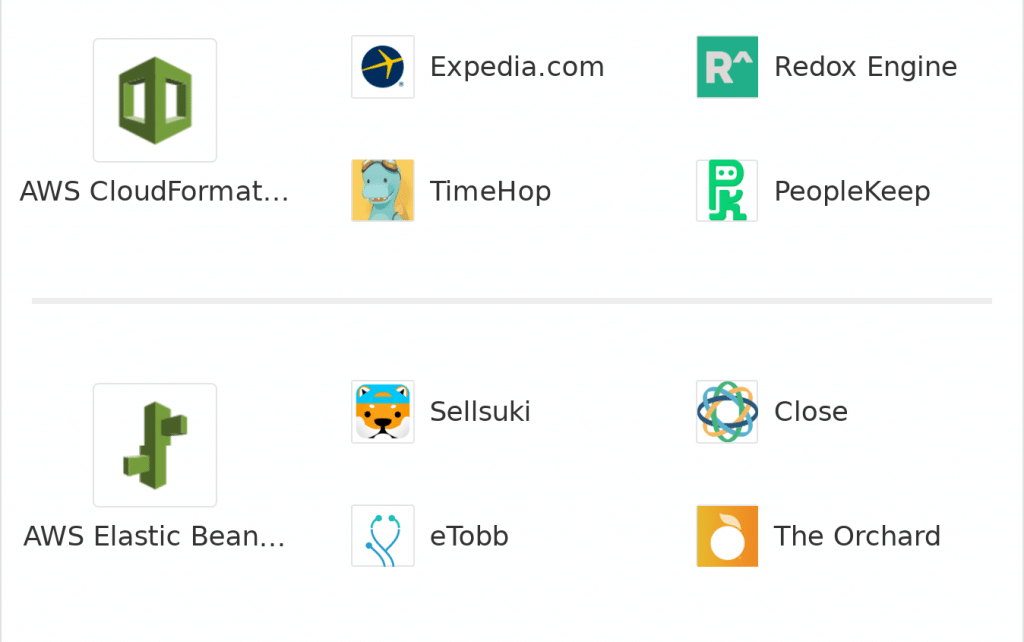
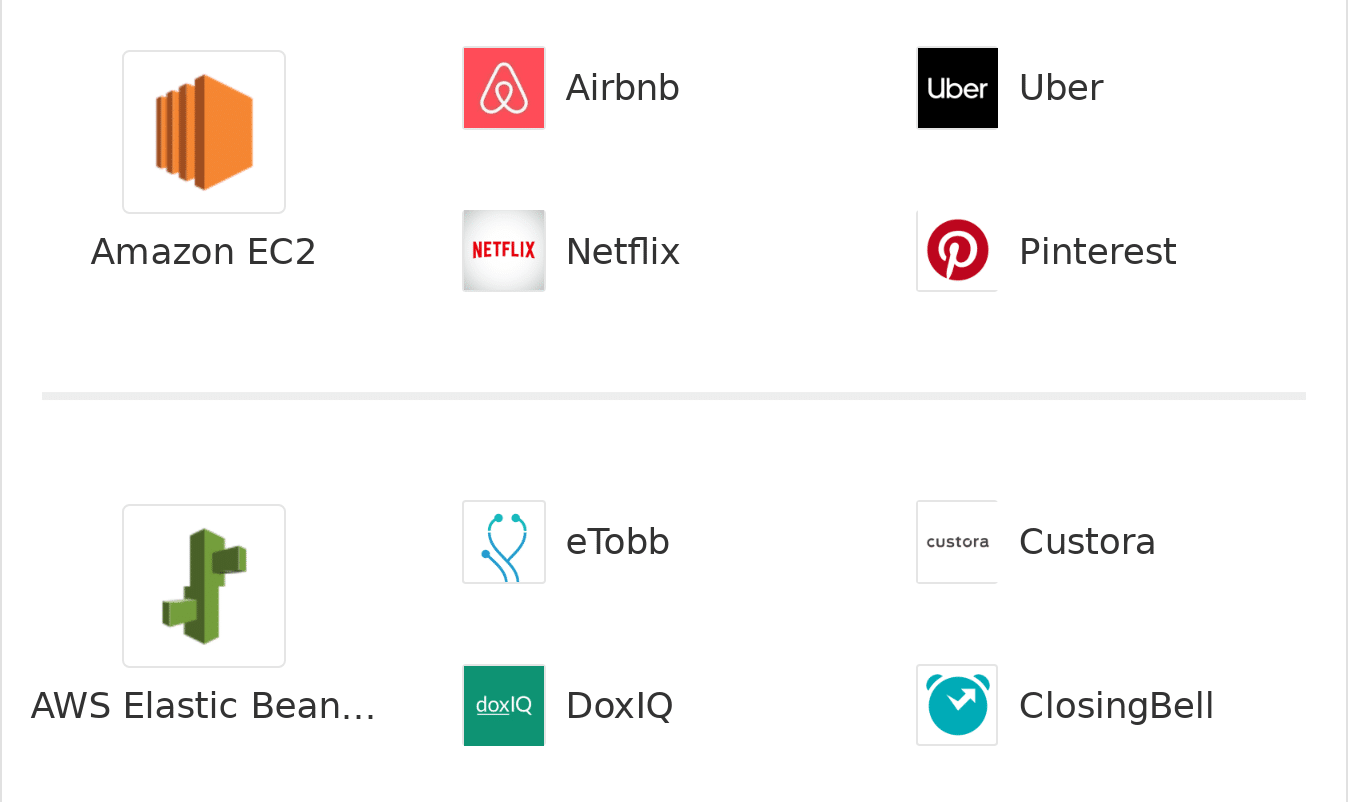
Elastic Beanstalk Vs CloudFormation - Use Cases of Elastic Beanstalk Vs CloudFormation

Elastic Beanstalk Vs CloudFormation – Use Cases of Elastic Beanstalk Vs CloudFormation


Service What it Does Advantages
AWS Elastic Beanstalk Directly takes care of EC2, Auto Scaling and Elastic Load Balancing Gives the developer the ability to manage only code and not systems
AWS CloudFormation Uses JSON files for defining and launching cloud services like ELB, Auto Scaling and EC2 Simplifies and makes everything easier for a Systems Engineer

AWS Elastic Beanstalk is considered the simplest automation solution which provides users the capabilities for setting up somewhat complex deployment environments while not needing a lot of insights on AWS. When it comes to AWS CloudFormation, things will be more pressuring and complex to start with, but once you get some hands-on, they can be straightforward.

It’s best with Web endpoints that are somewhat complex in terms of the required services and systems, which ends up having a low number of web frontends that are going with RDS implementation.


Here are few awesome resources on AWS Services:
AWS Elastic Beanstalk Basics
AWS Elastic Beanstalk Pricing
AWS Elastic Beanstalk Vs EC2
AWS Elastic Beanstalk vs Lambda
AWS EC2 Tagging

  • CloudySave is an all-round one stop-shop for your organization & teams to reduce your AWS Cloud Costs by more than 55%.
  • Cloudysave’s goal is to provide clear visibility about the spending and usage patterns to your Engineers and Ops teams.
  • Have a quick look at CloudySave’s Cost Caluculator to estimate real-time AWS costs.
  • Sign up Now and uncover instant savings opportunities.
 

Elastic Beanstalk Vs EC2 - Elastic Beanstalk Vs EC2 companies

Elastic Beanstalk Vs EC2: What Is Best?

This article provides a detailed overview of Elastic-Beanstalk vs. Ec2, and also highlights a few of the use cases in general.


Elastic Beanstalk Vs EC2: What is Best?

In the ongoing debate about the best between Elastic Beanstalk Vs EC2, the prime concern of new users as they go on with exploring AWS’s Elastic Beanstalk, is the manner by which it is seen as unique in relation to Amazon EC2. Such a position is justifiable since the two AWS services may be utilized correspondingly for some specific outstanding tasks at hand.

Watch the video below about AWS Elastic Beanstalk vs AWS EC2 comparison

Regardless of their similarities, there are significant contrasts between them, as well.

  • The Elastic Beanstalk is essentially 1 layer of reflection away from that of the EC2 layer.
  • At a point when you work with Beanstalk’s service, all the backend servers will be EC2 instances, and they will be getting their configuration behind a load balancer that will open them to the outer universe.
  • Truly, a Beanstalk arranged framework conceals several matters as it sets up a situation for you that contains EC2 instances, security scaling groups, databases, and so forth.

Now let’s all hop into the facts on the “How” and “Where” those 2 AWS services actually vary.


Differences between the AWS Services of Elastic Beanstalk and EC2:

How does the EC2 work Vs Elastic Beanstalk?

Elastic Beanstalk Vs EC2 - EC2 compared to Elastic Beanstalk

Elastic Beanstalk Vs EC2 – EC2 Vs Elastic Beanstalk

EC2 allows users to create and launch servers in the cloud. The EC2 instances offer a total web services API for accessing the many different services that are available on AWS platform.


How does the Elastic Beanstalk actually work Vs EC2?

Elastic Beanstalk Vs EC2 - Elastic Beanstalk compared to EC2

Elastic Beanstalk Vs EC2 – Elastic Beanstalk Vs EC2

  • The Elastic Beanstalk service from AWS provides developers with a platform for the deployment of apps on the AWS cloud, as well as gets them connected to other AWS services.
  • This means that Elastic Beanstalk cannot be regarded as something which could be discovered as time goes by, but on the contrary, it should be studied in terms of its underlying AWS services and the way they work in concert with the help of Elastic Beanstalk.
  • Elastic Beanstalk connects services such as S3, EC2 and Auto Scaling in order to deploy elastic cloud apps.
  • When an environment gets launched, Elastic Beanstalk will merely use an already defined AMI, which is accompanied by an operating system that is installed, then goes ahead with launching a newly created instance having the same type of your specification.
  • Additionally, Beanstalk would set up an elastic load balancer making it respond to a unique URL.
  • Due to the fact that Elastic Beanstalk would orchestrate various services, you will find extra procedures of interaction with those services.

Regardless of the fact that everything would be organized and verified by default, you will get the possibility to actually work with and change the assets managed by Elastic Beanstalk, where you’ve got the opportunity to either overwrite, adjust or bypass whatever Elastic Beanstalk performs. You can also get things customized based on what you require.


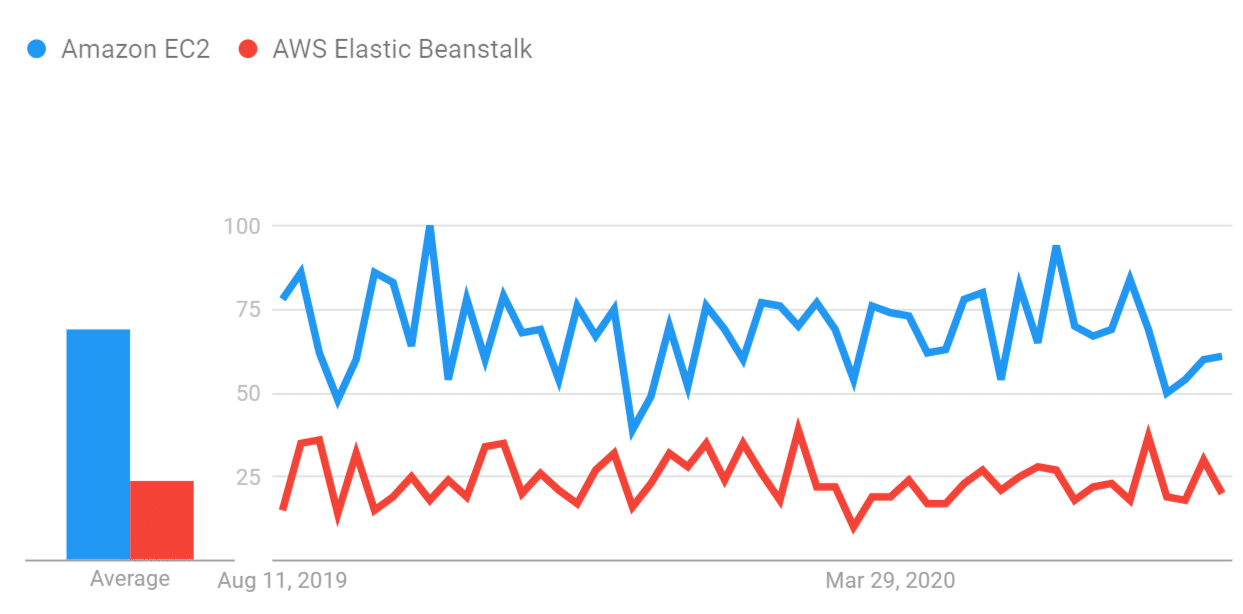
Comparison of Interest over time for Elastic Beanstalk Vs EC2:

Elastic Beanstalk Vs EC2 - Elastic Beanstalk and EC2 Interest Over Time

Elastic Beanstalk Vs EC2 – Elastic Beanstalk and EC2 Interest Over Time

As it can be concluded from the above graph, Amazon EC2 has a higher interest over time while AWS Elastic Beanstalk has a low interest overtime rate. This means that with the use of Amazon EC2 you can get a higher rate of interest as time goes by, while with AWS Elastic Beanstalk this rate will be way less.


Advantages and Disadvantages of AWS Elastic Beanstalk Vs EC2:

Check out in the table below some of the major advantages and disadvantages of AWS Beanstalk and those of Amazon EC2.

AWS Service Advantages Disadvantages
Elastic Beanstalk 1. Integrates with a variety of AWS services

2. Easy deployment

3. Quick

4. Painless

5. Neatly Documented

You will get charged directly upon exceeding the free quota
EC2

1. Fast and reliable cloud servers

2. Scalable

3. Easily managed

4. Low costing

5. Auto-scaling

Ui needs extra work

Poor CPU performance

High learning curve


“Fast and reliable cloud servers” is the major cause for having a greater number of developers who prefer using Amazon EC2, yet a lower number of developers shed light on the feature of “Integrates with a variety of AWS services” as the number one reason behind going with the AWS Elastic Beanstalk.


Summary:

What is the Functionality of AWS Elastic Beanstalk?

Elastic Beanstalk Vs EC2 - AWS Elastic Beanstalk

Elastic Beanstalk Vs EC2 – AWS Elastic Beanstalk

Upon uploading an app, the AWS Elastic Beanstalk will directly take care of the capacity provisioning & deployment details, along with that app health monitoring, auto-scaling & load balancing.


What is the Functionality of Amazon EC2?

Elastic Beanstalk Vs EC2 - Amazon EC2

Elastic Beanstalk Vs EC2 – Amazon EC2

Amazon EC2 is a web service that offers its users some resizable computing capacity when working with the cloud. This service helps in transforming web-scale computing into a simple and easy task for its developers. If you’d like to learn more about EC2 and how to work with instances, you can check our article about the EC2 Launch Instance Wizard.


What is the Classification of Elastic Beanstalk Vs EC2?

The category ofCloud Hosting” is the tech stack classification under which Amazon EC2 is located. Meanwhile, the classification of Platform as a Service is the one to which AWS Elastic Beanstalk belongs to.


Here are a few awesome resources on AWS Services:

AWS Elastic Beanstalk Basics
AWS Elastic Beanstalk Pricing
AWS Elastic Beanstalk Vs Cloudformation
AWS Elastic Beanstalk vs Lambda
AWS EC2 Tagging


  • CloudySave is an all-around one-stop-shop for your organization & teams to reduce your AWS Cloud Costs by more than 55%.
  • Cloudysave’s goal is to provide clear visibility about the spending and usage patterns to your Engineers and Ops teams.
  • Have a quick look at CloudySave’s Cost calculator to estimate real-time AWS costs.
AWS BATCH

Starting with AWS Batch

Starting with AWS Batch

For the sake of going through with the process of starting with AWS Batch features, you will need to go through the below steps.

Defining a Job in AWS Batch:

In the following tutorial, you will learn how to define your job definition; otherwise, choose to go on with the creation of a job queue and a compute environment with no job definition.

For the sake of configuring job options, go through the below steps:

Starting with AWS Batch - Configuring Job Options

Starting with AWS Batch – Configuring Job Options

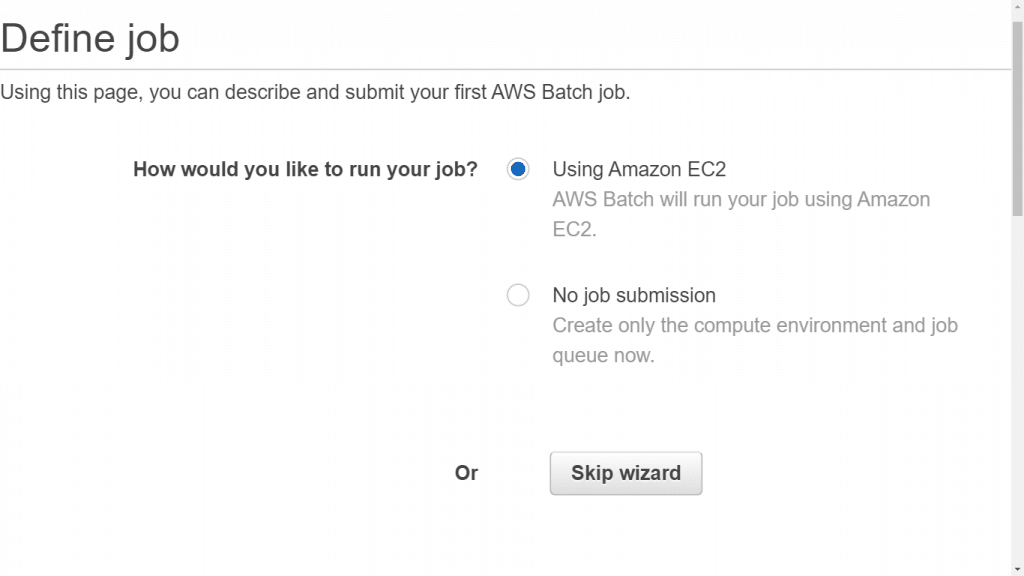
  1. Go to the Batch console first-run wizard using the following link https://console.aws.amazon.com/batch/home#/wizard.
  2. For the sake of creating a Batch job definition, a compute environment, as well as a job queue, then after that, going ahead with submitting your job, select the option Using Amazon EC2. For the sake of merely creating the compute environment as well as the job queue with no job submission, select No job submission.
  3. In case you decide to select the choice of creating a job definition, this will require you to go over the upcoming 4 sections of the first-run wizardJob run-timeEnvironmentParameters, and Environment variables and then choose Next.

For the sake of specifying job run time, go through the below steps:

Starting with AWS Batch - Specifying Job Runtime

Starting with AWS Batch – Specifying Job Runtime

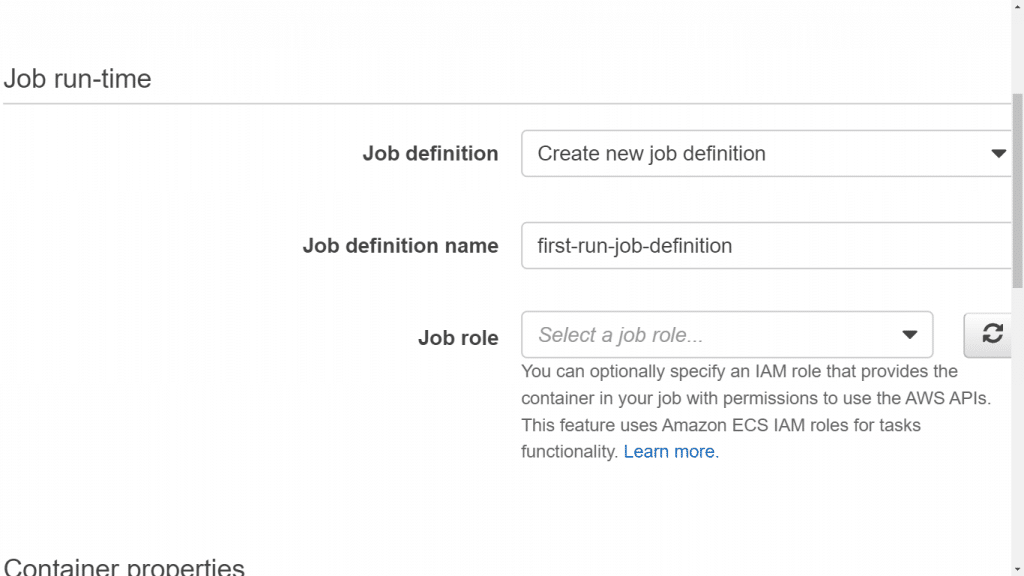
  1. In case you’re getting a new job definition created, you will need to set a name for your job definition in the section of the Job definition name.
  2. In the section Job role, it’s possible to set an IAM role capable of giving your job’s container permissions for using APIs that utilize ECS IAM roles for the sake of task functionality.
  3. In the section of Container Image, select the Docker image you’d like to set for the job.

For the sake of specifying resources for the environment, go through the below steps:

Starting with AWS Batch - Specifying Resources for the Environment

Starting with AWS Batch – Specifying Resources for the Environment

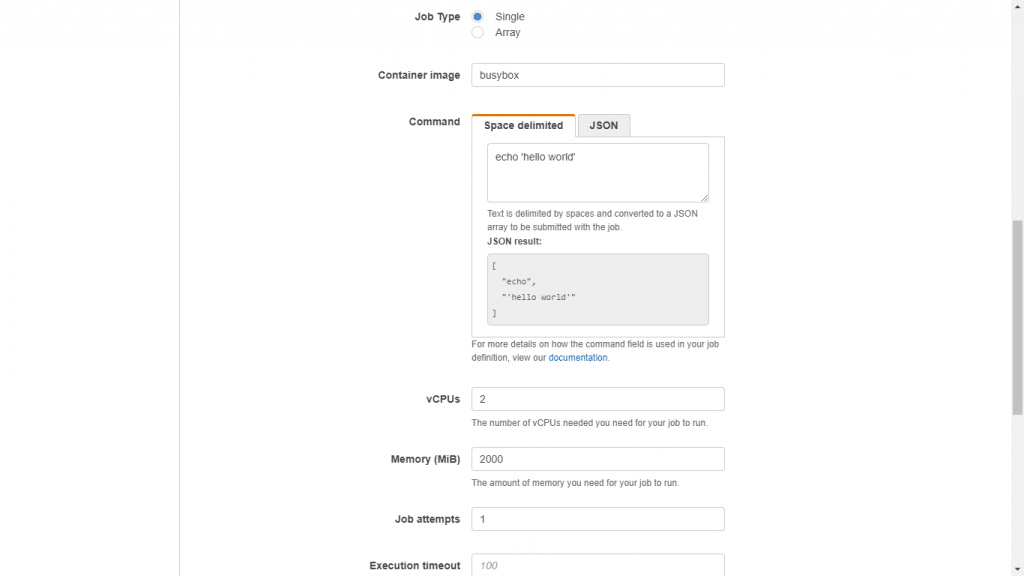
  1. In the section of Command, specify which command you’d like to give the container, and such a parameter will start mapping to Cmd in the section of Create a container found in Docker Remote API and the parameter of COMMAND to docker run.
  2. In the section of vCPUs, set how many vCPUs you’d like to reserve for your selected container.
  3. In the section of Memory, set the number of MiB for hard limit of memory for the sake of presenting it to the container of your job. If your container attempts to exceed the memory specified here, the container is killed.
  4. In the section of Job Attempts, set the max allowed number of times when a failure occurs for attempting your job.

Parameters

Starting with AWS Batch - Setting Parameters

Starting with AWS Batch – Setting Parameters

It is possible to set some parameter substitution placeholders and default values in the command.

  1. Key: setting a key for the parameter.
  2. Value: setting a value for the parameter.

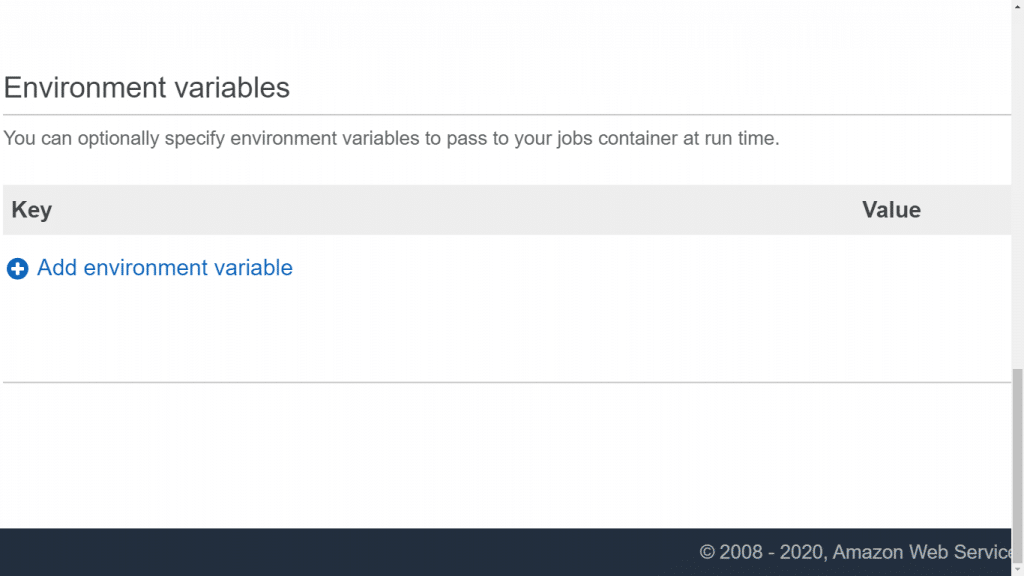
For the sake of specifying AWS Batch environment variables, go through the below steps:

Starting with AWS Batch - Specifying Environment Variables

Starting with AWS Batch – Specifying Environment Variables

It is possible to set some environment variables for passing to the container of your job.

Keep in Mind:

It’s not advised to utilize plain text environment variables when working with sensitive information like passwords and credential data.

  1. In the section of Key, you will need to set the environment variable’s key.
  2. In the section on Value, you will need to set the environment variable’s value.

Configuring the Job Queue and Compute Environment of you AWS Batch

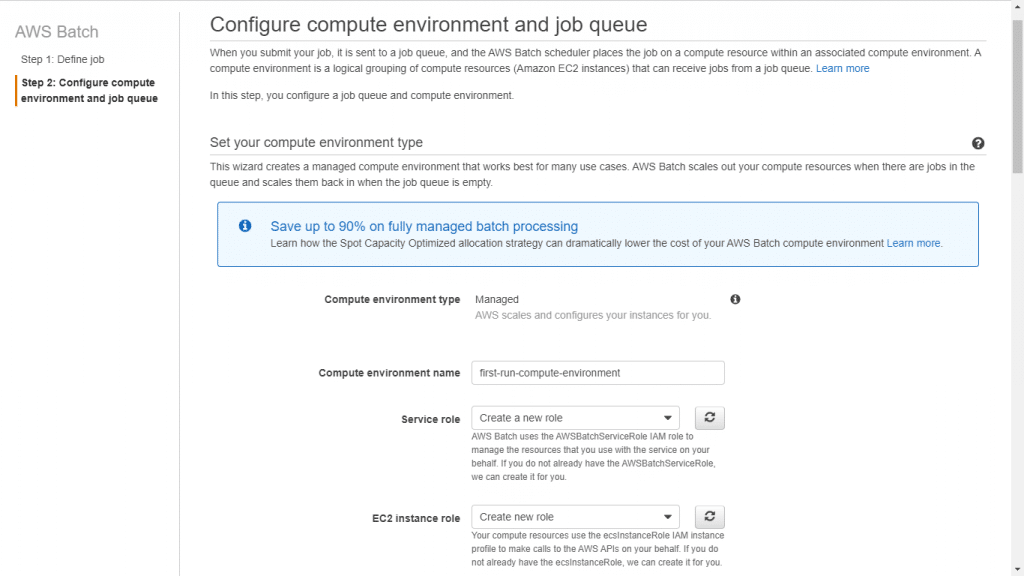
For the sake of configuring your compute environment type, go through the below steps:

Starting with AWS Batch - configuring your compute environment type

Starting with AWS Batch – configuring your compute environment type

  1. In the section Compute environment name, you will need to set a special name for the compute environment.
  2. In the section Service role, you can either go with the option of getting a new role created or simply using one of the already existing roles which will provide Batch service the capability to perform calls on your behalf to necessary APIs. In case you would like to get a new role created, you will find that the needed role of AWSBatchServiceRole will get created.
  3. In the section of EC2 instance role, you can either go with the option of getting a new role created or simply using one of the already existing roles which will provide the ECS container instances, which will be created for your compute environment, with the ability to perform calls to the needed APIs. In case you would like to get a new role created, you will find that the needed role of ecsInstanceRole will get created.

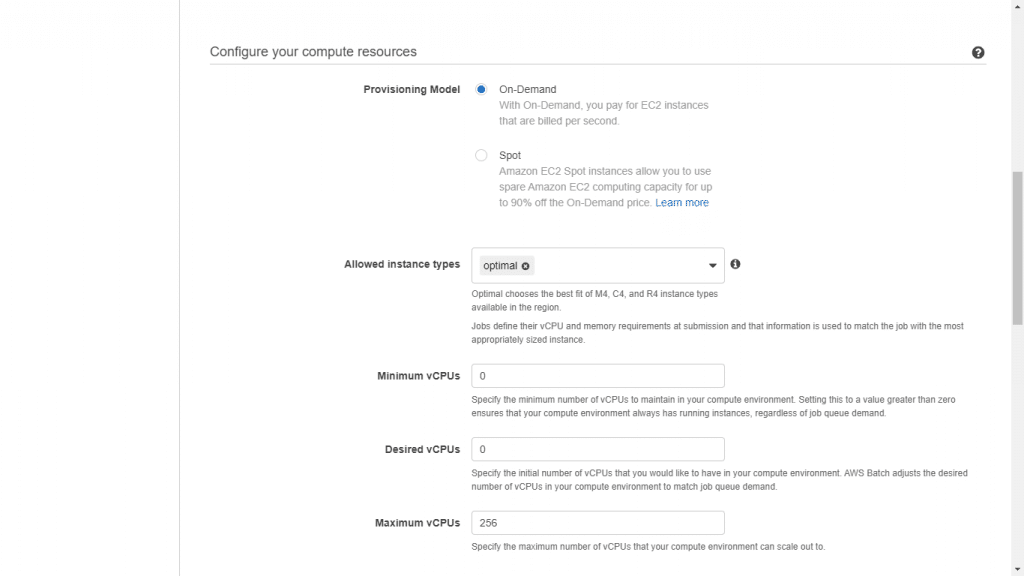
For the sake of configuring instances, go over the following steps:

Starting with AWS Batch - Configuring Instances

Starting with AWS Batch – Configuring Instances

  1. In the section of Provisioning model, select the option On-Demand for launching EC2 On-Demand instances; otherwise, choose the option Spot for using EC2 Spot Instances instead.
  2. In the case of selecting EC2 Spot Instances:

– For the section of Maximum bid price, you will need to select the max % for the Spot Instance price in comparison with On-Demand prices for the same instance type prior to launching the instances.

– For the section of Spot fleet role, you can either select the option for creating a new role otherwise utilizing an already existing EC2 Spot Fleet IAM role for the sake of applying it to the Spot compute environment.

  1. For the section of Allowed instance types, you will need to select the Amazon EC2 instance types that may launched.
  2. For the section of Minimum vCPUs, you will need to select the min of EC2 vCPUs for your compute environment to maintain without taking into consideration the job queue demand.
  3. For the section of Desired vCPUs, you will need to select the amount of EC2 vCPUs for launching your compute environment.
  4. For the section of Maximum vCPUs, you will need to select the max of EC2 vCPUs which may be scaled out to by your compute environment, without taking into consideration the job queue demand.

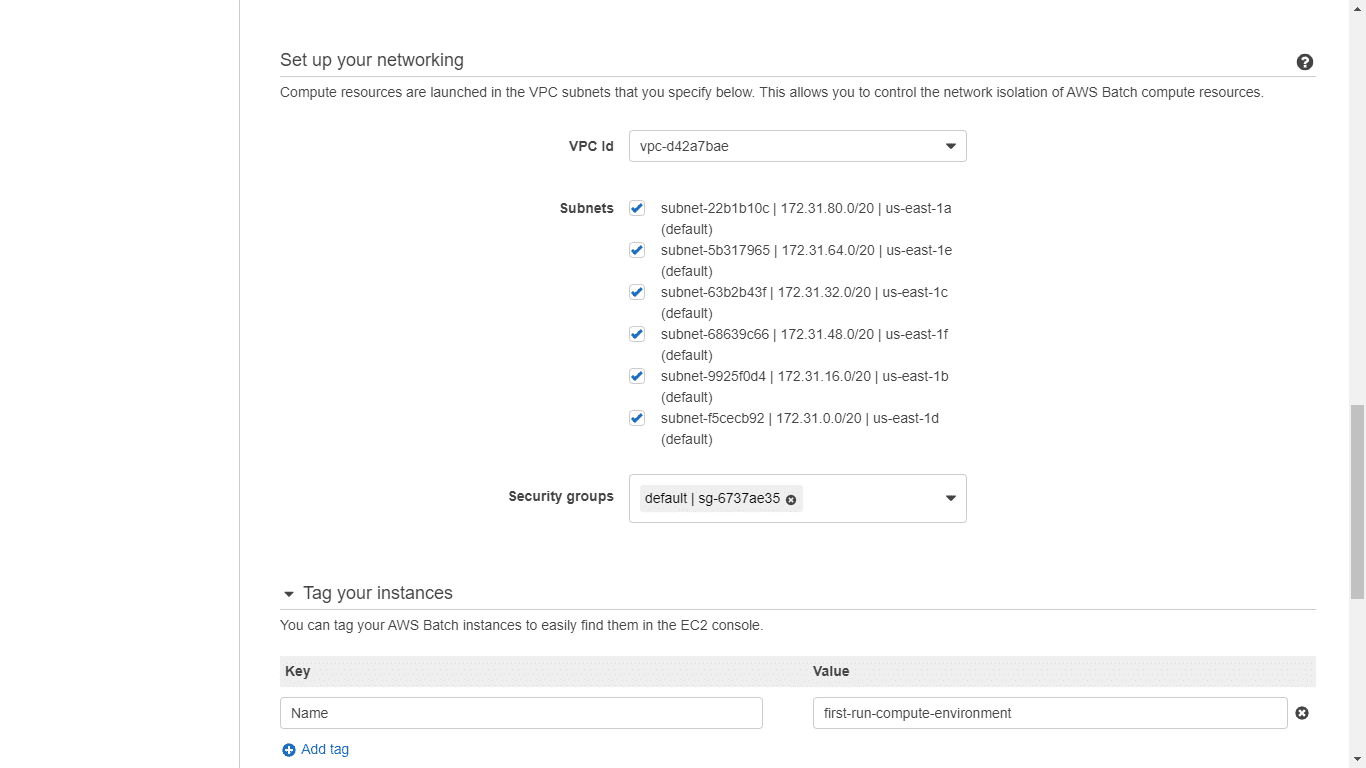
For the sake of setting up networking, go over the below steps:

Starting with AWS Batch - Setting Up Networking

Starting with AWS Batch – Setting Up Networking

Compute resources will get launched into your VPC along with the subnets that are going to be set now. Doing so will provide you with the ability to take control over the network isolation of your Batch compute resources.

Keep in Mind:

Compute resources will require to get access in order to be able to communicate with the ECS service endpoint. Such a process may be performed using an interface VPC endpoint otherwise using compute resources that include public IP addresses.

In case no interface VPC endpoint is found configured and you have to compute resources without public IP addresses, then you will need to rely on network address translation in order to get the required access.

  1. In the section of VPC Id, you will need to select which VPC you’d like to get your instances launched with.
  2. In the section of Subnets, you will need to select the specific subnets from the chosen VPC for hosting the instances. Every single subnet found in the chosen VPC is thus selected.
  3. In the section of Security groups, you will need to select a security group for the sake of attaching it to the instances. The default security group for this VPC will be chosen by default.

For the sake of tagging your instances, go over the below steps:

Starting with AWS Batch - Tagging Instances

Starting with AWS Batch – Tagging Instances

It is optional for you to apply key-value pair tags for your instances that get launched in your chosen compute environment.

As an example, it is possible to set “Name”: “Batch Instance – C4OnDemand” as one of your tags to give every instance found in your compute environment this same name which will grant you the capability to determine and differentiate between your Batch instances. Your compute environment name will be the one utilized by default for tagging instances.

  1. In the section Key, you will need to set the tag’s key.
  2. In the section Value, you will need to set the tag’s value.

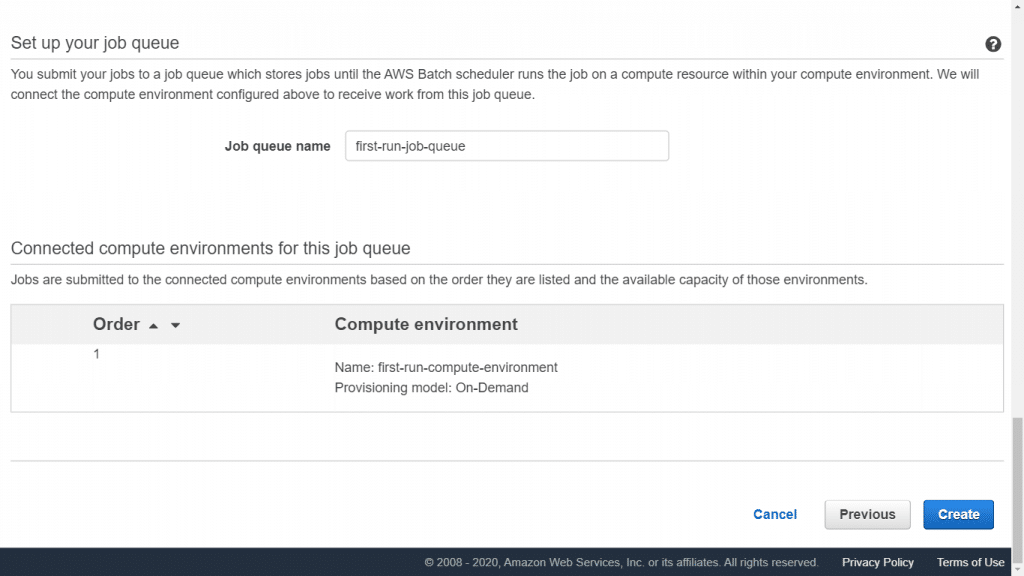
For the sake of setting up a job queue, go over the following steps:

Starting with AWS Batch - Setting Up Job Queue

Starting with AWS Batch – Setting Up Job Queue

Now, you will need to get your job submitted to a job queue that is capable of storing jobs till when the Batch scheduler starts running your job on one of the compute resources that are found in your chosen compute environment.

  • For the Job queue name, choose a unique name for your job queue.

For the sake of the AWS Batch step of reviewing and creating, go through the below:

In the section of Connected compute environments for this job queue, you can see that the newly created compute environment is going to be associated with the new job queue and the order accompanied by it.

After that, it’s possible to get different compute environments associated with this same job queue. Your job scheduler will utilize the order of your compute environment for the sake of choosing the right compute environment for getting your selected job executed. Your compute environments need to change to the VALID state so that you will be able to get them associated with a specific job queue. A number of 3 compute environments may be associated with your job queue.

  • Go over the compute environment as well as the job queue configuration, then go ahead and select Create in order to get the compute environment created.
AWS Lambda How to Create a Function - AWS Lambda Function Creation

AWS Lambda How to Create a Function

AWS Lambda How to Create A Function

Creating Lambda functions using the console:

In the following tutorial we will be learning how to create a function from our Lambda console. After that, we will get to invoke this Lambda function with some sample event data.

Your Lambda will be executing the function and returning its results. When this is done, you will have to verify those execution results and the created logs along with different CloudWatch metrics.

How to get a Lambda function created?

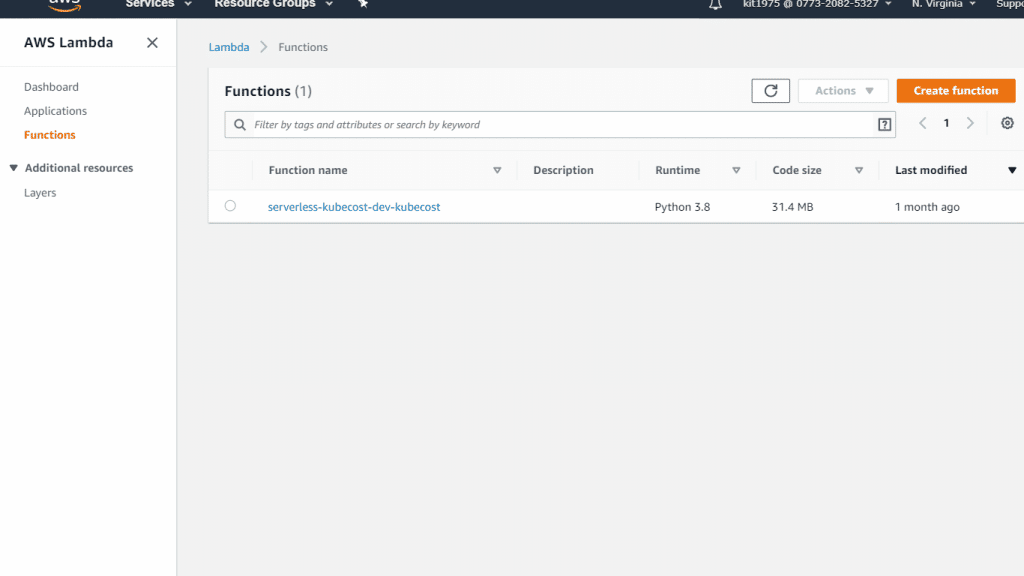
  1. Go straight to the AWS Lambda console.

    AWS Lambda How to Create a Function - AWS Lambda Console

    AWS Lambda How to Create a Function – AWS Lambda Console

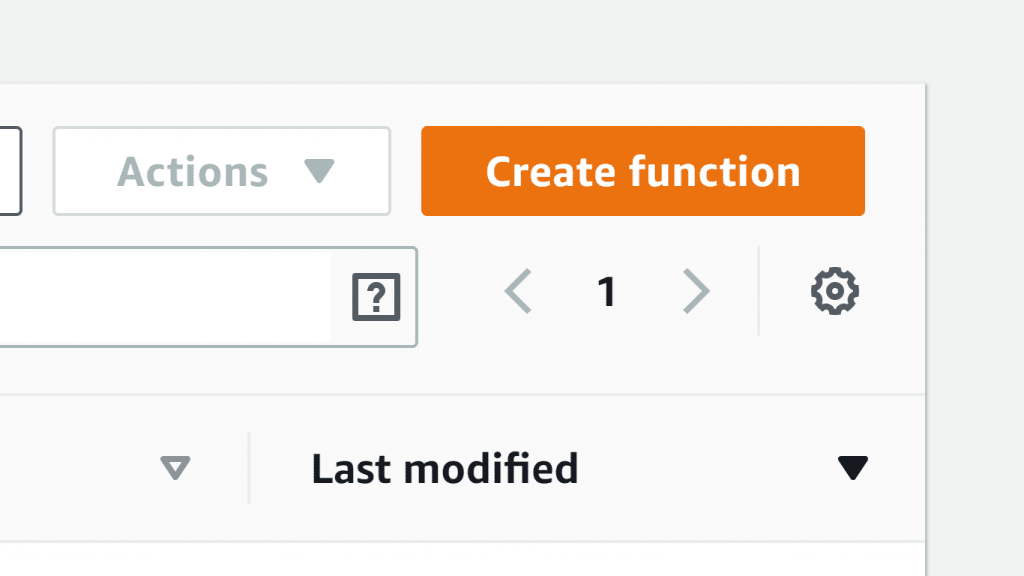
  2. Click on Create a function.

    AWS Lambda How to Create a Function - AWS Lambda Create A Function

    AWS Lambda How to Create a Function – AWS Lambda Create A Function

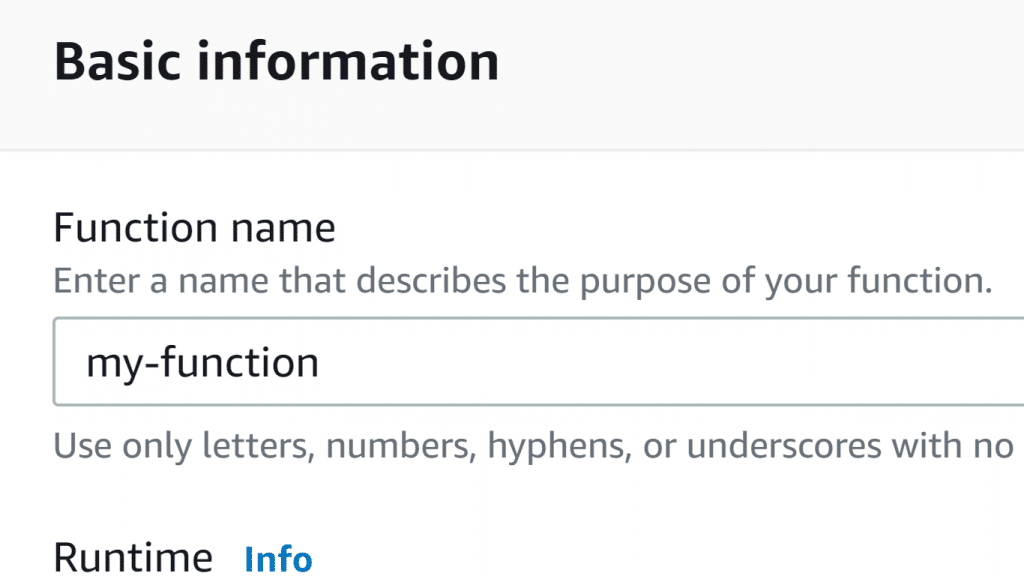
  3. In Function name, enter the following name for your function:

my-function.

AWS Lambda How to Create a Function - AWS Lambda Enter Function Name

AWS Lambda How to Create a Function – AWS Lambda Enter Function Name

  1. Click on Create function.

    AWS Lambda How to Create a Function - AWS Lambda Click Create Function

    AWS Lambda How to Create a Function – AWS Lambda Click Create Function

What happens now?

Lambda will be creating a Node.js function as well as an execution role which will be giving your function the required permission for uploading logs. Also, Lambda will be assuming the execution role upon invoking the function, then creates with it the credentials for SDK and reading data from event sources.

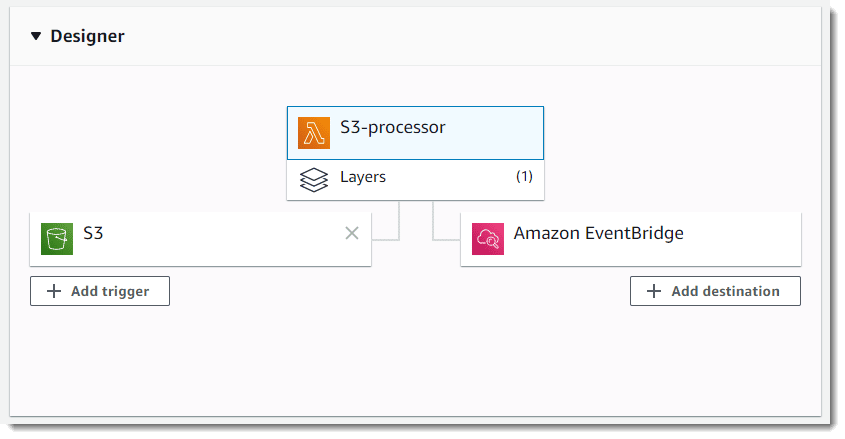
How to Use the designer?

Your Designer will display for you the following:

– Function’s overview

– Function’s upstream resources
– Functions downstream resources

The Designer helps you in configuring the following: layers, destinations and triggers.

AWS Lambda How to Create a Function - AWS Lambda Designer

AWS Lambda How to Create a Function – AWS Lambda Designer

You can click on my-function which is found in the designer so that you get back to the configuration and code of your function. When using scripting languages, your Lambda will give you some sample code which is capable of returning a success response.

How to Invoke Lambda function?

Invoke your Lambda function using the sample event data provided in the console.

For invoking a function, follow the below listed steps:

  1. Select Test from the top right.

    AWS Lambda How to Create a Function - AWS Lambda Test Button

    AWS Lambda How to Create a Function – AWS Lambda Test Button

  2. From Configure test event page, select the option Create new test event then for the Event template, do not change the default option for Hello World. Type in a unique Event name then take into consideration the below shown sample event template:
  3. {
  4. “key3”: “value3”,
  5. “key2”: “value2”,
  6. “key1”: “value1”

}

It is possible to put different key and values in the sample JSON yet without changing any of the event’s structure. In case of choosing to change specific keys and values, it will be required for you to update your sample code with the newly entered parameters.

  1. Click on Create then select Test. Every single user is capable of creating up to ten test events for each function and they will not be available to different users.
  2. Your function will get executed by Lambda for you and the lambda function handler will receive then it will start processing the sample event.
  3. When the execution succeeds, go and check the results using the console.

– Execution result: displays succeeded execution status and the results for your function execution which get returned using the return statement.

– Summary: displays key data which is found in the section of Log output under the REPORT line shown in execution log.

Log output: displays log generated by Lambda upon every execution. Those generated logs are the ones Lambda Function writes to CloudWatch and they are displayed by the Lambda console to simplify things for you.

Keep in mind the fact that the Click here link will display logs using the CloudWatch console and then the function is going to add logs to CloudWatch inside the log group which is associated with the Lambda function.

  1. You will need to run your Lambda function a couple of times for the sake of getting a few metrics for viewing up next.
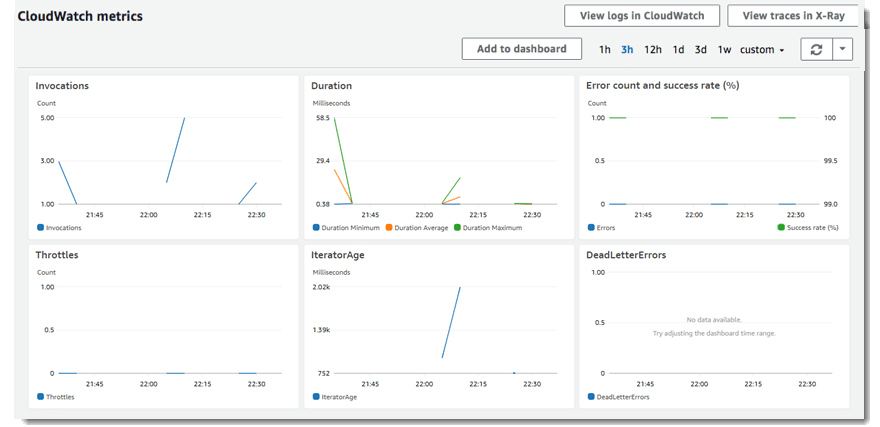
  2. Click on Monitoring where you will be able to check graphs for specific metrics sent by Lambda to CloudWatch.

    AWS Lambda How to Create a Function - AWS Lambda CloudWatch Metrics

    AWS Lambda How to Create a Function – AWS Lambda CloudWatch Metrics

How to perform the Clean up?

If you are done working with the example function, delete it. You can also delete the execution role that the console created, and the log group that stores the function’s logs.

Deleting Lambda function:

  1. Go to the Lambda console and open your Functions page.
  2. Select one of the functions.
  3. Click on Actions, then select the option Delete function.
  4. Click on Delete.

Deleting log group of the function:

  1. Go to the CloudWatch console and head to the Log groups page.
  2. Select the log group of the function which looks like this /aws/lambda/my-function.
  3. Click on Actions, then select the option Delete log group.
  4. Click on Yes, Delete.

Deleting execution role of the function:

  1. Go to the IAM console and open the Roles page.
  2. Select the role of the function which looks like this my-function-role-31exxmpl
  3. Click on Delete role.
  4. Select the option Yes, delete.

You can automate Cleanup and creation of functions, log groups and roles using CloudFormation and CLI.


How to perform Dependency management with layers?

It’s possible to locally install libraries and add them to the deployment package uploaded to Lambda, yet you need to know that doing so actually has its bad sides and some of which are:

– Bigger files will increase your deployment times

– It will not allow you to use the Lambda console for testing changes to your function code

How to solve this?

You will need to make sure that your deployment package as small as possible while avoiding the uploading of unchanged dependencies, and this way, the sample application will get to create a Lambda layer and get it associated with the selected function.

Example of a blank-nodejs/template.yml Dependency layer

Resources:

function:

Type: AWS::Serverless::Function

Properties:

Handler: index.handler

Runtime: nodejs12.x

CodeUri: function/.

Description: Call the AWS Lambda API

Timeout: 10

# Function’s execution role

Policies:

– AWSLambdaBasicExecutionRole

– AWSLambdaReadOnlyAccess

– AWSXrayWriteOnlyAccess

Tracing: Active

Layers:

        – !Ref libs

  libs:

    Type: AWS::Serverless::LayerVersion

    Properties:

      LayerName: blank-nodejs-lib

      Description: Dependencies for the blank sample app.

      ContentUri: lib/.

      CompatibleRuntimes:

        – nodejs12.x

2-build-layer.sh script: It will install the dependencies of your function using npm then add them to a folder having the necessary structure for Lambda runtime.

Example of 2-build-layer.sh How to prepare the layer?

#!/bin/bash

set -eo pipefail

mkdir -p lib/nodejs

rm -rf node_modules lib/nodejs/node_modules

npm install –production

mv node_modules lib/nodejs/

When the sample application gets deployed, the CLI will package the layer apart from the function code, then it goes ahead with deploying them.

When performing subsequent deployments, you will find that the layer archive will merely get uploaded in case the lib folder includes changed contents.

AWS lambda Synchro or Asynchro


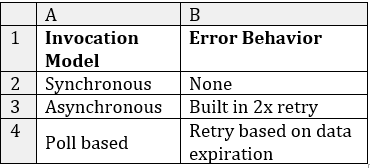
AWS Lambda Synchronous or Asynchronous - Synchronous Vs Asynchronous Error Behavior

AWS Lambda: Synchronous or Asynchronous

AWS Lambda: Synchronous or Asynchronous

Synchronous or Asynchronous?

AWS Lambda Synchronous or Asynchronous - Synchronous Vs Asynchronous Error Behavior

AWS Lambda Synchronous or Asynchronous – Synchronous Vs Asynchronous Error Behavior

Synchronous or Asynchronous Invocations are the 2 types of Invocations used by Lambda.

Upon executing code within Lambda, you may invoke your functions synchronously or asynchronously. They are both useful and required for various situations, but are accompanied with interesting side effects as well in your serverless space.

Synchronous functions:

– Utilized for discovering what the result of an operation is even prior to carrying on along to your next one.

– Simple just like invoking one function which performs a calculation and later on utilizes its result in the other function.

– Easier and simpler for handling and keeping track of since they mainly get invoked each one on its own after the other, in order.

– Provide you with the result of a function right before heading on to the following other one in order not to worry about getting any data missing.

At other times, it wouldn’t even matter what response you would get; it is simply satisfactory to discover your function has gotten fired and is now running perfectly well. In this case, you should rely on asynchronous functions for your invocations. An example of when its good for you to be choosing to run an asynchronous function is when you’d like to start a video encoding process. Lambda then sends a response stating that your video encoding function was invoked and has begun successfully. Since this function is asynchronous, you will receive this response right after the process starts, rather than needing to keep waiting up till the process finishes.

Functions that get invoked synchronously or asynchronously within Lambda get handled in various ways in case of failure, and this may inflict a couple of unexpected side effects in the logic of your program. In the case of synchronously invoking your functions directly, then the invoking application used will be held responsible for every single one of the retries. While relying on integrations you will find that they might include extra retries that come built in. Functions which get invoked asynchronously will not be relying on any invoking application for their retries, because the retries here will be built in and running automatically. The invocation shall get retried two times while having delays in-between. In case both retries end up in failure, the event will get discarded. Asynchronous invocations allow you to create a Dead Letter Queue that may be utilized for keeping the failing event from getting discarded. A Dead Letter Queue provides you with the opportunity to send unprocessed events to an Amazon SQSor SNS queue so that you get to build some logic to start dealing with.
 

Synchronous Invocation

Upon the invocation of a function synchronously, Lambda will run the function and await a response. Upon the finish of the function execution, Lambda will return a response from the function’s code holding extra data, like the executed function’s version. For invoking a function synchronously using the CLI, utilize the following command: invoke.

$ aws lambda invoke –function-name my-function –payload ‘{ “key”: “value” }’ response.json

{

“ExecutedVersion”: “$LATEST”,

“StatusCode”: 200

}

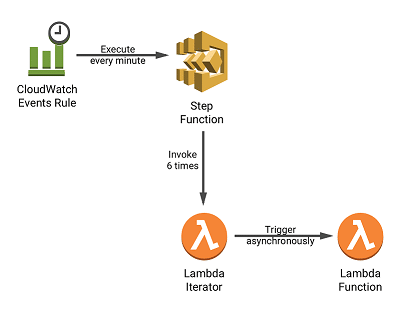
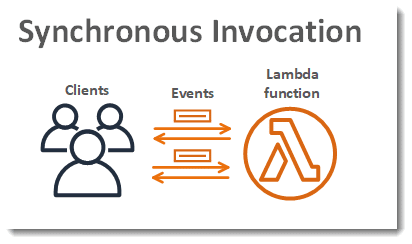
This below diagram displays the way clients invoke their Lambda functions synchronously. Lambda tends to send the events in a direct manner to your function and then starts sending the function’s response to its invoker.

AWS Lambda Synchronous or Asynchronous - Synchronous Invocation

AWS Lambda Synchronous or Asynchronous – Synchronous Invocation

The payload refers to a string containing an event found in the JSON format. The file that get the response written by CLI from the function is called response.json. In the case of returning an object or error, the response will be that object or error sent in the JSON format. In case the function ends up exiting without error, its response will be null.

Output from command: shown in the terminal and contains data from headers found in the response coming from Lambda, including the version in which the event was processed (useful for aliases), and the status code which is sent back by Lambda. In case Lambda runs the function, 200 is what the status code will be, regardless if an error gets returned by the function.

In the case that Lambda fails to run the function, the error is going to get displayed in the output.

$ aws lambda invoke –function-name my-function –payload value response.json

An error occurred (InvalidRequestContentException) when calling the Invoke operation: Could not parse request body into json: Unrecognized token ‘value’: was expecting (‘true’, ‘false’ or ‘null’)

at [Source: (byte[])”value”; line: 1, column: 11]

Rely on the –log-type option for getting logs for your invocation coming from the command line. Included in the response is a LogResult field which has up to 4 KB of base64-encoded logs from that invocation.

$ aws lambda invoke –function-name my-function out –log-type Tail

{

“StatusCode”: 200,

“LogResult”: “U1RBUlQgUmVxdWVzdElkOiA4N2QwNDRiOC1mMTU0LTExZTgtOGNkYS0yOTc0YzVlNGZiMjEgVmVyc2lvb…”,

“ExecutedVersion”: “$LATEST”

}

It’s possible to utilize the base64 utility for decoding the logs.

$ aws lambda invoke –function-name my-function out –log-type Tail \

–query ‘LogResult’ –output text |  base64 -d

START RequestId: 57f231fb-1730-4395-85cb-4f71bd2b87b8 Version: $LATEST

“AWS_SESSION_TOKEN”: “AgoJb3JpZ2luX2VjELj…”, “_X_AMZN_TRACE_ID”: “Root=1-5d02e5ca-f5792818b6fe8368e5b51d50;Parent=191db58857df8395;Sampled=0″”,ask/lib:/opt/lib”,

END RequestId: 57f231fb-1730-4395-85cb-4f71bd2b87b8

REPORT RequestId: 57f231fb-1730-4395-85cb-4f71bd2b87b8  Duration: 79.67 ms      Billed Duration: 100 ms         Memory Size: 128 MB     Max Memory Used: 73 MB

AWS Lambda Synchronous or Asynchronous - Asynchronous Invocation

AWS Lambda Synchronous or Asynchronous – Asynchronous Invocation

Asynchronous Invocation

When a function is invoked asynchronously, waiting for a response to arrive from the function code is not necessary. The event gets handed off to Lambda and Lambda will be handling the rest. The way that Lambda handles errors may be configured, and it’s possible to send invocation records to reach a downstream resource for the sake of chaining together the components of your used application.

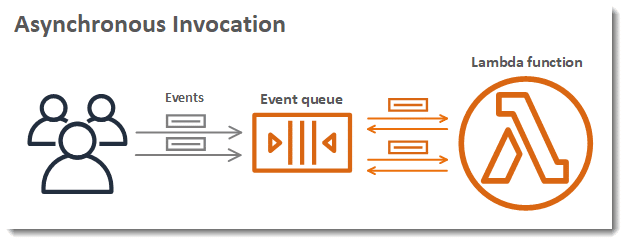
In the below diagram you can see clients invoking a Lambda function asynchronously. Lambda tends to queue its events prior to sending them to functions.

Asynchronous invocation:

The event gets placed by Lambda in a queue and then a success response is returned with absolutely no additional information. Another different process will be reading events from that queue and then sending them straight to your function. For getting a function invoked asynchronously, you must set the invocation type parameter to the following: Event.

$ aws lambda invoke –function-name my-function  –invocation-type Event –payload ‘{ “key”: “value” }’ response.json{    “StatusCode”: 202}

Output file is (response.json) and it will not contain any kind of data, but it will still be  created upon running this command. In case the event was not added by to the queue, the error message will be displayed in the command output.

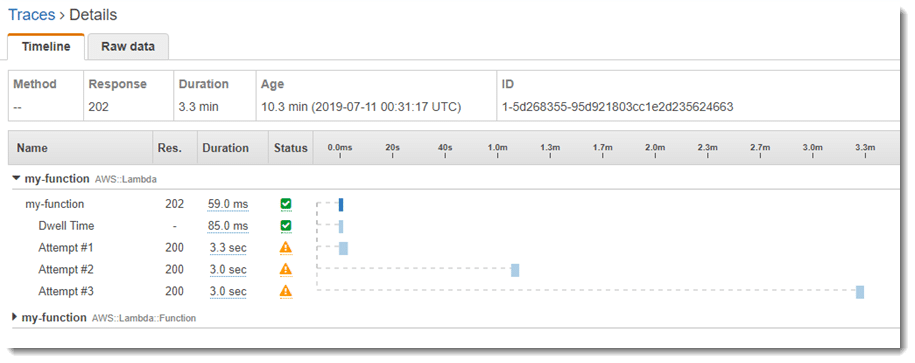
Lambda manages the function’s asynchronous event queue and attempts to retry on errors. In case an error is returned, Lambda will run the function an extra 2 more times, while having to wait for 1 minute in between the first 2 attempts being made, and 2 minutes in between the 2nd and 3rd attempts made. Function errors will be including errors that get returned through the function’s code and errors that get returned through the function’s runtime, for example: timeouts.

AWS Lambda Synchronous or Asynchronous - Error Behavior

AWS Lambda Synchronous or Asynchronous – Error Behavior

In case the function did not include enough concurrency available for processing every single event, some additional requests will get throttled.

The below example displays an event which got successfully added to the queue, but remains pending for a whole one hour late because of throttling.

AWS Lambda Synchronous or Asynchronous - Error Behavior Pending

AWS Lambda Synchronous or Asynchronous – Error Behavior Pending

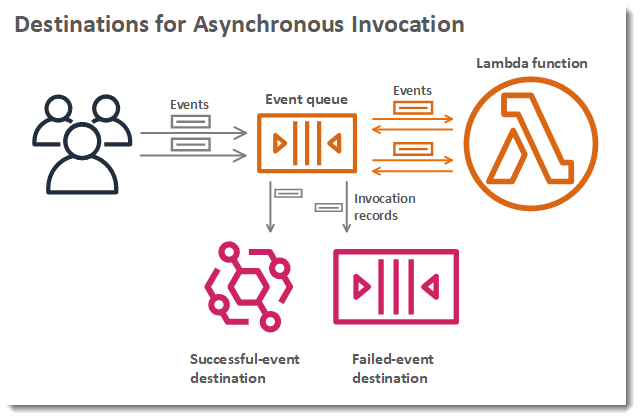
It’s also possible to get Lambda configured for sending an invocation record to a different service. The below destinations are supported by Lambda for asynchronous invocation.

AWS Lambda Synchronous or Asynchronous - Destinations for Asynchronous Invocation

AWS Lambda Synchronous or Asynchronous – Destinations for Asynchronous Invocation

  • Amazon SQS: queue.
  • Amazon SNS: topic.
  • AWS Lambda:
  • Amazon EventBridge: event bus.

Invocation record:

– Includes detailed information regarding the request and response all in a JSON format. – It’s possible to get separate destinations configured for events which get processed in a successful manner, and the events which tend to fail every processing attempt.

– It’s possible to get an SQS queue or SNS topic configured as a dead-letter queue for an discarded event whatsoever.

– Lambda will merely be sending for dead-letter queues, the content of its events, with no details regarding the response.

what is AWS lambda


AWS Tagging - AWS Tagging using tags

AWS Tagging

AWS Tagging

How do AWS Tags Work?

Take a look at what AWS tagging is and the way you can use and rely on those tags to improve your AWS experience.

Let’s start with some basic questions that you must be asking yourself:


    • What is a “tag”?

It’s a label which is assigned to a specific resource.

It consists of two variables, a key and a value, which are both chosen by you.


  • What is it used for?

It helps you in classifying your AWS resources each according to a specific way. For example, you can use a tag to classify your resources by “owner”, “region” or “date”.


  • When do you need them?

You can resort to using tags when you have a large number of resources that are of a  similar type. Tags will help you in distinguishing each resource from the other,  based on the tags assigned to differentiate between them.


  • Where are they used?

You can use them in AWS Management Console, Amazon EC2 API and AWS CLI.


  • How are tags named?

Take note of the below while naming your AWS resources so that you can be able to differentiate between each and every one of them while giving them a unique tag key and value:

  • You should keep in mind that you are capable of adding up to 50 tags only.
  • Tag values or tag keys cannot start with the text aws:. (it’s only for internal use).
  • A tag can have empty values like pageNumber= “ ” . Tag keys are not capable of being empty.
  • 1 tag cannot have various different values. It is possible to get a custom multi-value structure in that 1 value.
  • Tag keys and values of tags are capable of having spaces, letters, numbers and the following symbols: _ . : / = + – @ .
  • Tag key–value pairs: not case sensitive but preserved so as to not be able to include different Apartment and apartment tag keys.
 

  • How can you Display Tags?

There are two types to display tags: Displaying Tags for One of the Resources, or Displaying Tags for All of the Resources.
  • Displaying Tags for One of the Resources:


  1. First you need to open the Amazon EC2 console, https://console.aws.amazon.com/ec2/ then choose a resource specific page.
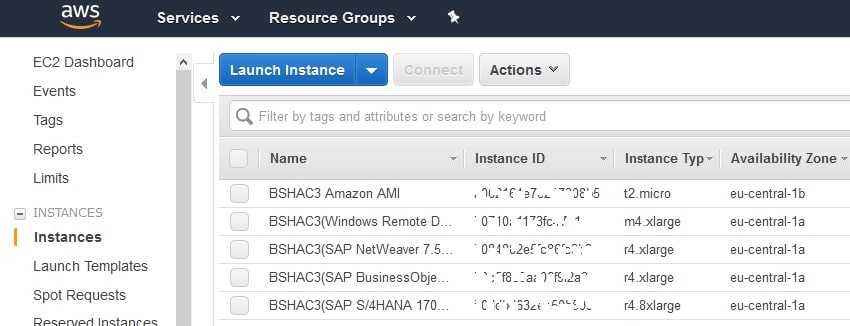
  2. Choose Instances from Navigation Pane, and the console will display to you a list of the Amazon EC2 Instances.
  3. Choose a resource from the list which supports tags so that you can view and manage its tags. (For example, instance.) AWS Tagging - Click on Instances from Console  AWS Tagging – Click on Instances from Console


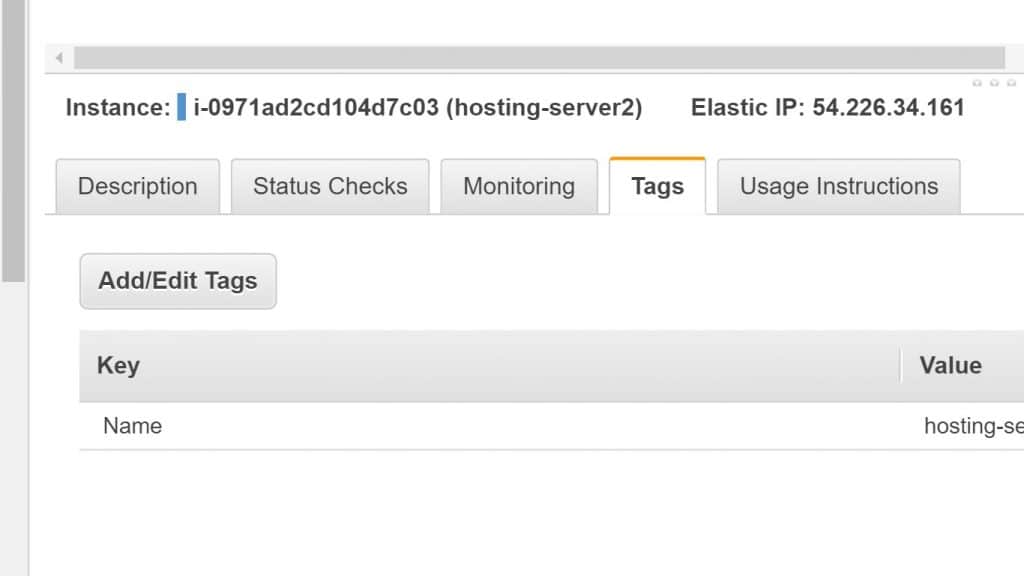
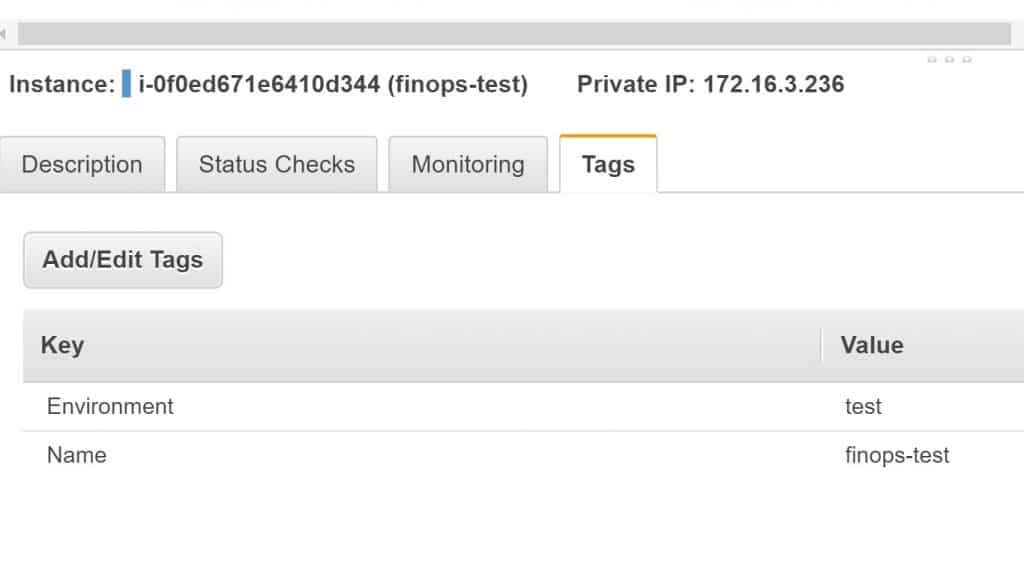
5. Go to the Tags tab on the Details Pane.


AWS Tagging - Tags Tab in Details

AWS Tagging – Tags Tab in Details

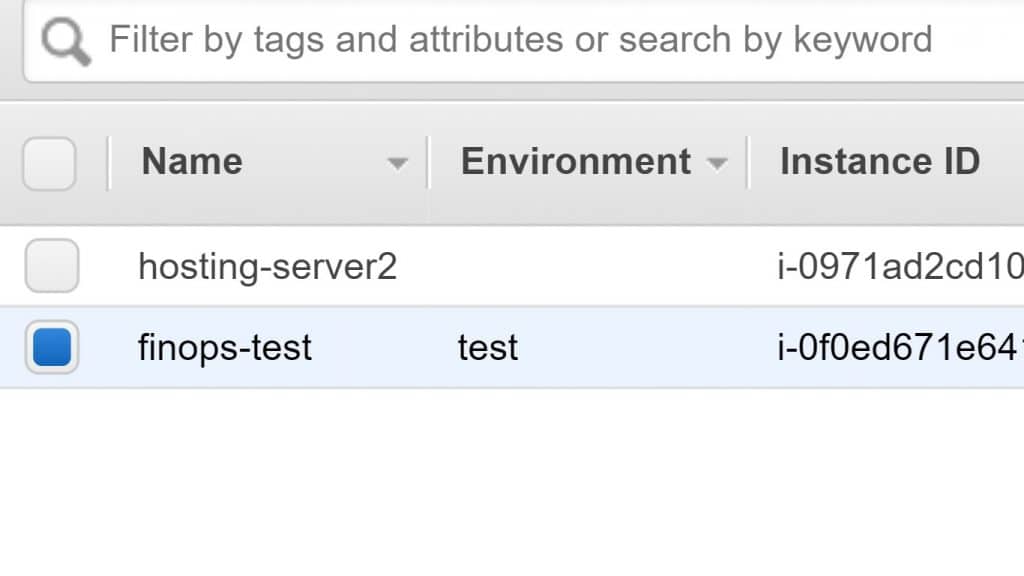
6. From the Tags tab click on Show Column You will see on the console that a new column has been added.

AWS Tagging - Click on Show Column

AWS Tagging – Click on Show Column


AWS Tagging - Added Column Environment

AWS Tagging – Added Column Environment

7. Click on the Show/Hide Columns gear shaped icon.

8. Finally, in the Show/Hide Columns dialog box, select tag key under Tag Keys.


  • Displaying Tags for All of the Resources:


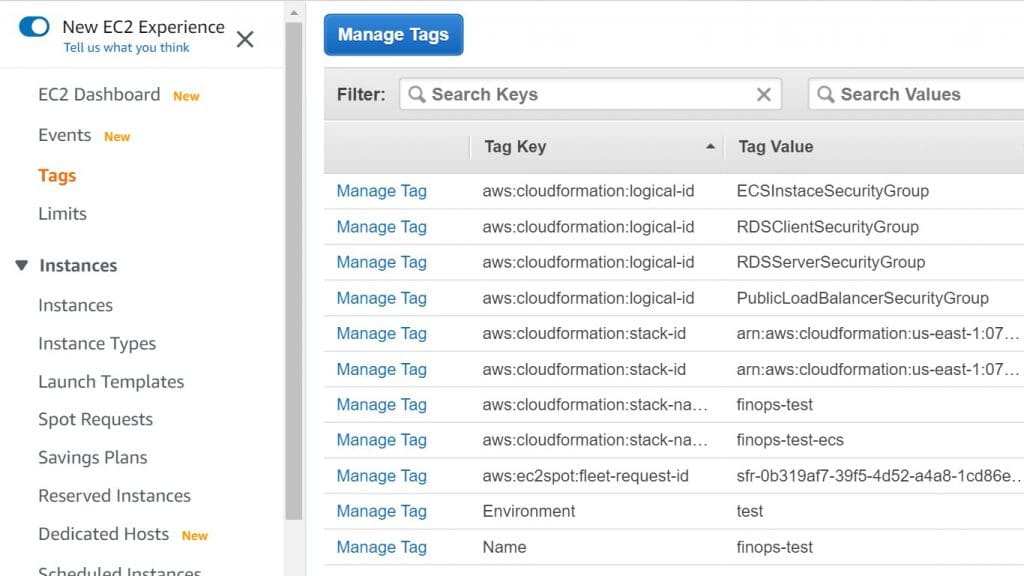
  1. Select Tags from the Navigation Pane found in the Amazon EC2 Console. (Same as that of the previous process.)

The following picture illustrates all the tags used by resource type in the Tags Pane.

AWS Tagging - Tags Section from the Console to view all tags

AWS Tagging – Tags Section from the Console to view all tags


  • How can you Add or Delete Tags?

Now let’s get ahead with learning how to add/delete tags:


  • Adding Tags:

  1. Again, go to Amazon EC2 console, https://console.aws.amazon.com/ec2/.
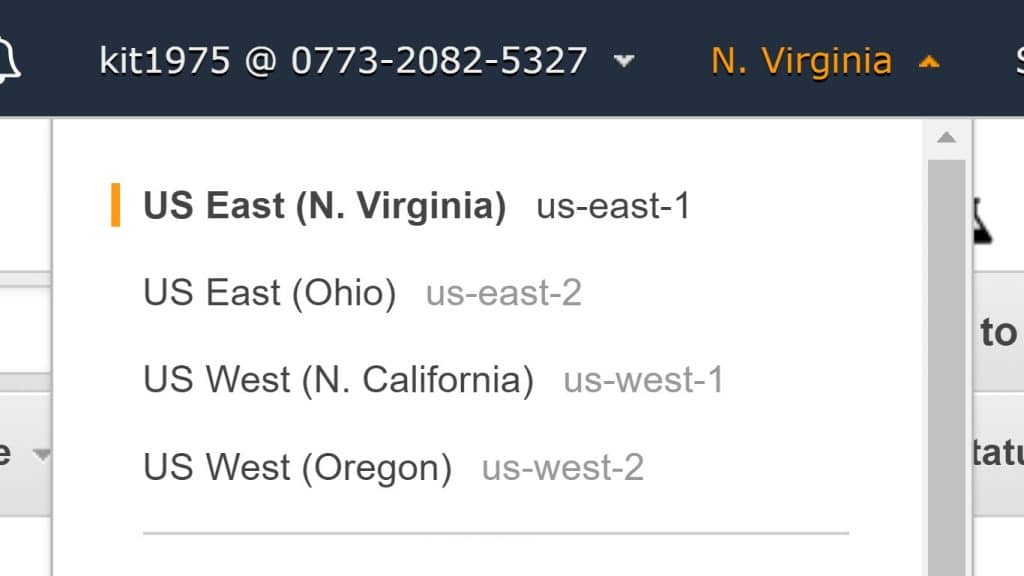
  2. Go to navigation bar, and choose the Region you need. This step is important because the number of Amazon EC2 resources that can be shared between Regions are limited.
AWS Tagging - Select a Region

AWS Tagging – Select a Region

  1. From navigation pane, choose a resource type (Instances).
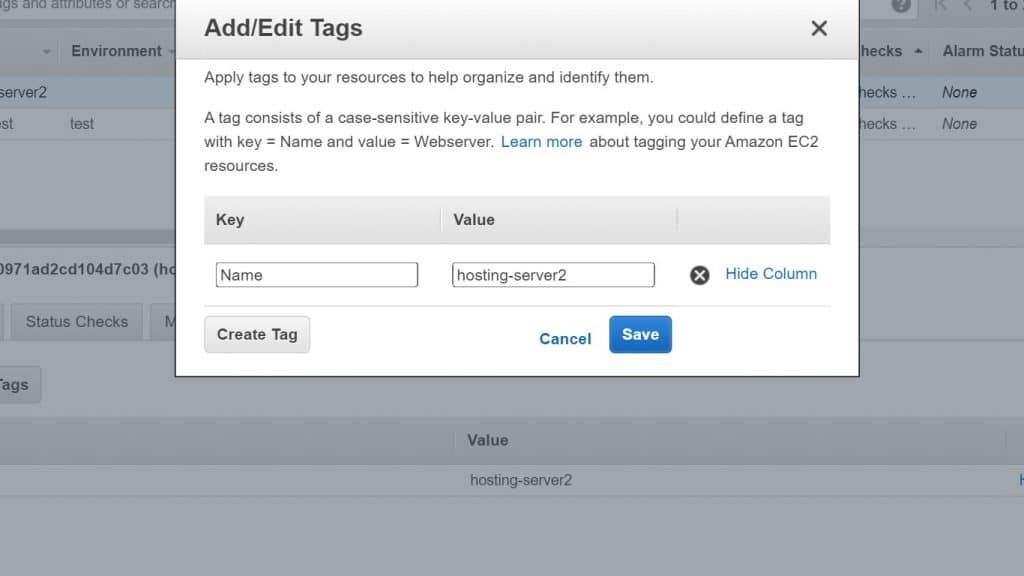
  2. Choose the resource from the resource list, then go to Tags, and click Add/Edit Tags.
AWS Tagging - Add,Edit Tags

AWS Tagging – Add,Edit Tags

5. When you reach the Add/Edit Tags dialog box, place the key and value for every single tag, and then click Save.


  • Deleting Tags:

  1. Open the Amazon EC2 console at https://console.aws.amazon.com/ec2/.
  2. Go to navigation bar, and select the Region that meets your needs.
  3. From the navigation pane, choose a resource type (for example, Instances).
  4. Choose the resource from the resource list and click on Tags.
  5. Go to Add/Edit Tags, select the Delete icon for the tag, and choose Save.
AWS Tagging - Click on Delete icon to delete a Tag

AWS Tagging – Click on Delete icon to delete a Tag

Watch the tutorial for AWS tagging

ec2 status check alarms

Posted in EC2