AWS Neptune Create a Notebook - AWS Neptune create a notebook using workbench

AWS Neptune Create a Notebook

AWS Neptune Create a Notebook

How to create a notebook on AWS Neptune using the workbench?


In order to go through the AWS Neptune create a notebook process, the Neptune console sets up the Neptune workbench in SageMaker to create a Jupyter notebook.

For creating a Jupyter notebook and go through AWS Neptune create a notebook, you can utilize Neptune workbench:

  1. The attached security group in the VPC of a running Neptune should have a rule for granting inbound connections.
  2. Login to the Management Console, then head to the Neptune console using this link https://console.aws.amazon.com/neptune/home.
  3. From left navigation pane, click on Notebooks.
    AWS Neptune Create a Notebook - Notebooks navigation pane

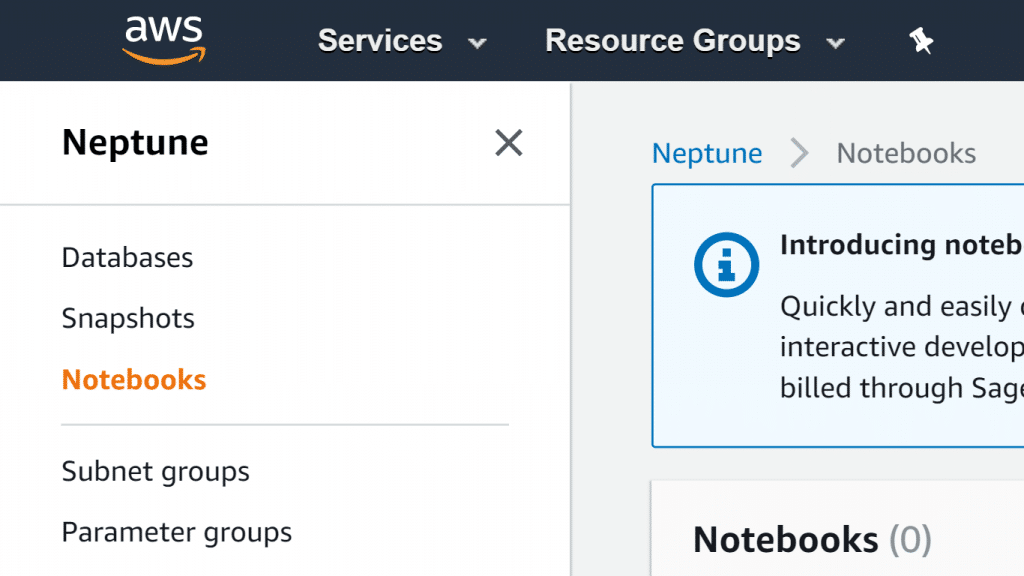
    AWS Neptune Create a Notebook – Notebooks navigation pane


  4. Select the option Create notebook.
    AWS Neptune Create a Notebook - Create Notebook button

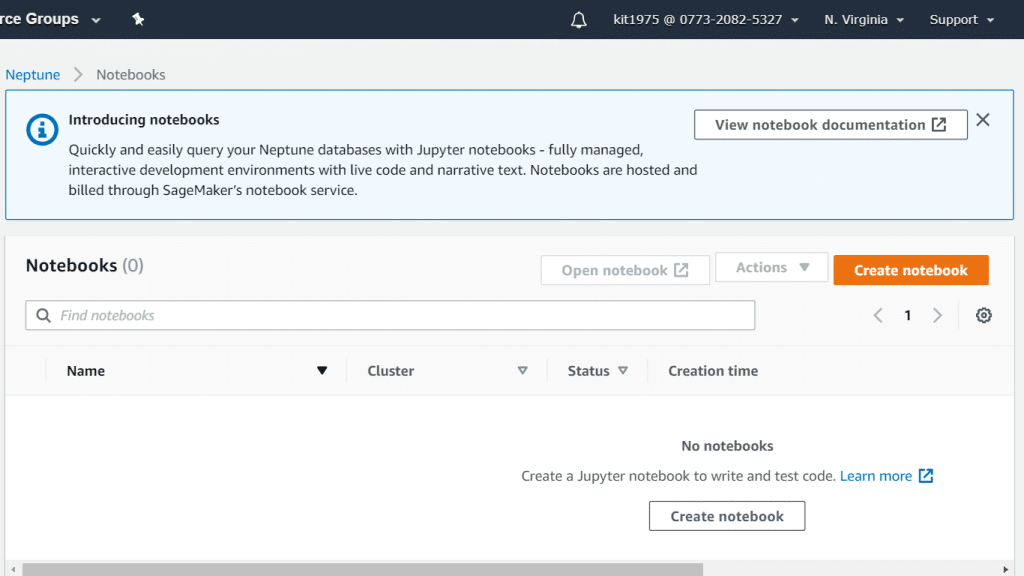
    AWS Neptune Create a Notebook – Create Notebook button


  5. From the listed clusters under Cluster, select the needed Neptune DB cluster. In case of not having an already created DB cluster, you need to click on Create cluster for creating a new one. To learn how to create a new Neptune DB Cluster, go through the Amazon Neptune: Create A Database tutorial.
    AWS Neptune Create a Notebook - Add a Cluster, Name and description

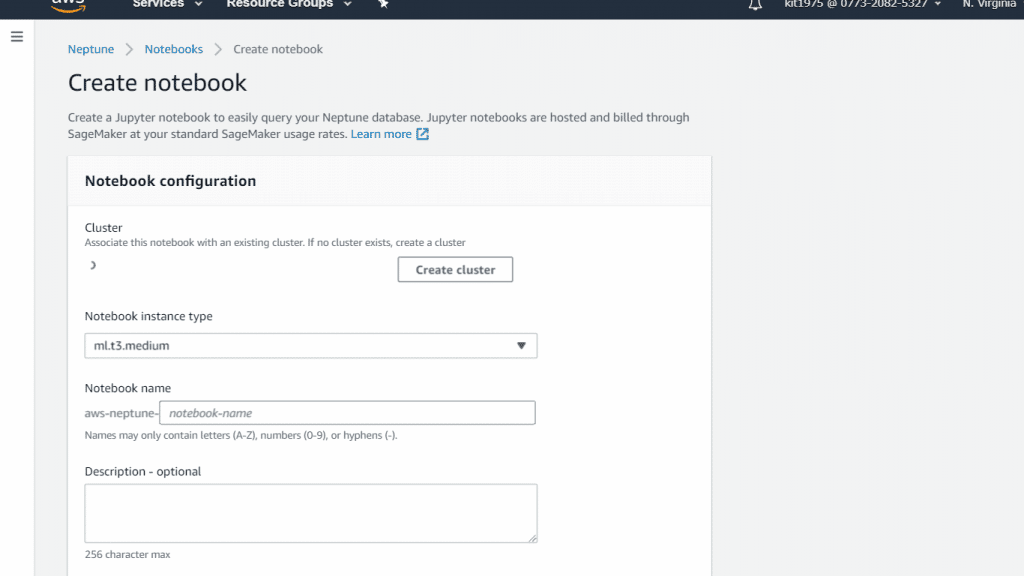
    AWS Neptune Create a Notebook – Add a Cluster, Name and description


  6. Enter a name and an optional description for your notebook.
  7. If you haven’t yet created an IAM role for notebooks, you need to click on Create an IAM role. Then, fill in a name for your IAM role.
    AWS Neptune Create a Notebook - Select IAM Role

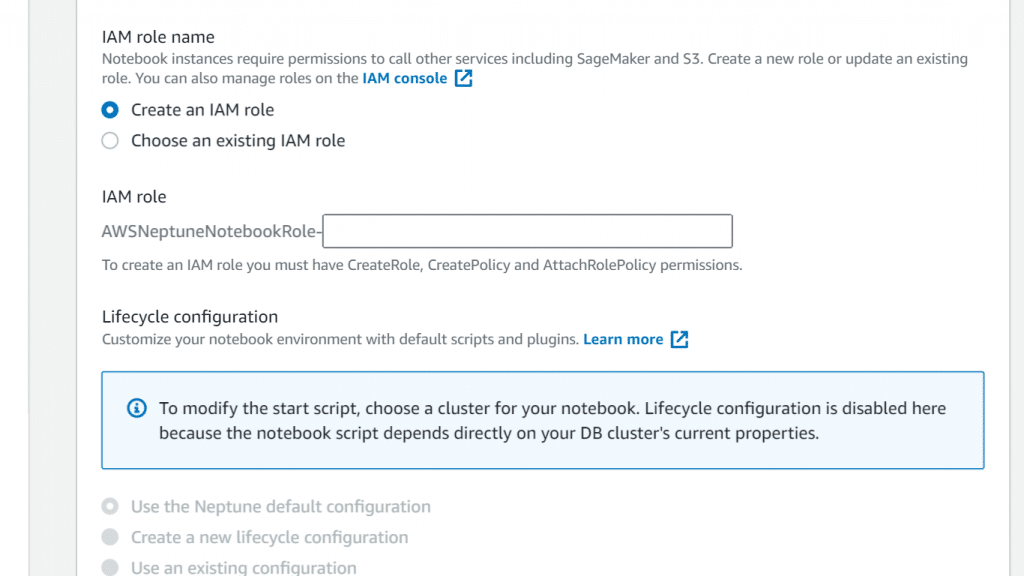
    AWS Neptune Create a Notebook – Select IAM Role


  8. Click on the option Create notebook.
  9. Upon finally creating the notebook, you need to choose it then click on Open notebook.

    AWS Neptune Create a Notebook - Open Notebook

    AWS Neptune Create a Notebook – Open Notebook


How to work with Neptune Workbench along with Jupyter Notebooks?

To begin working with Neptune you should try out the Neptune workbench.
It allows you to use Neptune DB cluster with Jupyter notebooks that get hosted

by SageMaker.

SageMaker will charge your for using workbench resources, not included in the Neptune bill.

Keep in Mind

For working with a workbench, the attached security group in the VPC of a running Neptune should have a rule for granting inbound connections.

An IAM can be created for notebooks using the console, or a user can create it. This role’s policy must contain the below:


{

"Version": "2012-10-17",

"Statement": [

{

"Effect": "Allow",

"Action": [

"s3:GetObject",

"s3:ListBucket"

],

"Resource": [

"arn:aws:s3:::aws-neptune-notebook",

"arn:aws:s3:::aws-neptune-notebook/*"

]

},

{

"Effect": "Allow",

"Action": "neptune-db:connect",

"Resource": [

"your-cluster-arn/*"

]

}

]

}

Also, the role should establish the following trust relationship:

{

"Version": "2012-10-17",

"Statement": [

{

"Effect": "Allow",

"Principal": {

"Service": "sagemaker.amazonaws.com"

},

"Action": "sts:AssumeRole"

}

]

}


How to operate to Neptune’s Getting Started notebooks?

The Neptune workbench has multiple notebooks for aiding users in how to write a query and learn how to work with notebooks.

Head to the Getting Started notebooks to know how you can perform AWS Neptune and create a notebook:

  1. From left navigation pane, click on the right button of Open Notebook.
  2. As the Neptune workbench is opening while Jupyter is run, there will be at the top a Neptune folder. You need to click on it for accessing the folder.
  3. In the second level there is a folder named 01-Getting-Started. Click on it and you will find Inside notebooks that will teach you everything you need to know about Neptune:

First: 01-About-the-Neptune-Notebook.ipynb

Second: 02-Using-Gremlin-to-Access-the-Graph.ipynb

Third: 03-Using-RDF-and-SPARQL-to-Access-the-Graph.ipynb

Fourth: 04-Social-Network-Recommendations-with-Gremlin.ipynb

  1. First of all you need to enter the folder named 01-About-the-Neptune-Notebook.ipynb. Inside of it you will find information about the meaning of a Jupyter notebook and the Neptune workbench. It also provides you with the ways for using a notebook.
  2. The other three Getting Started notebooks carry information about querying as well. They also have extra opportunities for digging deep into Neptune graphs.


Visualizing Graphs in the Neptune workbench:

In many cases the Neptune workbench can create a visual diagram of your query results as well as returning them in tabular form. The graph visualization is available in the Graph tab in the query results whenever visualization is possible.

Keep in Mind

In order for you to be granted access to fixes and functionality in your notebooks, you will need to stop the notebook. After doing so, restart the notebook instance and you’ll get access.

How to Visualize Gremlin query results?

Visualized query results will be created by Neptune workbench for Gremlin queries having a path returned. For checking this visualization, you need to head to the right tab named Graph located in the tab of Console tab below the running query.

Query visualization hints can alter the visualizer diagrams query output. The hints come after the %%gremlin and before them is the –path-pattern which stands short for -p:

%%gremlin -p comma-separated hints

The hints are named in a way that lets you know the Gremlin steps for jumping through vertices, and they work according to the naming. Every hint must be the same as the next coming Gremlin step in the visualized query, such as:

%%gremlin -p v,oute,invg.V().hasLabel(‘airport’).outE().inV().path().by(‘code’).by(‘dist’).limit(5)

The below are available visualization hints:

vinvoutveineoute

How to Access visualization tutorial notebooks using the Neptune workbench?

There are 2 visualization tutorial notebooks offered by the Neptune workbench with examples in SPARQL as well as in Gremlin showing you the way to start querying your graph data in an effective manner while you can get visualized results.

For Opening Visualization notebooks:

  1. From the left navigation pane, select the right button named Open Notebook.
  2. As the Neptune workbench is opening while Jupyter is run, there will be at the top a Neptune You need to click on it for accessing the folder.
  3. The second level will show a folder called 02-Visualization. Click on the folder. You will find 2 notebooks. They will show you how to use SPARQL and Gremlin for querying graph data. Also, they will teach you the way you can visualize your query results. They are the following:

Air-Routes-SPARQL.ipynb

Air-Routes-Gremlin.ipynb

You can choose one of the 2 notebooks to begin experimenting with its queries.

AWS cost optimization

AWS Kinesis Create a Data Stream - How Kinesis Works

AWS Kinesis Create a Data Stream

AWS Kinesis Create a Data Stream

Amazon Kinesis Data Streams is real time stream management service that enables real-time data streaming to AWS data stores and applications. It is a highly scalable service where you do not have to worry about consuming high volume of streaming data in real-time.

Kinesis Data Streams enables consuming stream data such as logs, telemetry, clickstream or video feeds from different data producers. Range of sources can be mobile devices, web applications, IoT devices and social media platforms as an example

Kinesis Data Streams allows real-time analytics on streaming data with low latency. Data can be analyzed as it is ingested using the AWS Kinesis Data Streams API. You should manage partition keys to enable multiple producers to write to a single stream as well as improve data retrieval time.

Kinesis Data Firehose is integrated with Kinesis Data Streams so streaming data to be automatically loaded into data stores such as Amazon S3, Amazon Redshift or Amazon Elasticsearch. Kinesis Video Streams, another service in the Kinesis family, enables real-time streaming of video data from connected devices for processing, analysis, and playback.

You can also analyze stream data in real-time for use cases such as fraud detection, IoT data processing, social media sentiment analysis and log analysis. Data lakes can be also used to store streaming data in S3 while processing it with tools like Amazon EMR, Amazon Athena or Amazon Redshift.

To begin with the process of creating an AWS Kinesis Data Streams you can start by using Kinesis Data Streams console, the CLI, or Kinesis Data Streams API.

AWS Kinesis Create a Data Stream through console:

  1. Login to Management Console then head to Kinesis console using the following link https://console.aws.amazon.com/kinesis.
  2. From navigation bar, use the Region selector at the top right to select a specific Region.
    AWS Kinesis Create a Data Stream - Region Selector

    AWS Kinesis Create a Data Stream – Region Selector


  3. Click on Create data stream.
    AWS Kinesis Create a Data Stream - Create Data Stream

    AWS Kinesis Create a Data Stream – Create Data Stream


  4. From the page of Create Kinesis stream, type in a stream name as well as the required shards number. Then, select the option Create Kinesis stream.

    AWS Kinesis Create a Data Stream - Stream name and number of shards

    AWS Kinesis Create a Data Stream – Stream name and number of shards

You can see from the page of Kinesis streams the following statuses accordingly:

Status= Creating (When stream is ongoing creation)

StatusActive (When stream becomes available for using)

5. Click on your stream’s name. You will find on the page of Stream Details an overall report of monitoring info as well as the stream config.


AWS Kinesis Create a Data Stream through CLI:

With CLI you can start creating a stream directly through using the create-stream command.


AWS Kinesis Create a Data Stream with API:

Go over the below steps for creating a Kinesis data stream.

First: AWS Kinesis Build a Data Streams Client

Prior to starting with Kinesis data streams, a client object needs to get built. In the bellow Java code, a client builder will be instantiated and utilized for setting the client config, the credentials, and the Region. Then, a client object will be built.

AmazonKinesisClientBuilder clientBuilder = AmazonKinesisClientBuilder.standard();

clientBuilder.setRegion(regionName);

clientBuilder.setCredentials(credentialsProvider);

clientBuilder.setClientConfiguration(config);

AmazonKinesis client = clientBuilder.build();

Second: AWS Kinesis Create a Data Stream

After the creation of a Kinesis Data Streams, a stream can now be created. This can be done through either the Kinesis Data Streams console, or with programming. For the programmatic creation of a stream, a CreateStreamRequest object needs to be instantiated. A name must be given for this stream and a number of shards needs to be set for using.

CreateStreamRequest createStreamRequest = new CreateStreamRequest();

createStreamRequest.setStreamName( myStreamName );

createStreamRequest.setShardCount( myStreamSize );

A stream name is used for identifying the stream. It is scoped to the app’s account, and by Region.

2 streams from 2 different accounts are capable of having the exact name.

2 streams in 1 same account yet from 2 differing Regions are capable of having the exact name.

2 streams in the exact account and in exact Region cannot have the same name.

Throughput of stream= function of the number of shards. As shards increase, there will be more provisioned throughput, and more charged cost for AWS.


client.createStream( createStreamRequest );

DescribeStreamRequest describeStreamRequest = new DescribeStreamRequest();

describeStreamRequest.setStreamName( myStreamName );

long startTime = System.currentTimeMillis();
long endTime = startTime + ( 10 * 60 * 1000 );

while ( System.currentTimeMillis() < endTime ) {

try {    Thread.sleep(20 * 1000);  }   catch ( Exception e ) {}

try {    DescribeStreamResult describeStreamResponse = client.describeStream( describeStreamRequest );

String streamStatus = describeStreamResponse.getStreamDescription().getStreamStatus();

if ( streamStatus.equals( "ACTIVE" ) )

{      break;    }

//    // sleep for one second    //

try {      Thread.sleep( 1000 );    }

catch ( Exception e ) {}  }

catch ( ResourceNotFoundException e ) {}}

if ( System.currentTimeMillis() >= endTime )

{  throw new RuntimeException( "Stream " + myStreamName + " never went active" );}


How to update a data stream through the console?

  1. Go to the Kinesis console using the following link https://console.aws.amazon.com/kinesis/.
  2. From navigation bar, use the Region selector at the top right to select a specific Region.
    AWS Kinesis Create a Data Stream - Region Selector

    AWS Kinesis Create a Data Stream – Region Selector


  3. Pick a stream name from the list of streams. In the page of Stream Details you will get an overall report for your monitoring info and stream config.
  4. For editing the shard number, select Edit option from under the Shards section, then type in the shard count of your choice.
  5. For enabling data records server-side encryption, click on Edit from the section of Server-side encryption. Select a specific KMS key for making it master key for the process of encryption. Otherwise, just go with the default kinesis managed master key, aws/kinesis. If you enable encryption for a stream and utilize a KMS master key of your own, you must make sure the consumer apps as well as the consumer obtain permission to access to the KMS master key that you chose.
  6. For editing period of data retention, you need to click Edit from the section of Data retention period. After that, type in a different value for data retention period.
  7. In case of enabling custom metrics, click on Edit from the section of Shard level metrics. Then, set your stream’s metrics.


How to Update a Stream with API?

If you’d like to get stream details updated through the API, it can be done using the below methods:

  • DecreaseStreamRetentionPeriod: To lessen the period of retention.
  • UpdateShardCount: To change the shard count.
  • EnableEnhancedMonitoring: To allow for enhanced monitoring.
  • AddTagsToStream: To give the stream added tags. To learn more about tagging you can check the AWS Tagging guidlines.
  • StopStreamEncryption: To prevent the encryption of the stream.
  • RemoveTagsFromStream: To delete existing tags from the stream.
  • DisableEnhancedMonitoring: To prevent enhanced monitoring.
  • IncreaseStreamRetentionPeriod: To add more time to the retention period.
  • StartStreamEncryption: To begin the encryption of the stream.

AWS Cost Optimization

Manage Redshift Cluster Subnet Groups -Redshift Cluster Subnet Groups

Manage Redshift Cluster Subnet Groups

Manage Redshift Cluster Subnet Groups

Creating a cluster subnet group:


How to use the console to manage redshift cluster subnet groups?

A minimum of 1 cluster subnet groups should be available to be able to start provisioning a selected cluster in a VPC. If you’d like to learn about VPC data transfer pricing you can check the AWS VPC Data Transfer Pricing manual.

To begin with, you must know that there are now 2 consoles that you can work with on Amazon Redshift. A New console or simply the Original console. Go over the steps for each according to which console you’re using.


Using new console to Manage Redshift Cluster Subnet Groups

For the sake of creating a cluster subnet group using the new console:

  1. Login to the Management Console and head to the Redshift console using the following link https://console.aws.amazon.com/redshift/.
  2. From the navigation menu, select CONFIG, then click on Subnet groups. You will get a list of available subnet groups.
  3. Select Create cluster subnet group for checking the create page.
  4. Fill in data for your subnet group, as well as the subnets for adding.
  5. Click on Create cluster subnet group in order to get the group created having your selected subnets.


Using original console to Manage Redshift Cluster Subnet Groups

For the sake of creating a cluster subnet group using the original console:

  1. Login to the Management Console and head to the Redshift console using the following link https://console.aws.amazon.com/redshift/.
  2. From left navigation pane, select Security.
  3. From Subnet Groups tab, click on Create Cluster Subnet Group.

    Manage Redshift Cluster Subnet Groups -Click Create Cluster Subnet Group

    Manage Redshift Cluster Subnet Groups -Click Create Cluster Subnet Group

  1. Inside Create Cluster Subnet Group box, start adding some subnets.
    1. Enter a unique Name, a specific Description, and a value for VPC ID.
    2. Start adding subnets through performing 1 of the below actions:
      • Select the link named add all the subnets.
      • From the boxes of Availability Zone and Subnet ID select a particular subnet then click on Add.

Below you can see how a cluster subnet group has been specified with 1 subnet.

Manage Redshift Cluster Subnet Groups -1 Subnet added

Manage Redshift Cluster Subnet Groups -1 Subnet added

  1. Click on Yes, Create.

You can find your newly created group listed under cluster subnet groups.


How to modify a cluster subnet group?


Using new console to Manage Redshift Cluster Subnet Groups

For the sake of modifying a cluster subnet group using the new console:

  1. Login to the Management Console and head to the Redshift console at https://console.aws.amazon.com/redshift/.
  2. From navigation menu, Select CONFIG, and click on Subnet groups. You will get a list of subnet groups.
  3. Select the needed subnet group for modification.
  4. Under Actions, Select Modify for showing information about the subnet group.
  5. Update the subnet group.
  6. Select Save for modifying your group accordingly.


Using original console to Manage Redshift Cluster Subnet Groups

For the sake of editing a cluster subnet group using the original console:

  1. Login to the Management Console and head to the Redshift console at https://console.aws.amazon.com/redshift/.
  2. From left navigation pane, Select Security.
  3. From Subnet Groups tab, head to the cluster subnet group list, and select the needed group’s row for modification, then click on Edit.

Below you can see that subnetgroup2 will be the selected cluster subnet group for modification.


  1. For Cluster Subnet Group Details, you can perform one of the below actions.

Action 1:

You can choose to add 1 or multiple subnets to the group.

Select subnets one by one according to their Availability Zone and Subnet ID boxes or just select the option of add all the subnets.

Manage Redshift Cluster Subnet Groups -Add Cluster Subnet Groups

Manage Redshift Cluster Subnet Groups -Add Cluster Subnet Groups

Click on the Save Button.


Action 2:

You can choose to get a subnet removed from the group.

From the listed subnets used for the group, select the Remove option located on the side of the needed subnet.

Manage Redshift Cluster Subnet Groups -Remove Cluster Subnet

Manage Redshift Cluster Subnet Groups -Remove Cluster Subnet

Click on the Save Button.


How to delete a cluster subnet group?

A used cluster subnet group is not capable of getting deleted.


Using new console to Manage Redshift Cluster Subnet Groups

For the sake of deleting a cluster subnet group using the new console:

  1. Login to the Management Console and head to the Redshift console at https://console.aws.amazon.com/redshift/.
  2. From navigation menu, select CONFIG, and click on Subnet groups. You will get to see a list of subnet groups.
  3. Select the needed subnet group for deletion, and click on Delete.


Using original console to Manage Redshift Cluster Subnet Groups

For the sake of deleting a cluster subnet group using the original console:

  1. Login to the Management Console and head to the Redshift console at https://console.aws.amazon.com/redshift/.
  2. From left navigation pane, click on Security.
  3. From Subnet Groups tab, select the needed group’s row for deletion form the listed cluster subnet group.

Below you can see that subnetgroup2 will be the group ready to get deleted.

Manage Redshift Cluster Subnet Groups - Delete subnetgroup2

Manage Redshift Cluster Subnet Groups – Delete subnetgroup2

  1. When the Delete Cluster Subnet Group dialog box appears, click on Delete.

    Manage Redshift Cluster Subnet Groups - Delete Cluster Subnet Groups

    Manage Redshift Cluster Subnet Groups – Delete Cluster Subnet Groups

AWS cost calculator

AWS EMR Create a Notebook - Amazon EMR

AWS EMR Create a Notebook

AWS EMR Create a Notebook


The EMR console can be used for the process of AWS EMR create a notebook, while the CLI and EMR API cannot be used for this.

How to begin with the steps of AWS EMR Create a Notebook?

  1. Go straight to the EMR console through the following link https://console.aws.amazon.com/elasticmapreduce/.
    AWS EMR Create a Notebook - EMR Console Notebooks section

    AWS EMR Create a Notebook – EMR Console Notebooks section


  2. Click on Notebooks, then Create notebook.
  3. Type in a Notebook name as well as a Notebook description (Optional).
    AWS EMR Create a Notebook - EMR Notebook name and description

    AWS EMR Create a Notebook – EMR Notebook name and description


  4. For attaching your notebook to an active cluster running Spark, Livy, and Hadoop, keep the default selection on Choose an existing cluster. After that you should click on the button Choose, then choose one of the listed clusters, and select the option Choose cluster. Now you will find that the only shown clusters are the ones having the necessary requirements.

    AWS EMR Create a Notebook - Select a Cluster for Notebook

    AWS EMR Create a Notebook – Select a Cluster for Notebook

Otherwise,

Click on the option Create a cluster, fill in a specific Cluster name then select the required options. Your cluster will get created in your account’s default VPC with On-Demand instances. Follow the below guidelines when adding options.

Options Reference
Cluster name The unique name of your cluster.
EMR role Can be default or a custom service role.
Release The default value is the latest EMR release version, and this value is no modifiable.
Instance Set the value of needed instances then choose which EC2 Instance type you want. All the instances will be needed for core nodes except 1 instance which will be for the master node.

The chosen instance type will set how many notebooks may be attached at the same time to the cluster.

EC2 instance profile Can be default or given a custom service role.
Applications A listing of the installed apps on your cluster. (Not modifiable)
EC2 key pair For connecting to cluster instances.


  1. In the section of Security groups, you will need to select the option of Use default security groups. Otherwise, select Choose security groups, then choose available custom security groups in your cluster’s VPC. One for the master instance and a different one for the notebook client instance.
    AWS EMR Create a Notebook - EMR Notebook security groups

    AWS EMR Create a Notebook – EMR Notebook security groups


  2. In the section of AWS Service Role, you can keep it as default or select one of the listed custom roles. It will be utilized by the notebook’s client instance.
    AWS EMR Create a Notebook - AWS service role

    AWS EMR Create a Notebook – AWS service role


  3. In the section of Notebook location pick which location in S3 you’d like to save the notebook file in. Otherwise, you can set a location of your own in S3 which will be created for you by Amazon EMR.

    AWS EMR Create a Notebook - EMR Notebook location

    AWS EMR Create a Notebook – EMR Notebook location

A folder will thus be created having its name the Notebook ID, and the notebook gets saved to a file named NameofNotebook.ipynb.

Example:

S3 location= s3://Bucket1/Notebooks1.

Notebook name= FirstNotebook.

Notebook file gets saved to= s3://Bucket1/Notebooks1/NotebookID/FirstNotebook.ipynb.

In case the selected S3 location is encrypted, then a Service Role for EMR Notebooks needs to be set as the key user. The default value is: EMR_Notebooks_DefaultRole.

  1. In case you have a Git-based repository which you had previously added to EMR and you want to associate with this notebook, you must select Git repository. After this you click on the option Choose repository. Then choose one of the listed repositories. To learn how to add a Git Repository, you can check out our AWS EMR Add Git Repository tutorial.
    AWS EMR Create a Notebook - Choose Git Repository

    AWS EMR Create a Notebook – Choose Git Repository


  2. You can select Tags, and start adding as much key-value tags as needed for your notebook.
    AWS EMR Create a Notebook - Add tags to your EMR Notebook

    AWS EMR Create a Notebook – Add tags to your EMR Notebook


  3. Click on the option Create Notebook.


What are the Concurrently Attached Notebooks Limits?

Upon creating a cluster supporting notebooks, you will need to take into account the cluster master node’s EC2 Instance type. This will determine how many notebooks can get ready at the same time for running code and queries.

Type of Master Node EC2 Instance? How many Notebooks?
*.medium 2
*.large 4
*.xlarge 8
*.2xlarge 16
*.4xlarge 24
*.8xlarge 24
*.16xlarge 24


When is a cluster considered as Compatible for being attached to your AWS EMR Notebook?


When the cluster has the below mentioned requirements:

– Launched while Spark, Livy and Hadoop are installed.

– Created with EC2 instances having AMD EPYC processors.

– Created with EMR. The cluster can either be created independently or while creating an EMR notebook.

– Integrated with AWS Lake Formation without the installation of kernels and libraries.

– Created with VisibleToAllUsers value is set as true, which is the default.

– Created with EMR release version 5.18.0 or later.

– Not having multiple master nodes.

– Launched within an EC2-VPC, having private or public subnets. Without any EC2-Classic platform.

– Without any Kerberos authentication.

adding git repository 


AWS EMR Add Git Repository - How EMR Works

AWS EMR Add Git Repository

AWS EMR Add Git Repository

How can a Git-based repository be added?

  1. First step is to head to the EMR console through the following link https://console.aws.amazon.com/elasticmapreduce/.
    AWS EMR Add Git Repository - EMR Git Repositories

    AWS EMR Add Git Repository – EMR Git Repositories


  2. After that, you should select the option Git repositories, then click on Add repository.
  3. In the section of Repository name, you need to type in a unique name for your EMR repository. The name can only include the following: underscores, alphanumeric characters, and hyphens.
    AWS EMR Add Git Repository - Add an EMR Git Repository

    AWS EMR Add Git Repository – Add an EMR Git Repository


  4. In the section for Git repository URL, type in the repository’s URL. In case you’re utilizing the CodeCommit repository, you will find this URL upon selecting Clone URL and then choosing Clone HTTPS, such as the following example: https://git-codecommit.us-west-2.amazonaws.com/v1/repos/FirstCodeCommitRepoName.
  5. In the section of Branch, fill in a name for your branch.
    AWS EMR Add Git Repository - Select Git Credentials

    AWS EMR Add Git Repository – Select Git Credentials


  6. In the section on Git credentials, you will need to select specific options based on the below information. For the sake of adding authentication to the repository, a PAT or a Git username and password can be utilized. Secrets that are stored in the Secrets Manager can be used by EMR Notebooks for accessing Git credentials.


Option Selection What is it For?
Create a new secret For the sake of associating Git credentials with a newly created secret.

In case Git credentials are utilized for accessing the repository, choose Username and password, type in the used Secret name, then fill in the Username and Password.

Otherwise,

In case a personal access token is utilized for the sake of accessing, then you will need to choose the option Personal access token (PAT), type in the Secret name that you are going to be using in Secrets Manager, then fill in the personal access token.

Use an existing AWS secret. For existing saved credentials as a secret, then choose which secret name you’d like to use from the available list.

In case of choosing a secret that associates itself with specific Git credentials, then your secret needs to have the following format {“gitUsername”: XYUserName, “gitPassword”: XYPassword}.

Use a public repository without credentials. For accessing a specific public repository.

7.  Finally, click on Add repository.


How to Update or Delete a Git Repository?

For the sake of updating a Git-based repository, do the following steps:

  1. When the Git repositories page opens, you will need to choose the required repository for updates.
  2. When the repository page opens, click on the option Edit repository.
  3. Start with updating your Git credentials.

For the sake of deleting a Git repository, do the following steps:

  1. When the Git repositories page opens, you will need to choose the required repository for deletion.
  2. When the repository page opens, you will need to select every single notebook linked to this repository and then click on the option Unlink notebook.
  3. Again, from the repository page, you will need to click on the option Delete.

What are the different Repository Statuses, and what do they mean?

The following statuses may be given to any of your Git repositories.

Status Title Reference
Linking Linking to the notebook. Unable to stop notebook in the meantime.
Linked Linked to notebook and connected to the remote repository.
Link Failed Failure in linking to the notebook, try again.
Unlinking Unlinking from a notebook, thus, cannot stop the notebook right now. This will disconnect the Git repository from the remote repository without deleting your notebook’s code.
Unlink Failed Failure in unlinking from a notebook, try again.


How to get a Git-based repository linked to an EMR notebook?

You may link your repository to a specific EMR notebook as soon as this notebook becomes Ready. Linking can be made in two ways. Choose the one that suits you and go with it.

First Way:

  1. Select a specific notebook for updating from the list of Notebooks.
  2. For Git repositories, which can be found on the page named Notebook, click on the option Link new repository.
  3. Choose 1 or multiple repositories for linking to the notebook from the list of available repositories found in the window named Link Git repository to the notebook. Then, click on the option Link repository.

Second Way:

  1. From the page Git repositories, select which of the repositories you’d like to get your notebook linked to.
  2. From the EMR notebooks list, click on the option Link new notebook for the sake of linking the chosen repository to a notebook that already exists.


How to get a Git repository Unlinked to an EMR notebook?

Unlinking can be done in two ways. Choose the one that suits you and go with it.

First Way:

  1. In the list of Notebooks, click on the notebook that you’d like to get updated.
  2. From the Git repositories list, choose which repository you need to get unlinked from the notebook. Then, click on the option Unlink repository.

Second Way:

  1. From the page Git repositories, click on the wanted repository for updates.
  2. From the EMR notebooks list, click on which notebook you’d like to unlink from the chosen repository. Then, select the option Unlink notebook.

You can also use the AWS EMR for the sake of Creating a Cluster.

Elastic Beanstalk Vs Lambda- Companies that use Elastic Beanstalk Vs Lambda

Elastic Beanstalk vs Lambda: Which one is Better?

Elastic Beanstalk vs Lambda: Which One is Better?

Elastic Beanstalk Vs Lambda provided services:

Here is a quick look at the offered services of Elastic Beanstalk Vs Lambda.

When using lambda, developers are capable of avoiding the need to keep a look out at where this code runs. It Is only required of them to get a package deployed. Then Lambda goes ahead with executing it someplace. It charges according to the execution time spent.

When using Elastic Beanstalk, developers will enter an easier execution environment where they start coding their applications naturally. After that, AWS goes on provisioning their web server along with whatever is needed, such as scaling.

Differences between AWS Elastic Beanstalk vs AWS Lambda:

Elastic Beanstalk: this service is fast in deployment and managing apps in the cloud. Once you upload your application, Elastic Beanstalk automatically handles the deployment details of capacity provisioning, load balancing, auto-scaling, and application health monitoring. You can start with Elastic Beanstalk using the console.

Lambda: this service can directly start running code responding to modifications that are made to objects, updates or messages. AWS Lambda goes on its own in managing the underlying infrastructure for your compute resources. It can also be used for the sake of extending different services using custom logic and designing back-end services of your own choice. You can start with Lambda using the console.

AWS Elastic Beanstalk provides the following features:

Elastic Beanstalk Vs Lambda- Elastic Beanstalk Features

Elastic Beanstalk Vs Lambda- Elastic Beanstalk Features

  • Developed with known software stacks like Passenger for Ruby and Apache HTTP Server for Node.js, etc.…
  • Elastic Beanstalk will not let you pay for anything. It will only charge you for the required resources that you get for storing your apps and for running them.
  • Simple to start with as a fast and easy method for the sake of deploying applications to the cloud. In order to upload applications, users are capable of utilizing Git deployment, any IDE or The Management Console.

AWS Lambda offers the following features:

Elastic Beanstalk Vs Lambda- Lambda Features

Elastic Beanstalk Vs Lambda- Lambda Features

  • Uses custom logic for extending different services
  • Custom back-end services
  • Automates Administration


Comparison between Elastic Beanstalk Vs Lambda and their advantages:

Service What it Does Advantages
AWS Elastic Beanstalk Directly takes care of the details for deployment in terms of auto-scaling, app health monitoring, capacity provisioning, and load balancing Can integrate with different services

Easily deploys

Quick

AWS Lambda Runs code for events and directly manages the infrastructure for compute resources. Extends various services with custom logic, and creates back-end services. Requires no infrastructure management

Low costing

Swift


The reason why a number of developers go to use AWS Elastic Beanstalk is that it “Can Integrate with different services”. Meanwhile, a greater number of developers like the fact that AWS Lambda is hassle-free and “Requires no infrastructure management,” which is why they prefer using it.


Elastic Beanstalk Vs Lambda Company Use Cases:

Elastic Beanstalk Vs Lambda- Companies that use Elastic Beanstalk Vs Lambda

Elastic Beanstalk Vs Lambda- Companies that use Elastic Beanstalk Vs Lambda

Some of the companies that use Elastic Beanstalk in their deployment include the following:

– Accenture

– Bagelcode

– Atolye15

– Starship


Some of the companies that use Lambda in their deployment include the following:

– Trivago

– Nubank

– Bepro Company

– Delivery Hero SE


Elastic Beanstalk Vs Lambda Integration tools:


Some of the tools that can be integrated with Elastic Beanstalk include the following:

– AWS Code Pipeline

– Docker

– AWS CodeBuild

– Datadog


Some of the tools that can be integrated with Lambda include the following:

– Apex

– Amazon API Gateway

– AWS AppSync

– Serverless


Elastic Beanstalk Vs Lambda Interest Rate:

Elastic Beanstalk Vs Lambda- Interest Rates

Elastic Beanstalk Vs Lambda- Interest Rates

As seen from the graph above, the interest rate in AWS Lambda is way greater than that of AWS Elastic Beanstalk. This is all because of its new serverless computing model, which helps developers in avoiding the complex and time-consuming need for managing cloud infrastructure resources. This model actually still utilizes servers for the sake of running the apps, yet it tends to erase the need for users to attend server management as well as capacity planning in cloud computing. Therefore, serverless computing is considered the highest-growth public cloud service, and the whole reason for the high interest in Lambda is because, in fact, it is a serverless computing AWS service that requires no infrastructure management.

What are the Disadvantages of Elastic Beanstalk Vs Lambdas?

The bad side of AWS Elastic Beanstalk is how charges start adding up directly when the free quota gets exceeded. On the other hand, the negative side of AWS Lambda is that it is not capable of executing the languages of Ruby and Go.

You can also check out the differences between Elastic Beanstalk Vs EC2 or Elastic Beanstalk Vs CloudFormation.

How to create a function with Lambda