ec2-image-builder

EC2 Image Builder

AWS EC2 Image Builder

Instances are launched by Auto Scaling groups during the building and testing phases of the image pipeline. An Amazon EC2 Auto Scaling group needs to be created at least once before creating an image with EC2 Image Builder. Upon the usage of Auto Scaling, a service-linked role gets created in your account.
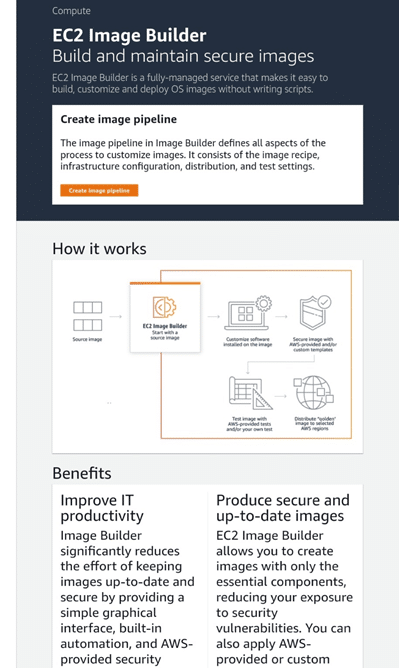
ec2 image builder


Service-Linked Role of EC2 Image Builder:

  • On your behalf, a service linked-role is used for granting permissions to other AWS services.
  • There is no need to manually create a service-linked role.
  • The service-linked role is created by the image builder upon the creation of the first Image Builder resource. The service-linked role is created by image builder upon the creation of the first Image Builder resource.

Access EC2 Image Builder by the following Interfaces:

  • Image Builder console landing page: Go to the EC2 Image Builder landing page.
  • Tools for SDKs: Use SDKs and Tools to be able to both access and also manage Image Builder using the language which you choose.
  • Command Line Interface (CLI): Use Command Line Interface to get access to the API operations.

How to Build and Automate “OS Image Deployment” through Image Builder Console:

  1. Go to the EC2 Image Builder landing page and click on Create image pipeline.
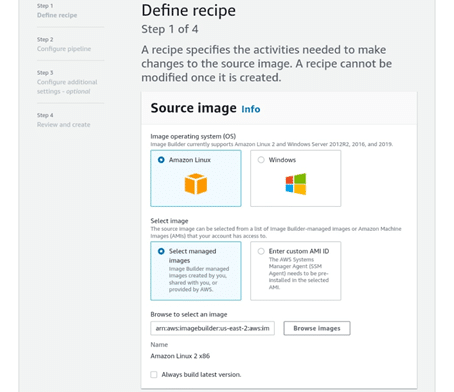
  2. Upon reaching the Define Recipe page, start creating an image recipe with your source image and components.
    aws ec2 image builder

    1. First, select your source image, which includes the image OS and the image to be configured. After you choose your image OS, three options are offered for selecting an image to get it configured:
      1. Choose a specific image from the managed images. To do so, you need to enter the image ARN into the text box, or you have to select Browse images so that you get to view managed images.
      2. Use custom AMI by typing in the AMI ID.
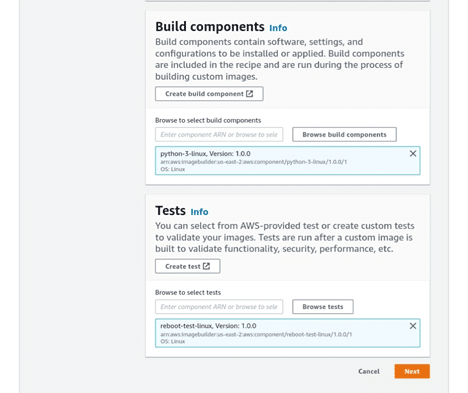
    2. Choose Build components. Components are:
      • Installation packages
      • Security hardening steps
      • Tests consumed by the recipe as you build your image

      After the creation of an image recipe, there is no way to modify or replace its components. In order to do so, you will need to go and create a new image recipe or image recipe version.

Components come in 2 types:

amazon ec2 image builder

Builds:

  • Installation packages and hardening security steps.
  • Enter a component ARN or simply browse through and select from a list of Image Builder components. For creating a new component, choose Create Component. Type in or choose the components the way you want them to start running in the pipeline.

Tests:

  • Tests for being performed on the output image, which is built by the image pipeline.
  • Enter a test component ARN or go browsing through and selecting Image Builder test components to start with.
  • If you wish to create a new component, choose Create Component. Type in or start selecting from the components in the way you want to run them in the image build pipeline.

Upon entering the source image and components, click on Next.

  1. When you reach the Configure Pipeline page, start on setting the image pipeline infrastructure and build the schedule.
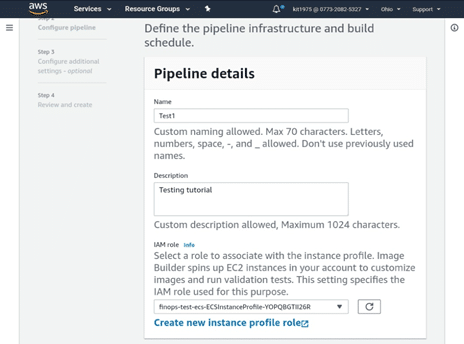
    1. Fill in the required specifications for Pipeline details:
      amazon aws ec2 image builder

      1. Set a unique Name for your image pipeline.
      2. Fill in a Description for the image deployment pipeline. (optional)
      3. Choose which IAM role you want to associate your instance profile with or simply Create a new role. To create a new role, Image Builder leads you to the IAM console. You can simply use the following IAM role policy: EC2InstanceProfileForImageBuilder
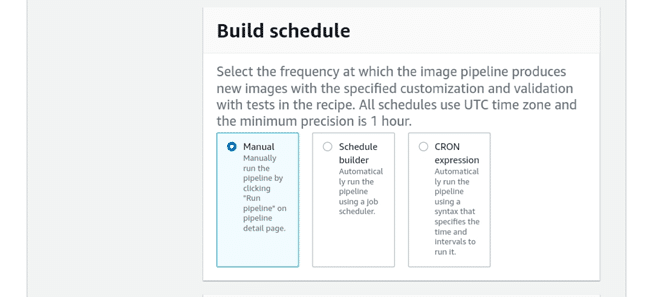
    2. Choose which Build schedule you want to run your image pipeline:
      ec2 image builder – schedule

      1. Manual: Select when to run the pipeline. When you want to do so, click on Run pipeline from the Pipeline details page.
      2. Schedule builder: Set the build pipeline so that it runs automatically using the job scheduler. Fill in the cadence(time) after “Run pipeline every”. Either choose to run the pipeline daily, weekly or monthly.
      3. CRON expression: Set the build pipeline for running with a syntax specifying which time and intervals are used to run it. Fill in the expression inside the text box.
    3. You can optionally choose to fill in the Infrastructure specifications in order to define the infrastructure you want for your image. The EC2 Instance which gets launched will be associated with those settings so as to build the image.
      1. Choose an Instance Type, which adheres to the needs of the software running your instance.
      2. To have the option of receiving notifications and alerts for steps performed in your image pipeline, fill in an SNS topic ARN to be notified.
      3. For Troubleshooting settings, fill in the required information: Useful to perform troubleshooting on your instance in case of failure.
        • For the Key pair name, choose the existing key pair or create a new one instead. To create a new key pair, you will be taken to the Amazon EC2 console. Select Create a new key pair and fill in the name for the key pair, then select Download Key Pair. Important.
        • It’s the only chance you get to save the private key file, so download it and make sure to save it in the safest place possible. Give the name of your key pair upon the launching of an instance, and fill in the required private key every time you choose to connect to this instance.
        • Go back to the Image Builder console, then select Refresh (next to the Key pair name dropdown). The new key pair will show up now in the dropdown list.
      4. Choose the option if you want to terminate your instance upon failure or not by clicking the check box. In case you need to troubleshoot the instance upon the failure of the image build, be sure to leave the check box unchecked.
      5. For S3 Logs, choose the S3 bucket to that you’ll send your instance log files. If you want to browse and choose your Amazon S3 bucket locations, click on Browse S3.
      6. For Advanced Settings, fill in this information to select a VPC for launching your instance:
      1. Choose a Virtual Private Cloud (VPC) for launching your instance. Also, it’s possible for you to Create a new VPC and you’ll go to the VPC console. For starting communication between your VPC and the internet: Enable this connectivity by selecting an internet gateway. For adding a new internet gateway to your VPC, go by the steps found in Creating and Attaching an Internet Gateway in the Amazon VPC User Guide.
      2. In case you choose a VPC, select the Public subnet ID to which your chosen VPC is or simply click on Create a new subnet to make a new one.
      3. In case you choose a VPC, click on the Security groups with which your VPC is associated, or simply click on Create a new security group to create a new one.

      Upon entering all infrastructure specifications, click on Next.

  2. From the Configure additional settings page, you can optionally start defining the test and distribution settings and also other optional configuration parameters performed when the image is built. To get those configurations defined, fill in this information:
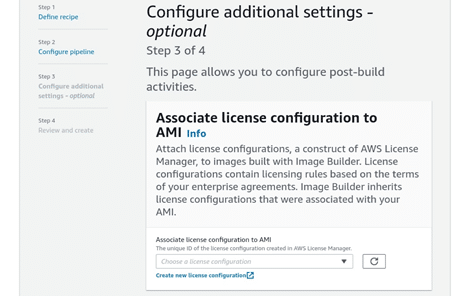
    ec2 image builder – additional settings

    1. For Associate license configuration to AMI, select to associate the output AMI with an already existing license configuration. Choose as many as you want unique license configuration IDs from the dropdown. To create a new license configuration, click on Create new License Configuration and you will go to the License Manager console.
    2. Fill in those required specifications for Output AMI.
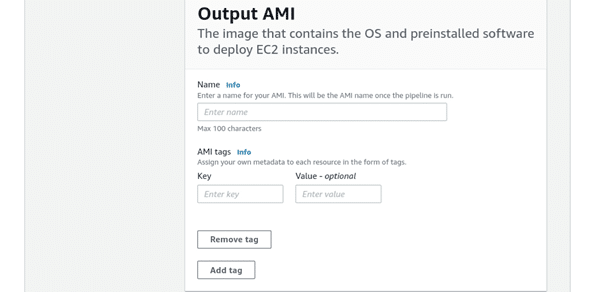
      1. Give a Name to your output AMI, and it will be the new name of your created AMI upon the completion of the image pipeline.
      2. For AMI tags, go ahead and add a Key and an optional Value tag.
    3. In the AMI distribution settings, choose other AWS Regions to copy your AMI to.-Also, you can configure permissions for outbound AMI. Either allow all AWS accounts, or chosen accounts, to launch the created AMI. Choosing to give all AWS accounts permission to launch AMI makes the output AMI public.
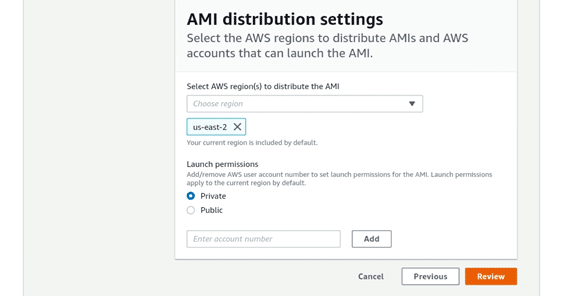
      ec2 image builder – AMI distribution settings

      1. Choose Regions where you want to distribute the AMI. (By default, the current Region is added)
      2. In Launch permissions, choose the AMI to be either Private or Public. By default, it will be placed as Private. Private Mode: Only specific accounts get permission to launchPublic Mode: All users will be granted access to the output AMI.
        • Choose it to be Public or Private.
        • For choosing Private: enter the account numbers you wish to give them launch permissions to and select Add.
  3. From the Review and create the page, you will get to check out all of your settings before creating the image pipeline.
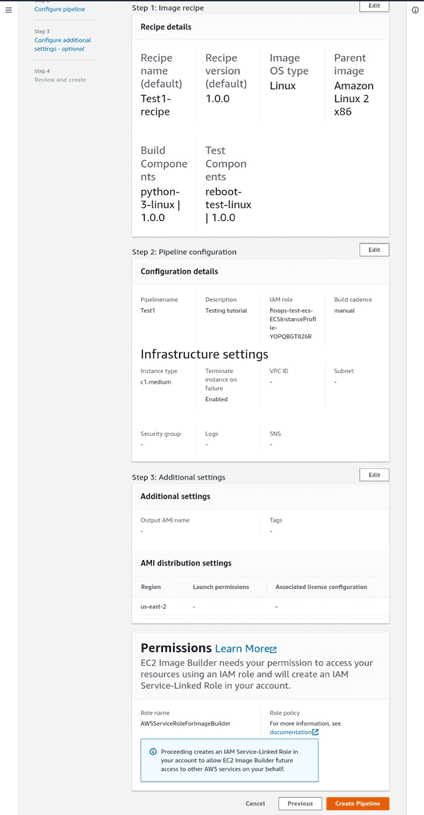
    ec2 image builder recipe details

    Go Over

    • Recipe details
    • Pipeline configuration details
    • Additional settings

    If you want to make changes, select Edit to return to the specification settings that you want to change or update. When the settings reflect your desired configuration, select Create Pipeline.

  4. If the creation fails, a message will show you the returned errors. Go fix these errors and try once again to create a pipeline.
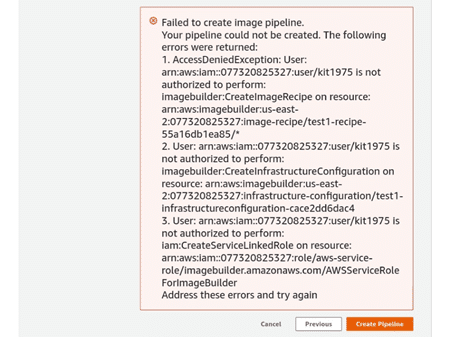
    ec2 image builder – error

  5. When you succeed in creating your image pipeline, you will be then sent to the Image pipelines page. Here, you get to do the following with your image pipeline: -Manage -Delete -Disable -View details -Run

See Also
AWS EC2 scheduling 

aws data transfer cost

AWS Data Transfer Costs

AWS Data Transfer Cost

Data Transfer Costs:

Before we begin you may want to try our advanced data transfer calculator

AWS Data Transfer Calculator

AWS charges if data is transferred to the internet or between AWS services, regions or Availability zones. Private or public IP or even transferring data to Amazon CloudFront and distributing from them will also effect overall cost structure.

Data is the most valuable asset a company possesses. By using the cloud, you will boost the flexibility and mobility of that data to get an enhanced value. The cloud makes it simple to transfer data wherever you want and whenever you want. However, this transfer of data is going to cost money, and aws data transfer costs are going to keep adding up at a quick pace.


What Are They?

They are the costs that AWS charges in order to transfer data in 2 ways:

  1. Between AWS and the Internet
  2. Within AWS, between services, like EC2 or S3

-Some AWS services account for the cost of moving data in or out as part of the cost of the service itself and are not billed separately.

-There might not be a distinct data transfer cost in either direction, like with AWS Kinesis.

-There might be a distinct cost to move data one way (in or out), but no cost for the other way, like transferring to and from S3 across distinct regions.

-There might also be a cost to transfer data both in and out, like transferring across EC2 instances in distinct availability zones.

This means that controlling data transfer costs is knowing the exact path your data is going to take while moving around.


Data transfer: Between AWS and the Internet

When transferring data from AWS to the internet, the costs will highly be dependent on the region.

-S3 buckets found in US West (Oregon) region:

The first GB per month for free, and the next 9.999 TB per month will cost $0.09 per GB.

Yet, when S3 buckets are located in South America (São Paolo) region:

The first GB per month is still for free, but the next 9.999 TB per month will cost $0.25 per GB.

Data transfer: Within AWS

Data can be transferred across regions or within one region when transferring within AWS.

Data transfer across regions

Same cost structure as that of transferring data between AWS and the internet.

Costs depend on the region as well, but transfer into one region from any different region is free of charge.

This means you only pay for the outbound transfer of the originating region and not for the inbound transfer in the target region.

Data transfer within regions

Data transferred between AWS services in a specific region will cost differently by depending on whether data is transferred within or across Availability Zones.

Free data transfers when:

  • Within the same region,
  • Within the same availability zone
  • Using a private IP address

Data that is transferred within the same region but in distinct availability zones will get a cost associated with it.

Cost-Saving Tips:

 Plan Your Route

The highest costs are for transferring data between regions.

Second-highest costs are the ones accompanied by the transfer of data between Availability Zones in a specific region.

The lower costs are those of data transfer in a single Availability Zone.

You should reduce data transfer costs by creating an infrastructure that allows data to flow along the least expensive routes.

Lessen traffic across regions and Availability Zones.

Raise traffic that remains in an Availability Zone or, in one region at least.

When not relying on a specific region, check a few of them to see which one of them offers the most cost savings.

Use Private IP Addresses

Data transferring costs are higher with public IP or Elastic IP addresses than with a private address when working across the board.

Utilizing private IP addresses at constant times can help in reducing costs.

Try Amazon CloudFront

It’s a widespread Content Delivery Network service.

It costs nothing to transfer data from EC2 to Amazon CloudFront.

When you intend on transferring high volumes of data to the users, like videos, images and audio, CloudFront will be beneficial by keeping those data transfer costs down.

Pricing for transferring data from CloudFront to the internet depends on Region & Amount of Data.

Check out a couple of options:

Regional Data Transfer Out to Internet (per GB)

Per Month United States & Canada Europe South Africa & Middle East Japan Australia Singapore, South Korea, Taiwan, Hong Kong, & Philippines India South America
 First 10TB $0.085 $0.085 $0.110 $0.114 $0.114 $0.140 $0.170 $0.250
 Next 40TB $0.080 $0.080 $0.105 $0.089 $0.098 $0.135 $0.130 $0.200
 Next 100TB $0.060 $0.060 $0.090 $0.086 $0.094 $0.120 $0.110 $0.180

Try AWS Simple Monthly Calculator

Experiment with various configurations in order to see how to save money as much as possible.

Directly check out which variables are capable of impacting your costs.

Choose which resource you wish to use, like EC2 or S3, put your required region, and check the Data Transfer section to know what to consider.

Add random values you want to check so that you get a sense of how the costs will be.

EC2 and S3 Costs

They are the widely-used AWS services. So, let’s find out what comes free and what doesn’t.

EC2 

  1. In the same region, no data transfer cost need when moving data out of EC2 to:

-Amazon SES

-Amazon SQS

-Amazon SimpleDB

-Amazon S3

-Amazon Glacier

-Amazon DynamoDB

  1. In the same Availability Zone, no data transfer cost needed when moving data to the following:

-Amazon ElastiCache instances

-Amazon Elastic Load Balancing

-Amazon RDS

-Amazon Redshift

-Elastic Network Interfaces

No matter the region or Availability Zone, there’s no cost to transfer data to CloudFront or when using a private IP address. Any data transfer IN to Amazon EC2 from the internet is totally free.

S3 

-Data transfer IN to S3 from the internet: Free.

-Data transfer OUT to CloudFront: Free.

-Everything else: Specific costs.

-S3 data transfer acceleration options: Extra costs.

-Pricing depends on AWS Edge Location used in order to accelerate data transfer.

  1. Data Transfer: IN – to Amazon S3 from the Internet:
Accelerated by AWS Edge Locations in the United States/Europe and Japan                 $0.04/GB
Accelerated by all other AWS Edge Locations                 $0.08/GB
  1. Data Transfer: OUT – from Amazon S3 to the Internet:
Accelerated by any AWS Edge Location $0.04/GB

Monitor Data Transfer Costs

As you gain more knowledge about your AWS data transfer costs, you’ll get better at taking control of it.

You should know what you’re spending and how you can be cost-efficient without losing any control the cloud provides you with.

That’s the reason for needing a cloud cost management platform. Using its wide variety of capabilities, everyone using it can work together to save money and increase efficiency.

When you wish to control your data transfer costs, then you require visibility over costs and data analysis reports that offer you actionable insights.

AWS S3 Bucket Cost

How to create an AWS S3 Bucket?

This article provides a general overview about AWS Bucket, also create a new bucket using AWS Console & CLI.


Amazon Simple Storage Service (S3) is a cloud storage service to provide scalable and durable object storage for any amount and type of data. Amazon S3’s main container for storing data is Amazon S3 bucket. You can create a bucket by using AWS Management Console, AWS SDKs or AWS CLI. When you create a bucket, you need to specify the region where you store the data in and you should also define set access control rules for the bucket.

Like other AWS resources, access controls for Amazon S3 buckets is managed using identity and access management (IAM) policies or access control lists (ACLs). You can define permissions for users, groups and roles using IAM policies whereas Access Control Lists allow you to set permissions for individual objects.

You should also estimate and forecast how frequent you need to access your data and select storage classes accordingly. Amazon S3 provides multiple storage classes. The Standard storage class is suitable if you need to access the data frequently. Infrequent Access and One Zone-Infrequent Access storage classes can be used as another option where you need less frequently access. For long term archival storage Amazon S3 also offers the Glacier storage class.

You can also apply server-side encryption for data at rest on Amazon S3. AWS Key Management Service (KMS) or Amazon S3-managed keys are two options, you can choose to encrypt your data.

Amazon S3 provides very scalable and durable storage option. You do not have to design your storage to scale up, Amazon S3 handles it for you, it offers 99.999999999% durability and 99.99% availability of your data. Disaster recovery is another thing that S3 handles for you. You can store your data with multiple copies in different availability zones within a region. You can use set op cross-region replication to replicate your data to a another region. Amazon S3 is very suitable solution for variety of use cases, big data analytics, content distribution, backup and recovery and archival storage are some of the well known use cases.

Before you start…

There are few easy steps to be taken in order to get an Access Key IDSecret Access Key for AWS account, which will give you access to all your AWS services depending on the permissions.

Even though there is a detailed documentation found on AWS, yet those direct instructions for the creation of an S3 bucket are of utmost importance.

The first thing you are going to need is an active AWS account, and in case you don’t already have one running, start creating a new one by heading to https://aws.amazon.com.

You are going to have to enter your credit card details and the registration is going to charge you a 1$ fee for the verification of your account.


How to Create an S3 Bucket?
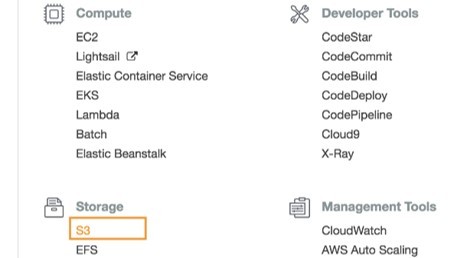
  • After you finish setting up your account, login to your AWS console at this link https://console.aws.amazon.com and choose S3 from Services menu.
  • Choose S3 from under the Storage.
s3 storage section

3 storage section

  • Click on Create a bucket in your S3.
  • You may go ahead and place any names that are available.
  • S3 names are worldwide, which means you will not be able to use a name that has already been used by someone else.
  • So, you can as an example start creating one for your project’s name with something similar to: tests3bucket38. (You can’t use the same name)
  • Choose a region which is located closest to you and then click on Create.
  • Now you are going to have an S3 bucket created underneath your Amazon S3 section with the name “tests3bucket38”.

How to Generate AWS Access Key ID and Secret Access Key?
  • After following the steps, you can easily get to access this account by using the Access key and Secret Access key of your AWS account.
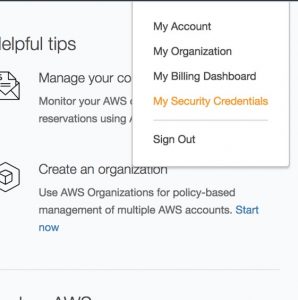
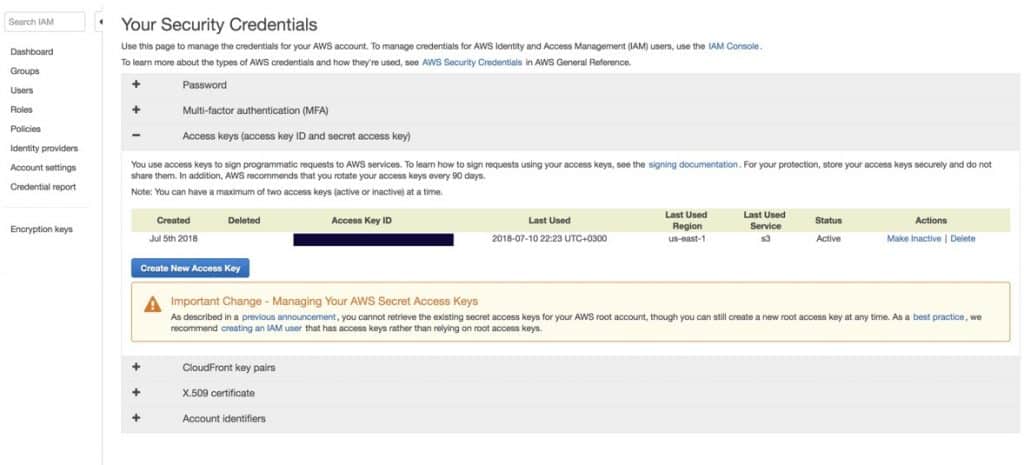
  • In case you do not already have one then head to your account and click “My Security Credentials”.
How to Generate AWS Access Key ID and Secret Access Key

How to Generate AWS Access Key ID and Secret Access Key

  • Then go ahead and choose the Access keys (access key ID and secret access key) 

You can notice the presence of an important notification on this section, where it is recommending you to start creating an IAM Role and not going on creating root access keys.

  • Click the Create New Access Key button.
amazon s3 storage security credentials

amazon s3 storage security credentials

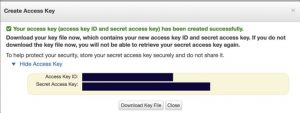
  • Click on Download Key File so that you get the Key pairs downloaded to your system for future use.
  • Click Show Access key,and your Access Key ID and Secret Access Key will appear.
amazon s3 create access key

amazon s3 create access key

You are going to need to use this Access Key ID and Secret Access Key when attempting to connect to your AWS connect and in order to get access to the S3 bucket.

  • You can create and manage keys on Users page of IAM Management Console.
  • Start WinSCP.
  • Login dialog will appear. On this dialog always do the following:
    • Check to make sure that New sitenode is selected.
    • On the New site node, go and choose Amazon S3
    • Fill in your user Access key IDand Secret Access key you previously got
    • Save all the site settings by clicking the Save
  • Finally, Login by clicking on the Login.

How to Work with Buckets?
  • Upon getting connected, a list of your S3 buckets as “folders” will appear in the root folder.
  • You can create a new bucket by using the Create directory command in the root folder.
  • You are not going to be able to see buckets which were previously shared with you by another AWS user, in root listing.
  • If you wish to access buckets shared with you by others, you will have to specify /bucketname as the initial Remote directory, when you are setting up your S3 session.
  • As such, whenever your access key fails in having permissions to list buckets, you are going to be required to specify the path to the wanted bucket by using the same way.
  • When it comes to scripting, you can also do that by appending the path to the bucket through this exact  session URL: s3://accesskey:secretkey@s3.amazonaws.com/bucket/.

Here are few awesome resources on AWS Services: 
Configure AWS S3 inventory
Upload Files/Folders to S3 bucket
AWS S3 Life-Cycle Management
AWS S3 File Explorer
AWS S3 Pricing Model
AWS S3 Bucket Costs

  • CloudySave is an all-round one stop-shop for your organization & teams to reduce your AWS Cloud Costs by more than 55%.
  • Cloudysave’s goal is to provide clear visibility about the spending and usage patterns to your Engineers and Ops teams.
  • Have a quick look at CloudySave’s Cost Caluculator to estimate real-time AWS costs.
  • Sign up Now and uncover instant savings opportunities.
Posted in S3
Azure Kubernetes cost optimization

Azure Kubernetes Service Cloud Cost Optimization

What is Azure Kubernetes Service (AKS)?

azure kubernetes service

Azure Kubernetes service

It is a service that gives power to engineers and developers and provides them with the ability to just easily deploy and manage containerized applications.

It features serverless Kubernetes, its deep continuous integration and continuous delivery (CI/CD) tool, which includes enterprise-grade security and governance.

It is an ideal option to go for by enterprise IT teams who wish to use a single platform to swiftly build, deliver, and scale the applications which they develop.

Cost for Running AKS?

cost of running azure kubernetes service

cost of running Azure Kubernetes service

Azure pricing state that the costs of cluster management are free.

However, users have to actually pay for all of the nodes upon which the containers are built.

To run AKS you should only pay for the VMs that are provisioned, for the storage which your teams may be using, and also for any data transfer costs which may be involved.

Getting to use AKS will open the door to other paid Azure services and tools, for example Azure DevOps, Azure Active Directory, and more, so that you get to better monitor and manage your containerized infrastructure.

VM Cluster management costs Cost per month, pay-as-you-go
D2 v3, general purpose $0 $85.41
E2 v3, memory-optimized $0 $108.04
F2, compute-optimized $0 $90.52

What are some other basic cost considerations?

azure kubernetes service cost considerations

Azure Kubernetes service cost considerations

Using AKS means that you will get to provision and manage lightweight services, but also decrease any fault tolerance because you’re running only 1 OS for managing multiple services.

Yet, it is going to cost less when doing such a thing rather than running traditional VMs.

CI/CD and DevOps services which are additionally factored are going to bring these costs up.

By adding even additional features you are going to increase the costs of running a VM.
As the VMs are getting billed per second, other options such as adding SSDs or services are going to have different pricing methods and requirements, taking as an example: SSDs charge by transaction units.

AKS considers Reserved VM Instance pricing

-It’s possible to cut down the cost of running some VM nodes while using AKS with the Reserved VM Instances.

-By paying up-front in either a 1-year or 3-year term you will allow your teams to efficiently save on cloud costs.

-Know that some planning is needed as your teams should be able to commit to a lot longer timeframe of utilization

-Savings are greatest with one year reserved yielding savings of around thirty-two percent for the D2 v3 and three years yielding about fifty-seven percent of savings

-To reach the most out of Reserved VM Instance pricing, do the following:

  • Go ahead and make a meeting with your teams and engineers
  • Perfectly determine the number of nodes required to meet containerization needs, because of the fact that operating the cluster management tools is free of charge
  • After determining how many nodes are required, and getting an idea of how much they need to be utilized
  • You should then make the best most confident investment into either the one-year or the three-year Reserved VM Instance and start saving greatly

Cloud cost management role:

-The provision of infrastructure for containers can be easy and simple to do on Azure, but the management of their costs at enterprise scale as time goes by gets complicated.

-Native cloud cost tools are not such a good choice for providing visibility into which teams, applications, and services are utilizing which portions of the containerized infrastructure.

-Such a failure is governed by the fact that:

  • Teams have both used and idle container resources which they pay for
  • They have to allocate these resources based on actual utilization

-Not all of the cloud cost tools can provide visibility to the proper allocation of resource usage to the right cost centers for chargebacks.

What provides correct tagging and cost visualization for containerized workloads?

-Use a cloud cost optimization platform to take on container costs with ease

-Use a platform with a robust data engine that gives your teams the ability to ingest containerization and node utilization costs as time passes by

Cloud cost management platforms may offer aid to organizations to accurately allocate costs by doing the following:

  • Tag and track Kubernetes services, clusters, namespaces and labels
  • Organize idle resources
  • Provide a single pane of glass for the reporting on and management of clusters that span multiple accounts and cloud providers

Azure TCO calculator

azure compute cloud cost optimization

A Cloud Cost Optimization Look at Azure Compute

A Cloud Cost Optimization Look at Azure Compute

If you and your IT teams are planning on using Azure Compute at a great scale, then here are some cost optimization features that you need to know.

What’s Azure Compute?

azure compute cloud cost optimization

azure compute cloud cost optimization

Azure Compute is featured by Microsoft Azure, as being its core virtualization offering in the cloud.

Its major focus is for making it easy for developers and engineers to start provisioning and working on new applications, or deploying the existing ones.

It offers you with the infrastructure you require to spin up VMs in order to run your applications, while greatly taking into consideration: Capacity in the cloud and Scale On-Demand.

There is also the availability of Containerization through tools like Azure Kubernetes Service, for applications if that’s considered part of your cloud infrastructure plans and strategies.

Compute paves the way for flexible options for the migration of VMs to the cloud by focusing on Windows and Linux VMs, in order to support enterprise-scale digital transformations.


Cost for running VMs on Azure Compute?

azure compute cloud cost calculator

azure compute cloud cost calculator


It has a pricing similar to that of AWS’s general purpose M5 EC2 instance.

Let’s check the cost of running:

-A D2 v3 for one month

– Running Windows

– On the Standard Tier

– With 50GB temporary storage

– In the West US, East US, and North Central US regions,

– Using the Azure Compute cost calculator.


Region Standard tier cost per month (without savings)
West US $152.62
East US $137.29
North Central US $140.21


By only changing the region and nothing else, the price for the VM changes.

This is merely one of the variables that can actually affect the price of cloud computing/month.


Other parameters include:


Operating system:Licensing Windows costs more than Linux. It is possible to migrate Windows licenses that your team already owns

Service tier:

There are three tiers for VMs:

  • Standard (for production, with higher cost)
  • Basic (for development and testing, lower data transfer, with lower costs)
  • Low Priority, where pricing is altered significantly


Additional storage: VMs contain ephemeral, temporary storage and have one HDD, so adding SSD volumes to VMs will ultimately add more cost

Databases:Azure provides a lot of database services which could be added to VMs, that is going to add more costs to track

Support: Every single VMs contains basic service named Included, and can also be up-leveled to reach higher tiers of support at an extra cost


The costs of running a VM increase due to additional features being added. As VMs are billed per second, other options such as adding SSDs or services have different pricing methods and needs.


When are you getting costs added?

  1. Every second a VM is running, you are being charged as well.
  2. Starting a Stop command to a VM will stop its services and its meter.
  3. Additional services, like storage operations, which may run outside of what the VM requires will still incur data transfer charges.


Here’s how two D2 v3 VMs can differ cost-wise by the simple addition of features:

D2 v3 in Low Priority, stock, in West US $81.85 per month
D2 v3 on Standard (production), with SSD upgrade and snapshots, and premium support $219.47 per month


Reserved VM Instance pricing:


There are a couple of ways to be cost effective on VM costs with Reserved VM Instances.

Pay up-front in either a one-year or three-year term and save significantly.

You will be required to commit to a very longer timeframe of utilization, but your savings are going to be very significant, where:

-A 1-year reserved will end up in yielding of around 18% savings for the D2 v3

-A 3-year yielding about 32% of savings.

Only VMs running in Standard mode can get Reserved VM Instances.

As the type of VM used changes, so does the price.


Vast Savings for migrating infrastructure using Windows licenses

azure compute cloud hybrid benefits

azure compute cloud hybrid benefits


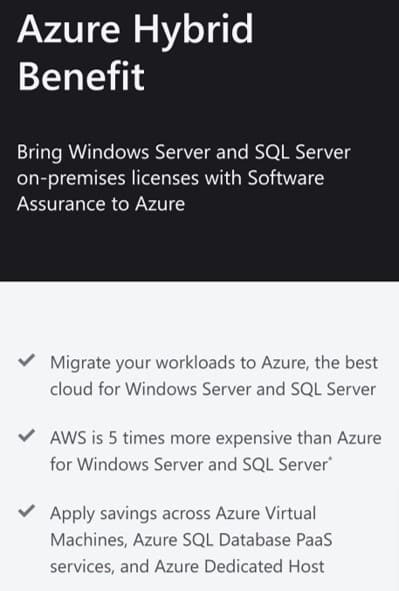
You and your team can use Azure Hybrid Benefit which is a migration program developed by Azure for the migration of new users’ infrastructure and Windows licenses to Azure.

With strategic utilization of Reserved VM Instances and with sticking to Windows licenses, great savings over GCP or AWS are yielded.


Cloud Cost Management’s Role:

Spinning up VMs on Azure: Simple task.

Managing costs at enterprise scale as time passes: Not so Simple.

Get help from cloud cost management platforms to:

Gain view over costs

Allocate to best cost centers

Configure with ease


Rely on a platform robust data and analytics engine which will allow your teams to ingest cloud costs and utilization over time to:

  • Teach engineers and finance teams about their utilization on Azure and their billings, with easy-to-use reporting
  • Get increased optimization for cloud costs through relying on a platform which helps in creating right sizing recommendations so you can utilize:

The correct size

The correct types of Azure services

To fit your actual business needs.

  • Get improved operations though the translation of cloud costs and spending into strategic business choices

azure kubernetes service


AWS Lambda Summary

AWS Lambda Summary

Serverless computing: 

Serverless computing is the utilization of pay-per-use services which give users the chance to run snippets of back-end code for various websites and applications without the expense of managing servers.

aws lambda

Importance: 

Its services help with the reduction of overhead and cost accompanied with managing any of physical or virtual infrastructures.

Who is affected by serverless computing?

 It affects mainly businesses and companies that are running websites and applications and require back-end services or analytics.

How far serverless computing has gone?

Serverless computing is on the go and happening right now where every one of the major cloud computing platform providers allow for the use of serverless computing services.

How to get into a serverless computing?

You can have Serverless computing by using any cloud platform you choose. It is available on Microsoft Azure, CloudFlare Workers, AWS, IBM Cloud Functions and Google Cloud Platform.

What does serverless computing mean?

What does serverless computing mean

What does serverless computing mean

It is a part of cloud computing services which focuses on two of the main selling points found in the as-a-service model, providing computing that is almost completely hands-off and where you only get to pay for the consumption that you utilize and nothing else.

In this service, there are no virtual infrastructures needed for the user’s management. The users are only charged depending on the duration when the code is functioning, until the nearest one hundred milliseconds.

All of the scaling, fault tolerance and redundancy of the infrastructure is being managed fully. There are servers involved, but the user shouldn’t worry about keeping an eye on them because everything is maintained by the cloud service provider.

Lambda and the rest of the AWS serverless computing services, are developed for running snippets of code that only take on a single short-lived task.

Those functions do not depend upon any other code and can therefore be deployed and executed anywhere and at any time they are needed.

One example of a Lambda function could be the code which works to apply a filter to each picture uploaded from a random website to Amazon’s S3 storage service.

The code which is running on serverless services is far more typical of that which can be found in a microservices software architecture, unlike cloud applications where the backend code is seemingly found in a more monolithic fashion and may handle a number of different tasks. Using such a model, applications get to be broken down into their core functions, which are intended to be run alone and communicate using API.

Functions being run by serverless services are triggered first by “events”. Lambda for example is triggered by an event source such as a user uploading a file to S3 or a video sent to AWS Kinesis stream for example. Lambda function runs when such events get fired. As soon as a function has run, the cloud service spins down the inner infrastructure. Such a method will result in users only getting charged for the duration of code working.

Lambda’s name comes from the original mathematical term Lambda function, which implies to the small anonymous functions that are used in Lambda calculus.

aws lambda pricing model