WordPress Lightsail instance
Follow the below steps to learn how to launch a WordPress Lightsail Instance in just a couple of minutes:
-
First, you will need to start creating an Amazon Lightsail Account.
It will be free tier eligible.
Otherwise, if you already have an account, simply Sign-in.
-
Second, you will need to start creating a WordPress Lightsail instance using Lightsail.
Go over the below steps for getting your WordPress instance set and run it on Lightsail.
a. Login to Lightsail console.
b. From the Instances tab located on the Lightsail home page, select the option Create instance.
c. Select which AWS Region and Availability Zone you’d like to choose for your instance.
d. Select an instance image.
- Select Linux/Unix to be the platform.
- Select WordPress to be the blueprint.
e. Select your needed instance plan.
Each plan you choose will have a cheap, known cost, machine configuration and data transfer allowance. You are capable of trying out the $3.50 USD Lightsail plan with no charge for a whole 1 month and up to 750 hours. AWS will give you 1 free month.
f. Fill in a specific name for your selected instance.
Follow the below resource name guidelines:
- Unique within every Region in your Lightsail account.
- Includes 2 to 255 characters.
- Begins and ends with an alphanumeric number or character.
- It may have alphanumeric numbers, characters, periods, underscores and dashes.
g. Click on the option Create instance.
-
Third, you will need to connect to your instance using SSH and then receive your WordPress website’s password.
You will find the default password for signing into the administration dashboard of your WordPress website to be stored on your instance.
Go over the below steps for connecting to your instance with the browser-based SSH client in the Lightsail console. After that, go get your required password for the administration dashboard.
a. On the Instances tab of the Lightsail home page, click on the SSH quick-connect icon for your WordPress Lightsail Instance.
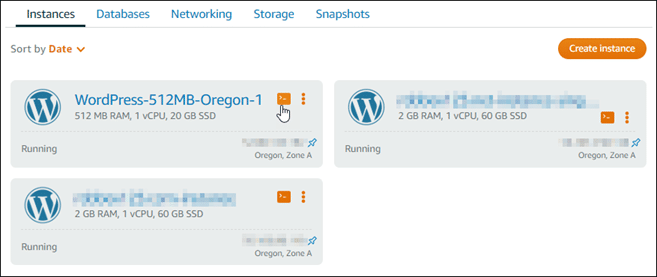
WordPress Lightsail Instance – Instances Tab
b. As soon as you get the browser-based SSH client window opened, you will need to fill in the below command for the sake of retrieving your default application’s password:
cat $HOME/bitnami_application_password
c. Save and keep in mind the password shown to you on the screen. You are going to need it soon to sign into your WordPress website’s administration dashboard.
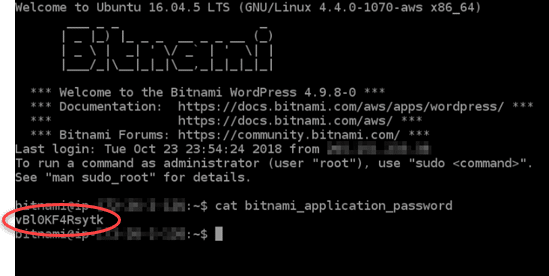
WordPress Lightsail Instance – Password
-
Fourth, you will need to sign into the administration dashboard of your WordPress website.
After you obtain the password for your WordPress website’s administration dashboard, you will be able to finally sign in.
From the administration dashboard, you are capable of doing the following and much more:
– Changing your user password
– Install plugins
– Changing your website’s theme
Go over the below steps for the sake of signing in to your WordPress website’s administration dashboard:
a. From a browser, head to the following link:
http://PublicIpAddress/wp-login.php
When you see the address, change PublicIpAddress and enter instead your WordPress instance’s public IP address. You will be able to obtain your instance’s public IP address by heading to the Lightsail console as displayed in the below image:

WordPress Lightsail Instance – Running Instance
b. Log In to your instance.
- For the section of Username or Email Address box, type in “user”.
- For the section of the Password box, type in the default password that you previously got in this tutorial.
- Click on Log in.
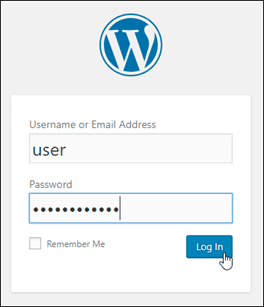
WordPress Lightsail Instance – WordPress Login
You will find yourself signed in to your WordPress website’s administration dashboard. Here you will be capable of performing administrative actions.
-
Fifth, you will need to start creating a Lightsail static IP address and then get it attached to your WordPress Lightsail instance.
Your WordPress instance’s Default public IP is going to change when stopping and starting your instance.
The instance’s attached static IP address is going to stay the same regardless of when you stop and start this instance.
Go over the below steps for creating a static IP address and then attaching it to your WordPress Lightsail instance:
a. From the Instances tab of the Lightsail home page, select your running WordPress instance.

WordPress Lightsail Instance – Instances Tab
b. Click on the Networking tab, and select the option of Create static IP.
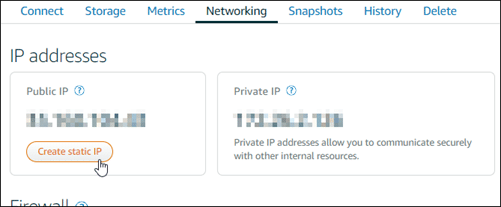
WordPress Lightsail Instance – Create Static IP
c. The 2 options of static IP location and the attached instance will be pre-chosen according to which instance you have selected previously in this tutorial.
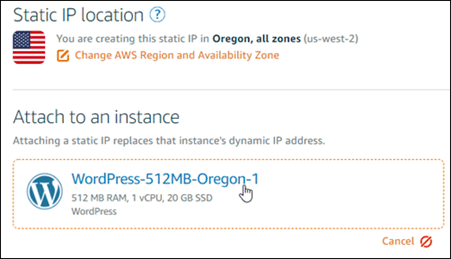
WordPress Lightsail Instance – Attach to Instance
d. Enter a name for your static IP, and click on Create.
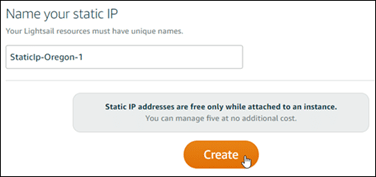
WordPress Lightsail Instance – Static IP Name
-
Sixth, you will need to start creating a Lightsail DNS zone and then mapping a domain to your WordPress Lighstail instance.
No, begin transferring the management of your domain’s DNS records to Lightsail. By doing so, you will be able to effectively perform the mapping of a domain to your WordPress instance, as well as manage additional resources of your website through the Lightsail console.
Go over the below steps for creating a Lightsail DNS zone and then mapping a domain to your WordPress instance.
a. Go to the Networking tab of the Lightsail home page, and click on Create DNS zone.

WordPress Lightsail Instance – Networking Tab
b. Fill in your domain, and click on Create DNS zone.
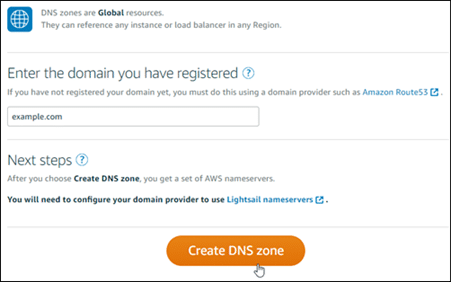
WordPress Lightsail Instance – Create DNS Zone
c. Save the name server address which is shown on the page.
Those name server addresses are to be added to your domain name’s registrar for the sake of transferring the management of the DNS records of your domain to Lightsail.
d. Upon transferring the management of your domain’s DNS records to Lightsail, you will need to start adding an A record for the sake of pointing the apex of your domain to your WordPress Lightsail instance, just as show below:
Those name server addresses are added to your domain name’s registrar for the sake of transferring the management of your domain’s DNS records to Lightsail.
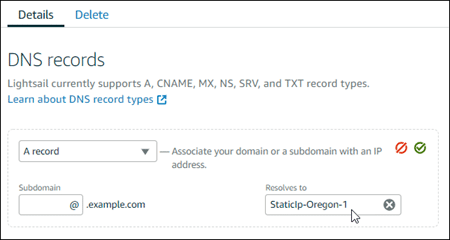
WordPress Lightsail Instance – DNS Record
- In section of DNS zone for your domain, click on Add record.
- For Subdomain box, type in an @ symbol for the sake of mapping your domain’s apex, like: “example.com”, to your instance. This added @ symbol will symbolize that you are about to add an apex record, and it’s not added as a subdomain.
- For the Maps to box, select the static IP which was attached to the WordPress instance in the previous step of this tutorial.
- Click on the save icon.
Give it a couple of minutes till the change propagates across the internet’s DNS before your domain begins routing traffic to your WordPress Lightsail instance.
If you’d like to learn more about LightSail and what it offers, check out our provided article for more information about LightSail.