Go through the following steps to learn how to get your S3 inventory configured:
For configuring inventory:
Keep in mind
Your first report is capable of taking up to 48 hours to be completed.
1. Login to the Management Console and head to the S3 console using the following link https://console.aws.amazon.com/s3/.
2. From Bucket name list, select which bucket you’d like to get its S3 inventory configured.

S3 Inventory Configuration – bucket name
3. Click on Management tab, then select Inventory.
4. Click on Add new.
5. Enter a specific name for your inventory then get it set up this way:
-
- You are capable of adding filter prefix to the objects that are inventory only and have names starting with similar strings.
- Select which destination bucket where you’d like to save your reports. Your chosen destination bucket needs to be located in a similar Region as that of your bucket which is getting its inventory set up, but it is capable of being in a differing account.
- You are capable of selecting for your destination bucket a prefix.
- Select the frequency of generating inventory.
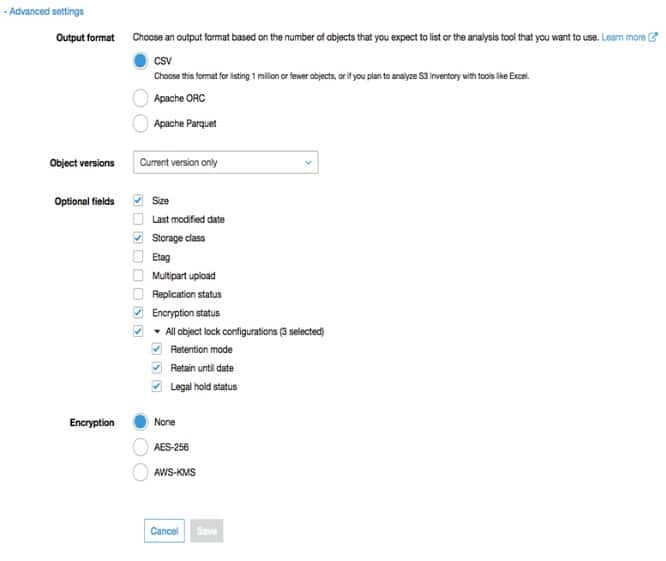
6. For Advanced settings, it’s possible to specify the below:
– Select ORC, CSV or Parquet as an inventory output file format.

S3 Inventory Configuration – advanced settings
– For the sake of adding every single version of objects in inventory, select the option Include all versions from the the Object versions list. Your inventory will contain by default, merely the objects’ current versions.
– As for the Optional fields, choose 1 or more from the below for including in your inventory report:
Size
Last modified date
Storage class
ETag
Multipart upload
Replication status
Encryption status
S3 Object Lock configurations: Status for Object Lock of your object, which contains the below settings:
1. Retention mode: Level of protection (Governance or Compliance).
2. Retain until date
3. Legal hold status
– In the section of Encryption, select either a server-side option or None:
-
-
- None: No inventory report encryption.
- AES-256
- AWS-KMS
-
Keep in mind
For the sake of encrypting your inventory list file using the option SSE-KMS, you will need to give S3 the appropriate permission for utilizing the KMS CMK.
4. Click on Save.
Policy for your Destination Bucket:
S3 tends to get a bucket policy created on your destination bucket which will give S3 the appropriate write permission, which is going to enable it with writing data for inventory reports to your bucket. In the case of an error occurring upon trying to get the bucket policy created, the required instructions are going to be supplied to you to learn the way of fixing it.
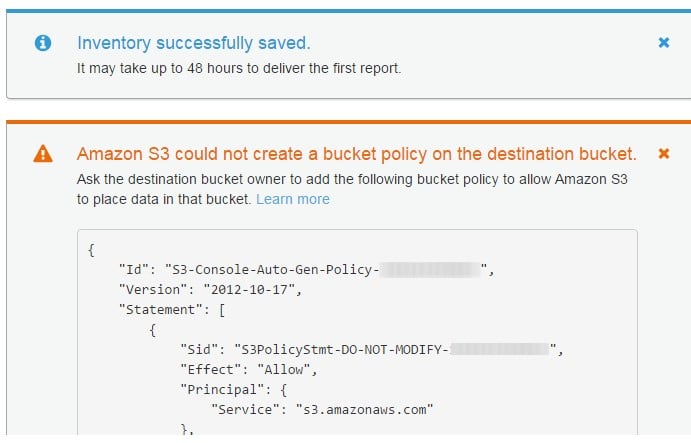
This means that in case you select a destination bucket that is located in a different account without having the necessary permissions for reading and writing to this bucket’s policy, you are going to get this message shown on the screen:

S3 Inventory Configuration – bucket policy
When this happens, the owner of this destination bucket will need to include the shown bucket policy into his destination bucket. In case the policy does not get added to the specified destination bucket, there won’t be an inventory report delivered since S3 did not receive the needed permission for writing to the specified destination bucket. In case the source bucket has different account owner which is not that of the current user, the right source bucket’s account ID needs to get substituted in the policy.
How to Create S3 Permission for Using the KMS CMK for Encryption?
In order to give S3 permission to be able to start encrypting with a KMS CMK, you will need to utilize a key policy.
If you wish to start updating your key policy to utilize a KMS customer managed CMK for encrypting your inventory file, you must go through the below listed process.
For granting permissions for encryption through KMS CMK:
1. Sign in to the Management Console with the account which owns the customer managed CMK.
2. Head over to the KMS console through the following link https://console.aws.amazon.com/kms.
3. For the sake of changing your Region, click on the Region selector from top right corner.
4. From the navigation pane on the left, click on Customer managed keys.
5. For Customer managed keys, select which customer managed CMK you want for the inventory file encryption.
6. For the Key policy, select the option Switch to policy view.
7. For the sake of updating your key policy, click on Edit.
8. For the Edit key policy, enter the below mentioned key policy to your key policy.
{
“Sid”: “Allow Amazon S3 use of the CMK”,
“Effect”: “Allow”,
“Principal”: {
“Service”: “s3.amazonaws.com”
},
“Action”: [
“kms:GenerateDataKey”
],
“Resource”: “*”
}
9. Click on Save changes.